# Smart Importer

# Smart Importer UI

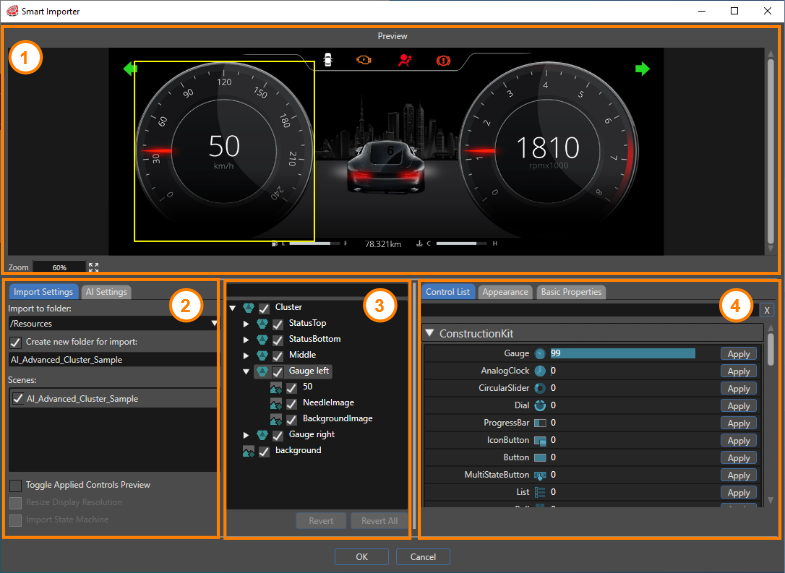
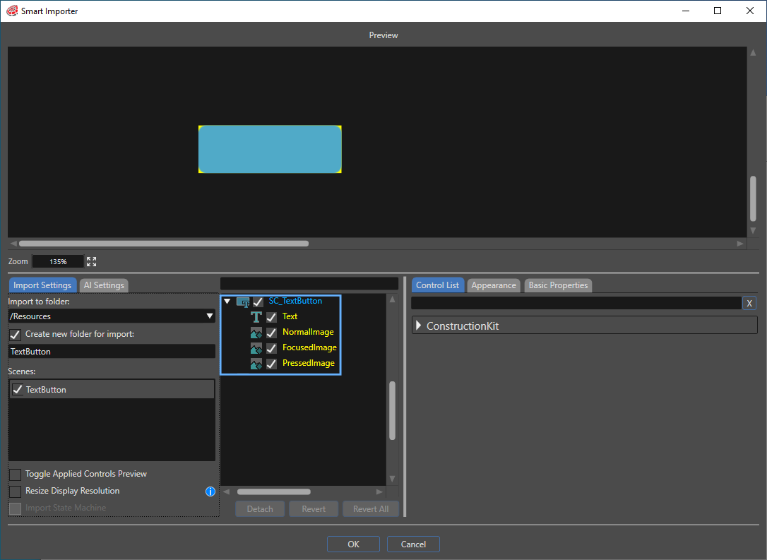
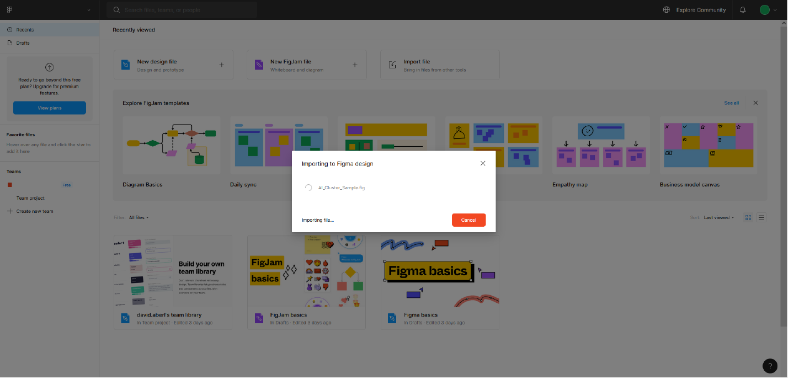
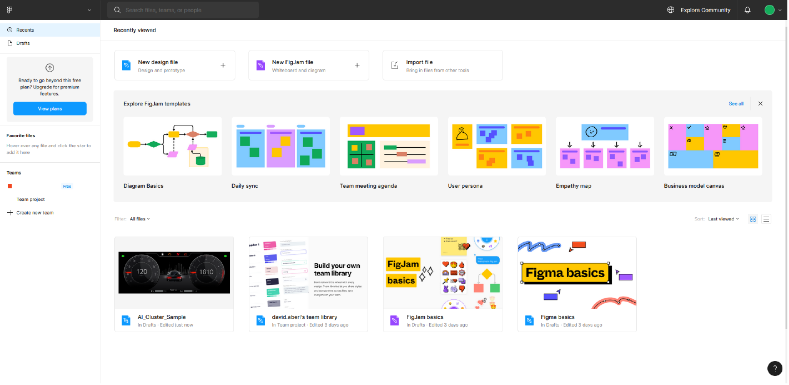
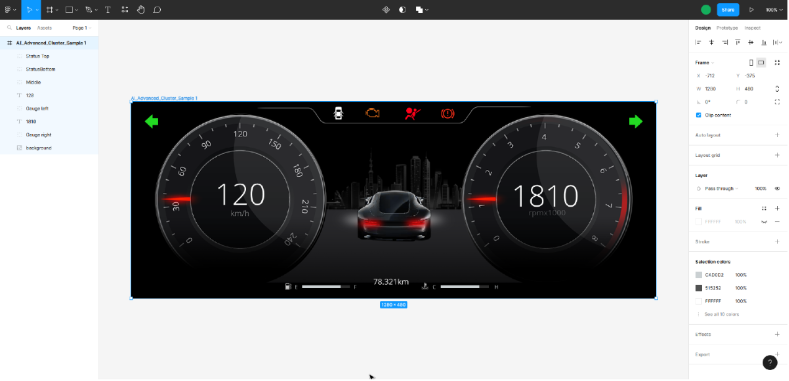
This page describes the Smart Importer dialog. The Smart Importer dialog consists of the following four parts.

1. <span style="color: rgb(230, 126, 35);">[Preview](#bkmrk-Preview)</span>
2. <span style="color: rgb(230, 126, 35);">[Import](#bkmrk-Import)</span>
3. <span style="color: rgb(230, 126, 35);">[Layer Tree](#bkmrk-Layer-tree)</span>
4. <span style="color: rgb(230, 126, 35);">[Control](#bkmrk-Control)</span>

<div drawio-diagram="6726"><img src="https://doc3161en.candera.eu/uploads/images/drawio/2024-09/drawing-5-1725626895.png" alt=""/></div>

### Preview

The Preview panel displays a preview of the file to be imported.

##### Zoom factor of the preview

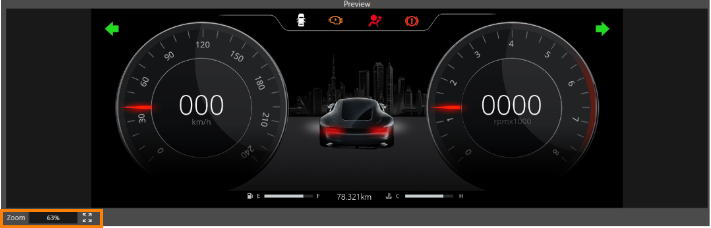
The current zoom factor is displayed in the lower-left corner. To adjust the zoom factor of the preview:

1. Use the mouse wheel to zoom in and out.
2. Click the button with the four arrows to preview the file at the maximum zoom factor within the display area.

<div drawio-diagram="5392"><img src="https://doc3161en.candera.eu/uploads/images/drawio/2024-03/drawing-4-1710316832.png" alt=""/></div>

Select an element on the preview image. Artificial intelligence (AI) detects controls on the selected element and lists them in the **Control** section.

### Import

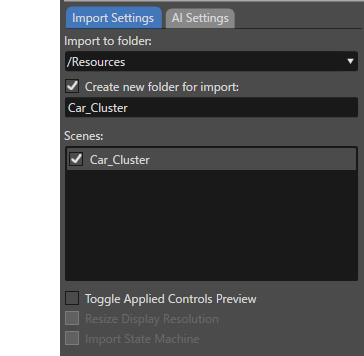
The import section consists of two tabs, **Import Settings** and **AI Settings**.

<div drawio-diagram="5393"><img src="https://doc3161en.candera.eu/uploads/images/drawio/2024-03/drawing-4-1710316951.png" alt=""/></div>

##### Import Settings Tab

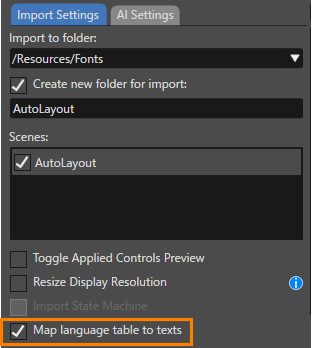
The **Import Settings** tab contains the following settings.

<table border="1" id="bkmrk-%%82%A8" style="border-collapse: collapse; width: 700px; border-width: 1px;"><colgroup><col style="width: 200px;"></col><col style="width: 500px;"></col></colgroup><tbody><tr><td>Import to folder</td><td>Select a destination folder for the imported resources. To change the destination folder, use the pull-down menu. create a new destination folder, use the **Create new folder for import** section. The destination folder can be any location in Solution Explorer.

</td></tr><tr><td>Create new folder for import</td><td>When this option is enabled, a new import folder can be created with any name. The created folder is located in the import destination folder specified in **Import to folder**.

</td></tr><tr><td>Scenes</td><td>Edit scenes with the Smart Importer. See the <span style="color: rgb(230, 126, 35);">[Basic Operations](https://doc3161en.candera.eu/books/import-of-resources/page/basic-operations#bkmrk-%E3%82%B7%E3%83%BC%E3%83%B3%E3%81%AE%E6%A7%8B%E6%88%90 "Basic Operations") </span>guide for editing scenes with Smart Importer.

</td></tr><tr><td>Toggle Applied Controls Preview</td><td>When this option is enabled, a green frame appears where the control is applied. The green frame allows you to visually check where the control is applied on the preview.

</td></tr><tr><td>Resize Display Resolution</td><td>This option is enabled when the resolution of the file to be imported is larger than the solution's display resolution. When this option is enabled, the Smart Importer automatically resizes the resolution of the imported file to fit the display resolution.

</td></tr><tr><td>Import State Machine</td><td>When this option is enabled,the Smart Importer imports state machines from your design file directly into your CGI Studio solution. If a global state machine already exists within your solution, the Smart Importer displays a prompt where you can choose whether to import the new state machines with the **Is Global** property enabled.

</td></tr></tbody></table>

##### AI Settings Tab

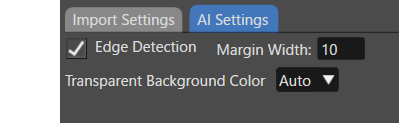
Configure AI detection settings on this tab.
<div drawio-diagram="7027"><img src="https://doc3161en.candera.eu/uploads/images/drawio/2024-10/drawing-4-1729212783.png" alt=""/></div>

The Smart Importer uses the value specified in the <span style="color: rgb(230, 126, 35);">[Preferences](https://doc3161en.candera.eu/books/preferences/page/configure-the-smart-importer)</span> for **Edge Detection**. For details, see the [<span style="color: rgb(230, 126, 35);">Preferences</span> ](https://doc3161en.candera.eu/books/preferences/page/configure-the-smart-importer)page.

AI uses the color selected under **Transparent background color** to analyze the image being imported. The best background color for detecting controls depends greatly on the image content.

If AI has problems detecting controls, change this setting.

### Layer Tree

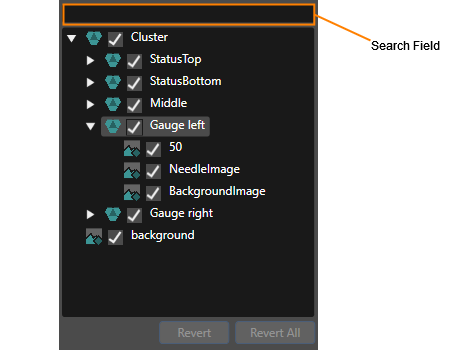
The Layer Tree displays a tree view of each element from the file being imported. The list displayed here corresponds to the scene tree in Scene Composer. When you select one or more elements in this list, AI detects controls on the selected elements and lists them in the **Control** section.

Enter keywords in the search field at the top of the Layer Tree to narrow the list to those layers that contain those keywords.

<div drawio-diagram="6727"><img src="https://doc3161en.candera.eu/uploads/images/drawio/2024-09/drawing-5-1725626973.png" alt=""/></div>

Check the checkbox to the left of each layer element to include it in the scene. The Smart Importer does not import cleared elements.

#### Revert/Revert All button

To cancel the applied control settings, select the target item in the Layer Tree panel and click **Revert**.

To cancel all applied control settings in the Layer Tree, click **Revert All**. The Smart Importer displays a confirmation dialog before continuing.

###   
Control

#### Control List Tab

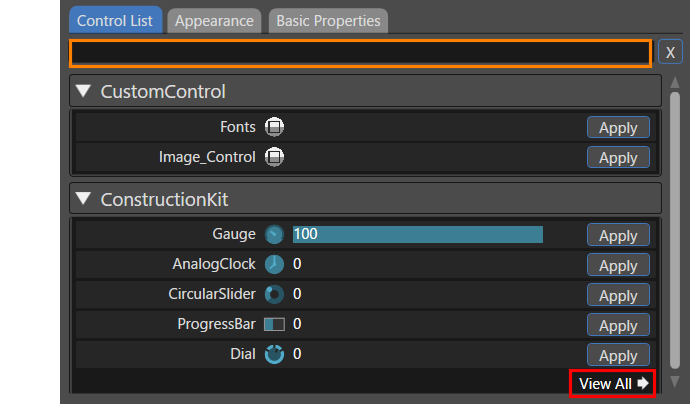
Select any layer in the Layer Tree, and AI detects the most suitable controls. The **Control List** tab displays the analysis results and lists candidate controls in order of probability.

The Smart Importer categorizes the controls by solution and reference, such as ConstructionKit and Custom Controls.

- For controls in ConstructionKit, the probability of matching with the AI is displayed as a number (and bar) to the right of the control name, and they are listed in descending order from the highest number. 
    - Custom controls that are not included in ConstructionKit are displayed in order of control name.
- By default, each category displays five controls. Clicking **View All** (red box in the image below) displays a list of all controls.
- The list of controls that is displayed can be narrowed down by entering keywords in the search field at the top (orange box in the image below).
- To apply the controls to the selected element, use **Apply** in the **Control List**.

<div drawio-diagram="7029"><img src="https://doc3161en.candera.eu/uploads/images/drawio/2024-10/drawing-4-1729213292.png" alt=""/></div>

To configure the display settings, click the triangle icon on the left side of the search field. The settings section lets you configure which controls appear according to the detection value.

To apply a control to a selected element, click **Apply** in the **Control List**. When you apply a control with a low AI detection probability, a dialog box appears to confirm your selection.

#### Appearance Tab

When you apply any control, the display automatically switches to the **Appearance** tab. Configure the appearance properties for the applied control. Some controls, such as TextValue, do not require appearance settings.

The **Appearance** tab is made up of the following three main sections.

1. <span style="color: rgb(230, 126, 35);">[<span style="color: rgb(230, 126, 35);">Image</span>](#bkmrk-layer-mapping)</span>
2. <span style="color: rgb(230, 126, 35);">[Pivot Point](#bkmrk-configure-the-pivot-)</span>
3. <span style="color: rgb(230, 126, 35);">[9-Patch](#bkmrk-9-patch)</span>

<div drawio-diagram="7030"><img src="https://doc3161en.candera.eu/uploads/images/drawio/2024-10/drawing-4-1729213616.png" alt=""/></div>

##### Image

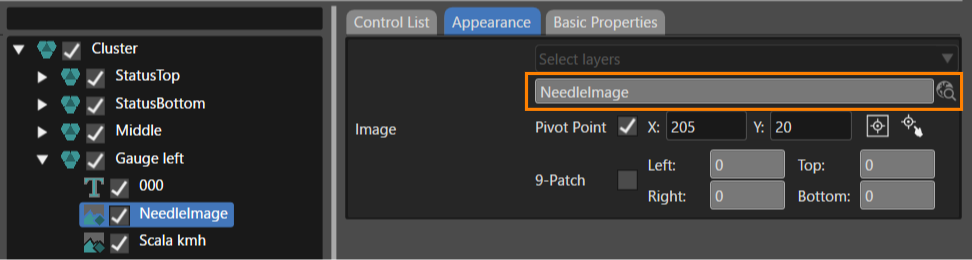
For each control image properties, select the layer image from the file to import. If the control image property name matches the layer name, the Smart Importer automatically sets the layer image. You cannot edit the image layer.

<p class="callout info">For example, when you apply the Gauge control, the Control Image has a NeedleImage property. Therefore, if NeedleImage exists in the layer name of the file to import, the Smart Importer automatically sets it to the NeedleImage property.</p>

<div drawio-diagram="7031"><img src="https://doc3161en.candera.eu/uploads/images/drawio/2024-10/drawing-4-1729213753.png" alt=""/></div>

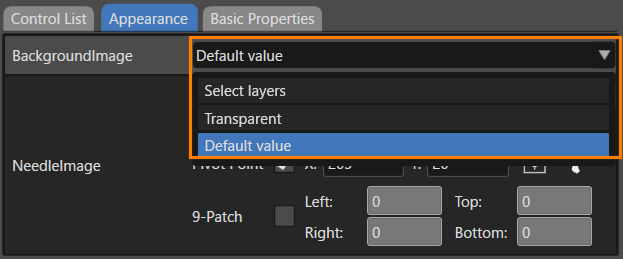
When you assign a control to a group layer, you can choose from the following options for the control image.

<div drawio-diagram="7032"><img src="https://doc3161en.candera.eu/uploads/images/drawio/2024-10/drawing-4-1729213848.png" alt=""/></div>

<table border="1" class="align-center" id="bkmrk-select-layers-select" style="border-collapse: collapse; width: 700px; border-width: 1px;"><colgroup><col style="width: 22.7385%;"></col><col style="width: 77.2368%;"></col></colgroup><tbody><tr><td class="align-left" style="border-width: 1px;">Select layers</td><td class="align-left" style="border-width: 1px;">Select any image layer from the group layer. You can use composite images with multiple layers. For more information, please refer to <span style="color: rgb(230, 126, 35);">[Configure a control image with multiple layers](https://doc3161en.candera.eu/link/1150#bkmrk-configure-a-control-)</span>.

After importing, the Smart Importer places the composite image in the **ControlBitmaps** folder and sets the bitmap name to the property name specified here.

If you select a single layer, the Smart Importer uses the original bitmap placed in the **Bitmaps** folder. For folder locations, see <span style="color: rgb(230, 126, 35);">[Folder structure after import](#bkmrk-folder-structure-aft)</span>.

</td></tr><tr><td class="align-left" style="border-width: 1px;">Transparent</td><td class="align-left" style="border-width: 1px;">The Smart Importer uses a transparent image.</td></tr><tr><td class="align-left" style="border-width: 1px;">Default value</td><td class="align-left" style="border-width: 1px;">The Smart Importer uses the default image for the applied control.</td></tr></tbody></table>

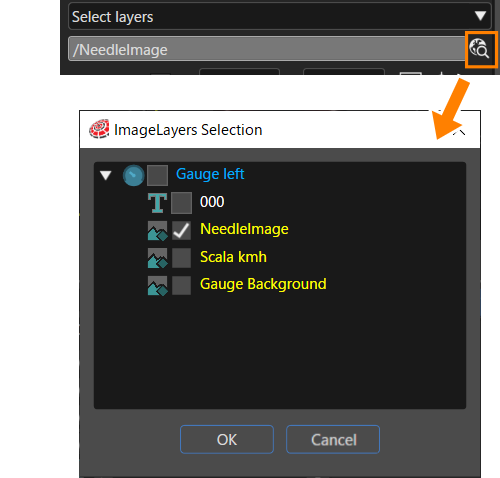
Select images included in the group layer by clicking the selection icon on the right of the image.

- Select images from the descendant layers and the current layer as property values
- You cannot select layers other than images (except for bitmap layers to which controls have been applied).
- After you selected the image, the Smart Importer sets the pivot point to the center of the composite image.
<div drawio-diagram="9227"><img src="https://doc3161en.candera.eu/uploads/images/drawio/2026-09/drawing-5-1789127376.png" alt=""/></div>

For each control image properties, set the layer image in the file to import. If the control image property name and the layer name match, the Smart Importer automatically sets the layer image.

##### Image Array Properties

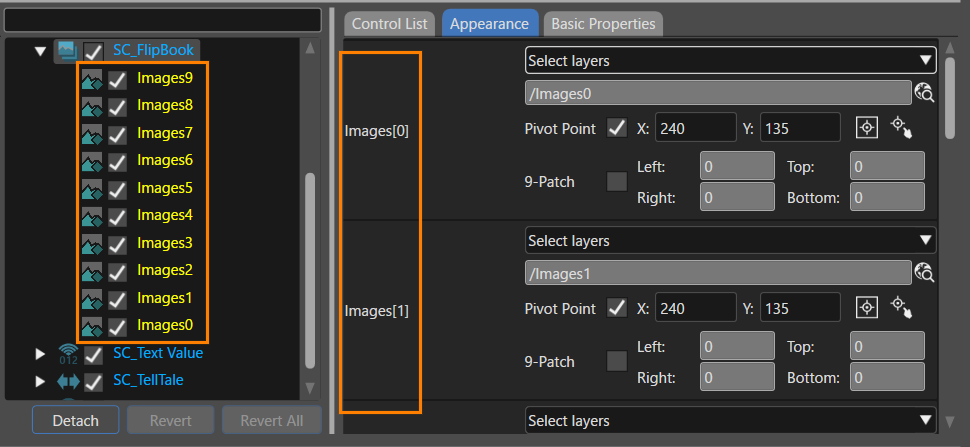
The Smart Importer supports image array properties and automatically assigns images in the FlipBook control. The numbers attached to each Image element on the Appearance tab correspond to the values displayed in descending order in the layer tree.

<div drawio-diagram="7044"><img src="https://doc3161en.candera.eu/uploads/images/drawio/2024-10/drawing-4-1729230884.png" alt=""/></div>

##### Folder structure after import

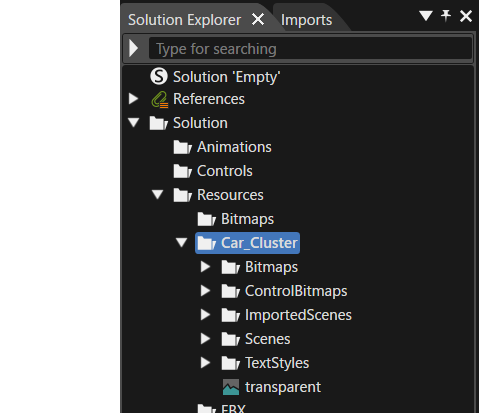
After import, the Smart Importer creates the **Bitmaps**, **ControlBitmaps**, and **TextStyles** folders in the Solution Explorer.

<table border="1" class="align-center" id="bkmrk-bitmaps-the-imported" style="border-collapse: collapse; width: 700px; border-width: 1px;"><colgroup><col style="width: 159px;"></col><col style="width: 540px;"></col></colgroup><tbody><tr><td class="align-left" style="border-width: 1px;">Bitmaps</td><td class="align-left" style="border-width: 1px;">Smart Importer places the imported bitmap for each layer in this folder.</td></tr><tr><td class="align-left" style="border-width: 1px;">ControlBitmaps</td><td class="align-left" style="border-width: 1px;">Smart Importer places the bitmap composed of multiple layers in this folder for the control properties.</td></tr><tr><td class="align-left" style="border-width: 1px;">ImportedScenes</td><td class="align-left" style="border-width: 1px;">Smart Importer places the scene imported as a template in this folder.</td></tr><tr><td class="align-left" style="border-width: 1px;">Scenes</td><td class="align-left" style="border-width: 1px;">When you import a StateMachine (screen transition), the Smart Importer places the target scene in this folder.</td></tr><tr><td class="align-left" style="border-width: 1px;">TextStyles</td><td class="align-left" style="border-width: 1px;">Smart Importer places the created text style in this folder.</td></tr></tbody></table>

<div drawio-diagram="7136"><img src="https://doc3161en.candera.eu/uploads/images/drawio/2024-10/drawing-4-1729754524.png" alt=""/></div>

##### Pivot Point

When you set up a control image with layer mapping, the Smart Importer automatically sets the pivot point. The pivot point values that the Smart Importer sets automatically are as follows. (However, if the pivot point values are specified with the layer names mentioned later, the specified values are used as the set values.)

- Pivot point X value: 0
- Pivot point Y value: 0

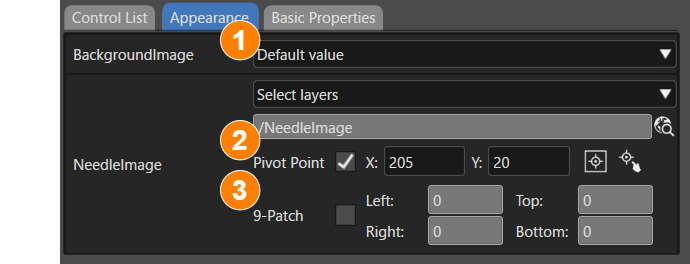
In addition, when you select the **Pivot Point** check box (No.1 in the image below), you can use the following options:

<div drawio-diagram="7034"><img src="https://doc3161en.candera.eu/uploads/images/drawio/2024-10/drawing-4-1729214188.png" alt=""/></div>

- Enter values for the X and Y coordinates of the pivot point. You can enter decimal values.
- Set the pivot point to the center of the image by clicking No.2 in the image above).
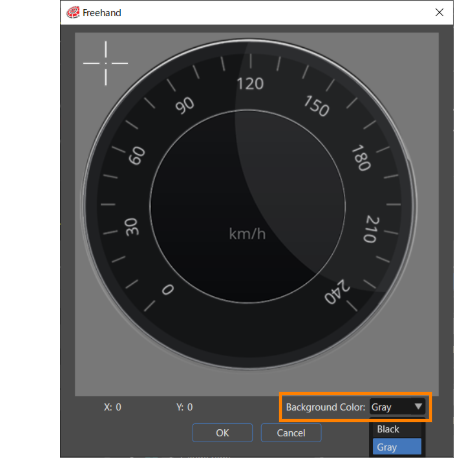
- Click No. 3 in the image above to open the **Freehand** dialog box. Move the crosshair cursor in the dialog box to configure the pivot point.
- Set the background color of the **Freehand** dialog to black or gray from **Background Color** in the lower-right corner of the dialog (highlighted in the orange box in the figure below). Additionally, configure the default background color in **<span style="color: rgb(230, 126, 35);">[Preferences &gt; Smart Importer](https://doc3161en.candera.eu/books/preferences/page/configure-the-smart-importer)</span>**.

<div drawio-diagram="8022"><img src="https://doc3161en.candera.eu/uploads/images/drawio/2025-03/drawing-4-1741158028.png" alt=""/></div>

Alternatively, you can apply any pivot point value by specifying it in the layer name of the image to import.

- If the layer name in the target file to be imported is something like `***@X10@Y20`, the pivot point values are automatically set as X = 10 and Y = 20.
- If the layer name in the file to be imported is `***@X10.5`, the pivot point value is automatically set as X = 10.5 and Y = 0.

##### 9-Patch

This option appears when the **Enable editing 9-Patch** option is enabled in the **<span style="color: rgb(230, 126, 35);">[Preferences &gt; Smart Importer](https://doc3161en.candera.eu/books/preferences/page/configure-the-smart-importer)</span>** settings. When enabled, the 9-Patch feature can be configured (input values must be positive numbers only).


#### Basic Properties Tab

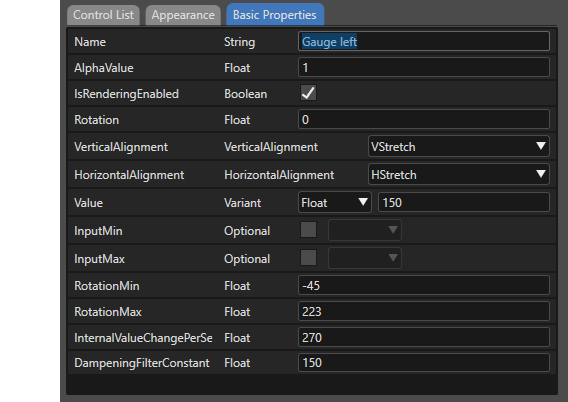
This section lets you set properties for the applied control. After importing, select the target control and configure it on the **Properties** panel.

<div drawio-diagram="6735"><img src="https://doc3161en.candera.eu/uploads/images/drawio/2024-09/drawing-5-1725628096.png" alt=""/></div>

<p class="callout info">If the layer name is the same as the control's property name, the Smart Importer automatically maps the individual properties from the file to import.</p>

# Basic Operations

This section describes the basic operations in Smart Importer.

#### Import File Formats

The Smart Importer imports files using one of the following two methods, depending on the file format:

- Local files: \*.psd, \*.xscil, \*.xd
- Cloud resources: Figma data

<div drawio-diagram="6896"><img src="https://doc3161en.candera.eu/uploads/images/drawio/2024-10/drawing-4-1727940873.png" alt=""/></div>

<p class="callout info">For more information on the Photoshop layer structure format, see <span style="color: rgb(230, 126, 35);">[Recommended Layers Structure for Smart Importer](https://doc3161en.candera.eu/books/import-of-resources/page/recommended-layers-structure-for-smart-importer)</span>.</p>

#### Restore Settings

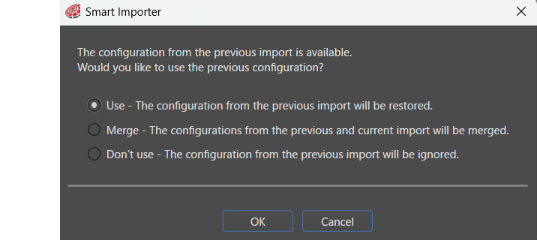
The Smart Importer saves the settings that you applied when configuring the import in the solution along with the imported scene. Therefore, when you importing the same file again to the same path in **Solution Explorer**, the Smart Importer displays a dialog asking if you want to use the saved settings.

<div drawio-diagram="8929"><img src="https://doc3161en.candera.eu/uploads/images/drawio/2026-02/drawing-7-1770713035.png" alt=""/></div>

<table border="1" class="align-center" id="bkmrk-restore-saved-settin" style="border-collapse: collapse; width: 700px; border-width: 1px; height: 59.4034px;"><colgroup><col style="width: 24.7475%;"></col><col style="width: 75.3648%;"></col></colgroup><tbody><tr style="height: 29.7017px;"><td class="align-left" style="border-width: 1px; height: 29.7017px;">Use</td><td class="align-left" style="border-width: 1px; height: 29.7017px;">The Smart Importer applies the saved settings.</td></tr><tr><td class="align-left" style="border-width: 1px;">Merge</td><td class="align-left" style="border-width: 1px;">Merges both the saved settings and the new settings.</td></tr><tr style="height: 29.7017px;"><td class="align-left" style="border-width: 1px; height: 29.7017px;">Don't use</td><td class="align-left" style="border-width: 1px; height: 29.7017px;">The Smart Importer does not apply saved settings and creates new settings.</td></tr></tbody></table>

If an image has been replaced in an imported file, select the **Use** Radiobutton to replace the old image in the scene with the updated image while maintaining the previous mapping between layers and colors.

For other behaviors when reimporting files, see <span style="color: rgb(230, 126, 35);">[reimporting files](https://doc3161en.candera.eu/link/1150#bkmrk-re-importing-a-file-)</span>.

#### Conversion to 2D Nodes

During import, Smart Importer converts specific elements, such as Photoshop artboards and Color Pickers, to optimal nodes in Scene Composer.

<table border="1" class="align-center" id="bkmrk-artboards-artboards-" style="border-collapse: collapse; width: 700px; border-width: 1px;"><colgroup><col style="width: 120px;"></col><col style="width: 580px;"></col></colgroup><tbody><tr><td class="align-left" style="border-width: 1px;">Artboards</td><td class="align-left" style="border-width: 1px;">Smart Importer can treat artboards in the file you imported as Group Node.

</td></tr><tr><td class="align-left" style="border-width: 1px;">Color Picker</td><td class="align-left" style="border-width: 1px;">Smart Importer can treat Color Pickers in the file you imported as Solid Color Nodes. In this case, the solid color layer uses the same icon as the Solid Color Node in Smart Importer.

</td></tr></tbody></table>

You cannot edit the **Appearance** tab under any of the following conditions:

- The layer of the file to be imported does not have image information.
- The applied control does not have a properties that refers to an image.

In all other cases, the same options are available as for image layers. For example, the **Layer Mapping** section can generate image resources after you map control properties to a layer. Similarly, other prototyping tools do the same with Color Pickers.

<p class="callout info">For each node in a 2D scene, see <span style="color: rgb(230, 126, 35);">[2D scene nodes](https://doc3161en.candera.eu/link/147#bkmrk-create-2d-nodes)</span>.</p>

#### Control instance configured with Smart Importer

After you finished applying the detected controls and configuring images, pivot points, and other properties, click **OK** at the bottom of the Smart Importer dialog to import the configured file.

<p class="callout info">See the <span style="color: rgb(230, 126, 35);">[Smart Importer UI](https://doc3161en.candera.eu/books/import-of-resources/page/smart-impoter-ui)</span> for details on what to configure in each part of the Smart Importer dialog.</p>

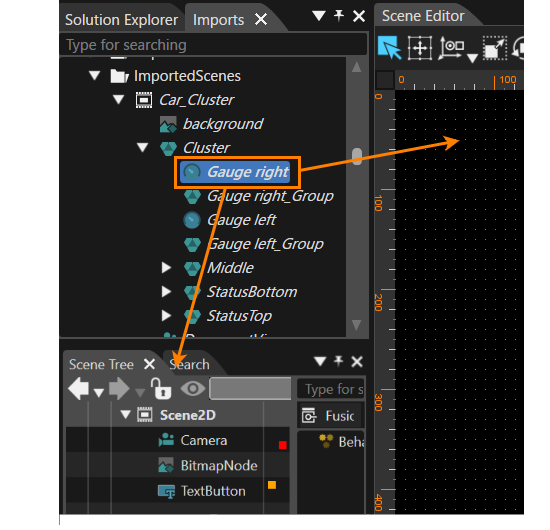
The Smart Importer imports the configured file to the location specified in the <span style="color: rgb(230, 126, 35);">[Import Settings Tab](https://doc3161en.candera.eu/link/1148#bkmrk-%E3%82%A4%E3%83%B3%E3%83%9D%E3%83%BC%E3%83%88%E8%A8%AD%E5%AE%9A)</span> using the configured settings. Note that you can view the control instance configured in Smart Importer , such as **Gauge left** in the image below, in the **Imports** panel.

<div drawio-diagram="6738"><img src="https://doc3161en.candera.eu/uploads/images/drawio/2024-09/drawing-5-1725628567.png" alt=""/></div>

You can use control instances configured in Smart Importer in the Scene Editor or drag them into the Scene Tree.

<div drawio-diagram="7570"><img src="https://doc3161en.candera.eu/uploads/images/drawio/2024-11/drawing-5-1732885515.png" alt=""/></div>

#### Configure Scenes

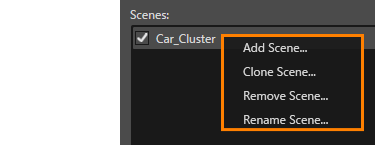
The **Import Settings** tab allows you to manage scenes that you import into Scene Composer. To see the available options, select a target scene from **Scenes**, then right-click the target scene:

<div drawio-diagram="5367"><img src="https://doc3161en.candera.eu/uploads/images/drawio/2024-03/drawing-4-1710298666.png" alt=""/></div>

<table border="1" class="align-center" id="bkmrk-%E3%82%B7%E3%83%BC%E3%83%B3%E3%82%92%E8%BF%BD%E5%8A%A0-%E6%96%B0%E8%A6%8F%E3%82%B7%E3%83%BC%E3%83%B3%E3%82%92%E8%BF%BD%E5%8A%A0%E3%81%97%E3%81%BE%E3%81%99%E3%80%82%E3%81%AA" style="border-collapse: collapse; width: 695px; border-width: 1px; height: 193.183px;"><colgroup><col style="width: 136px;"></col><col style="width: 558px;"></col></colgroup><tbody><tr style="height: 79.8667px;"><td class="align-left" style="border-width: 1px; height: 79.8667px;">**Add Scene**</td><td class="align-left" style="border-width: 1px; height: 79.8667px;">Adds a new scene. The Smart Importer clears all checkboxes for each element displayed in the Layer Tree.

After you select this option, the **Add Scene...** dialog box appears. Enter a name for the new scene.

</td></tr><tr style="height: 63.0667px;"><td class="align-left" style="border-width: 1px; height: 63.0667px;">**Clone Scene**</td><td class="align-left" style="border-width: 1px; height: 63.0667px;">The Smart Importer duplicates the scene while maintaining the configuration on the current Layer Tree.

After you select this option, the **Add Scene...** dialog box appears. Enter a name for the new scene.

</td></tr><tr style="height: 29.4667px;"><td class="align-left" style="border-width: 1px; height: 29.4667px;">**Remove Scene**

</td><td class="align-left" style="border-width: 1px; height: 29.4667px;">Deletes the selected scene.</td></tr><tr style="height: 20.7833px;"><td class="align-left" style="border-width: 1px; height: 20.7833px;">**Rename Scene**</td><td class="align-left" style="border-width: 1px; height: 20.7833px;">Rename the scene. You can also double-click the target scene name to change the name.

</td></tr></tbody></table>

#### TextStyle

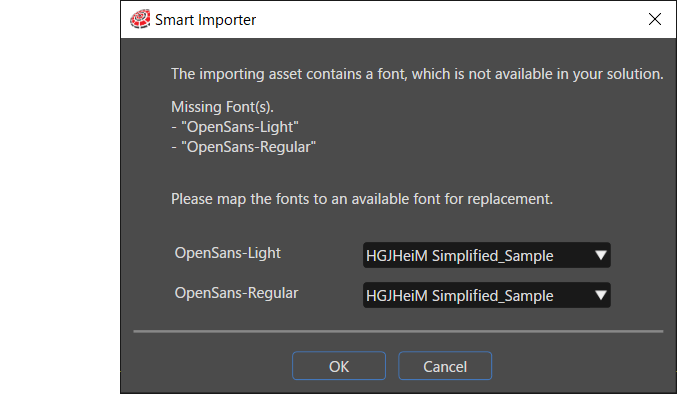
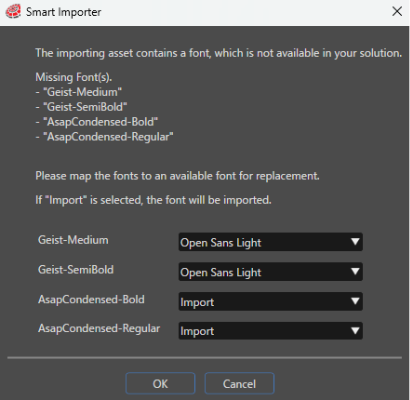
When you import a Text Layer into Scene Composer, Scene Composer creates a a new TextStyle. Its name combines the font name and font size used in the Text Layer of the PSD file. When Scene Composer creates a new TextStyle, it checks whether the Scene Composer solution includes a font resource with the corresponding name. If Scene Composer cannot find the appropriate font resources in the solution, it displays a dialog box like the one below.

If the font does not exist in the solution, you can use an existing font resource by specifying an alternative font on this dialog.

<div drawio-diagram="6869"><img src="https://doc3161en.candera.eu/uploads/images/drawio/2024-09/drawing-4-1727138202.png" alt=""/></div>

#### Text and text-containing controls

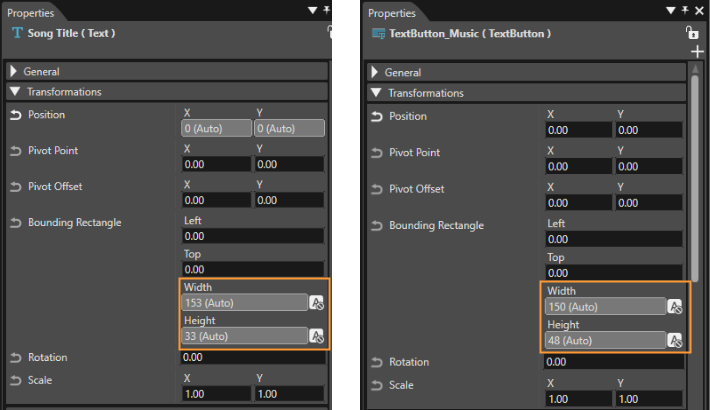
Scene Composer imports the bounding rectangle (width and height) of text and controls containing text as automatic values.

<div drawio-diagram="6741"><img src="https://doc3161en.candera.eu/uploads/images/drawio/2024-09/drawing-5-1725631019.png" alt=""/></div>

#### Global State Machine

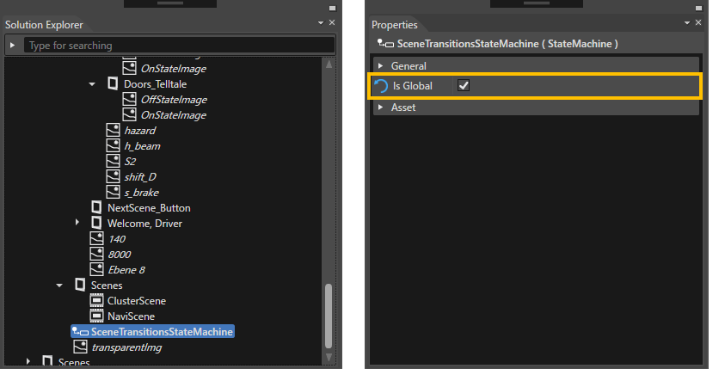
Scene Composer imports all State Machine elements as Global State Machine elements and does not display a confirmation dialog.

<div drawio-diagram="5371"><img src="https://doc3161en.candera.eu/uploads/images/drawio/2024-03/drawing-4-1710298910.png" alt=""/></div>

<div drawio-diagram="501"></div>

# Smart Importer UseCase

This section describes various use cases for Smart Importer operations.

#### Configure Scene Contents

This section explains how to configure the contents by using an example that imports an image file consisting of two scenes, an In-Vehicle Infotainment (IVI) scene (e.g., music player and climate control) and a cluster scene.

- The IVI layer is an IVI scene consisting of a music player and air conditioning controls.
- The Cluster layer is a scene that contains only clusters.

If the import file **IVI\_Scene** contains the two layers described above, you can configure the two scenes to contain different elements by following these steps.

1. In the Smart Importer window's **Import Settings** tab, select **IVI** from **Scenes:** and select **Clone Scene...** from the context menu.  
    
    - In the **Clone Scene...** dialog box, enter `Cluster_Scene` in the name field, and then click **OK**.
    - Two scenes, **IVI\_Scene** and **Cluster\_Scene**, appear under **Scenes**.
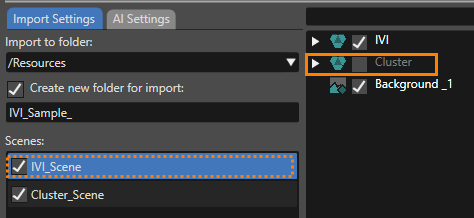
2. Select **IVI\_Scene** from **Scenes**, and then clear the **Cluster** check box in the **Layer Tree**.
    
    
    - Smart Importer excludes the Cluster layer from the IVI\_Scene scene structure.
        
        <div drawio-diagram="6755"><img src="https://doc3161en.candera.eu/uploads/images/drawio/2024-09/drawing-5-1726214385.png" alt=""/></div>
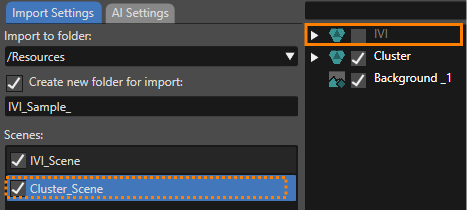
3. Select **Cluster\_Scene** from **Scenes**, and then clear the **IVI\_Sample** check box in the **Layer Tree**.
    
    
    - Smart Importer excludes the IVI\_Sample layer from the Cluster\_Scene scene configuration.
        
        <div drawio-diagram="6754"><img src="https://doc3161en.candera.eu/uploads/images/drawio/2024-09/drawing-5-1726214339.png" alt=""/></div>
4. Click **OK** in Smart Importer to perform the import.
    
    
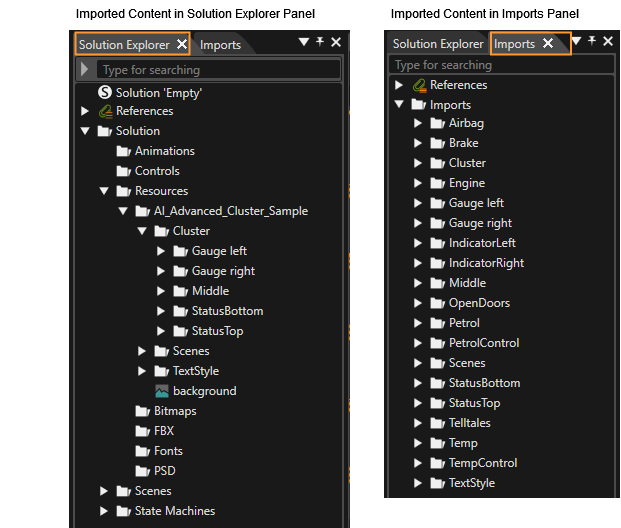
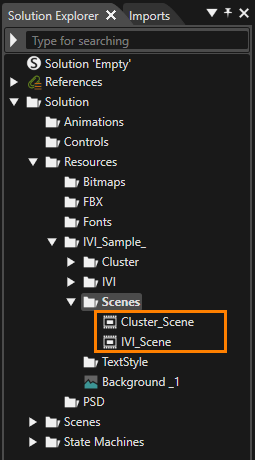
    - You can see the imported scenes and resources in the **Solution Explorer** panel.
    - The **IVI\_Scene** and **Cluster\_Scene** scenes do not contain the layers specified in steps two and three, respectively.
        
        <div drawio-diagram="6756"><img src="https://doc3161en.candera.eu/uploads/images/drawio/2024-09/drawing-5-1726214473.png" alt=""/></div>

#### Re-importing a file containing new images

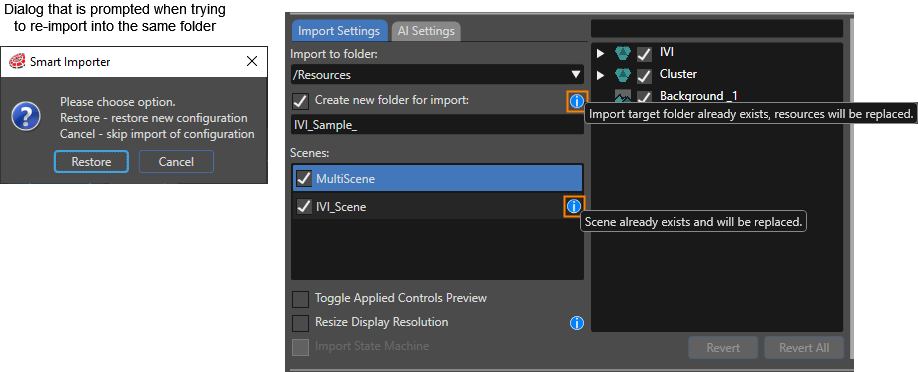
If you reopen a previously imported file using **Restore**, and the file has the same name and path, Smart Importer loads the saved settings, including applied controls and appearance settings. If the destination folder or scene already exists, Smart Importer displays blue information icons (see orange frames in the image below). Hold the mouse cursor over these icons to display the necessary information in a tooltip. When you run the import with the current settings, Smart Importer overwrites already imported resources and scenes, keeps the Layer Mapping settings and applied controls information, and updates the images in the Scene Composer solution to the latest image.

<div drawio-diagram="6758"><img src="https://doc3161en.candera.eu/uploads/images/drawio/2024-09/drawing-5-1726214928.png" alt=""/></div>

<p class="callout info">If you want to import image content into the Scene Composer solution a second time, keeping the resources and scenes from both imports, select a different import location or a different scene name.</p>

#### Re-importing a file containing images with different layers

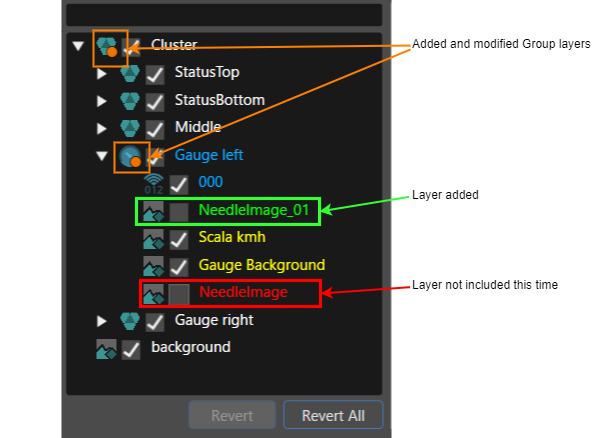
If you import a previously imported file, that has the same destination path and same file name, but a partially different layer structure, the **Layer Tree** in Smart Importer dialog appears as follows.

<table border="1" class="align-center" id="bkmrk-%E8%BF%BD%E5%8A%A0%2F%E4%BF%AE%E6%AD%A3%E3%81%95%E3%82%8C%E3%81%9F%E3%82%B0%E3%83%AB%E3%83%BC%E3%83%97%E3%83%AC%E3%82%A4%E3%83%A4%E3%83%BC-%E3%82%B0%E3%83%AB%E3%83%BC" style="border-collapse: collapse; width: 800800px; height: 105.188px; border-width: 1px;"><colgroup><col style="width: 33.2441%;"></col><col style="width: 66.7559%;"></col></colgroup><tbody><tr style="height: 45.5938px;"><td class="align-left" style="height: 45.5938px; border-width: 1px;">Added or modified group layers</td><td class="align-left" style="height: 45.5938px; border-width: 1px;">Smart Importer adds an orange icon to the Group Node icon. This symbol helps you identify groups that have been modified since the last import (see orange frame in the image below).

</td></tr><tr style="height: 29.7969px;"><td class="align-left" style="height: 29.7969px; border-width: 1px;">Control Assigned Bitmap</td><td class="align-left" style="height: 29.7969px; border-width: 1px;">If you have already assigned a control to a bitmap node and another control uses that bitmap, Smart Importer displays the bitmap in yellow font.

</td></tr><tr style="height: 29.7969px;"><td class="align-left" style="height: 29.7969px; border-width: 1px;">Newly added layer</td><td class="align-left" style="height: 29.7969px; border-width: 1px;">Smart Importer displays newly added layers in green font (see green frame in the image below).

Note that Smart Importer does not show newly added layers in **Preview**, it disables the check box in **Layer Tree** by default. To show the layer in **Preview**, select the check box.

</td></tr><tr><td class="align-left" style="border-width: 1px;">Deleted Layer</td><td style="border-width: 1px;">Smart Importer displays in red font layers that existed in the previously imported file but do not exist in the current import file (see reed frame in the image below).

Smart Importer also disables the check boxes in **Layer Tree**. Since these layers are not included in the current import file, Smart Importer does not display these layers in **Preview**, even if you select them in **Layer Tree**.

</td></tr></tbody></table>

<div drawio-diagram="7104"><img src="https://doc3161en.candera.eu/uploads/images/drawio/2024-10/drawing-4-1729307338.png" alt=""/></div>

#### Merging multiple scene settings

Smart Importer saves the settings that you apply during the import run in the solution along with the imported scene. This settings-saving behavior allows you to import various configurations into the solution by using a single import target file and eventually merge the configurations into a single configuration. The following example shows how to set this up.
##### Creating Multiple Configurations

This section uses the Photoshop Document (PSD) file `Car_Cluster.psd` in the following location as an import example. Note that Smart Importer does not display the **New SPI configuration was found** dialog during each import operation because you specify a different import-destination folder.

`<strong><root>\cgi_studio_content\2D\PSD\Car_Cluster.psd</strong>`

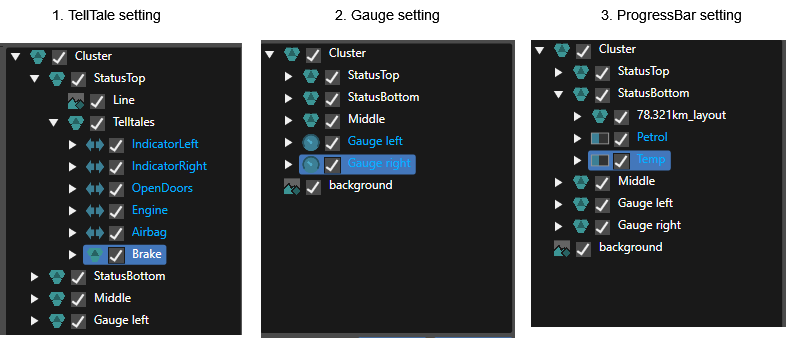
1. Open the `Car_Cluster.psd` file in the Smart Importer and configure the Telltale control. Then, under **Import to Folder**, enter `/Resources/Cluster_Telltales` as the import destination and perform the import. 
    - See **1. TellTale Settings** in the image below.
2. Re-open the same image file in the Smart Importer, this time setting the Gauge control. Enter `/Resources/Cluster_Gauge` as the import destination and perform the import.
    
    
    - See **2. Gauge Settings** in the image below.
3. Repeat the process for the ProgressBar control. Enter `/Resources/Cluster_ProgressBar` as the import destination and perform the import.
    
    
    - See **3. ProgressBar Settings** in the image below.

<div drawio-diagram="6763"><img src="https://doc3161en.candera.eu/uploads/images/drawio/2024-09/drawing-5-1726221490.png" alt=""/></div>

##### Merge of multiple scene configurations

1. Open the `Car_Cluster.psd` file in the Smart Importer.
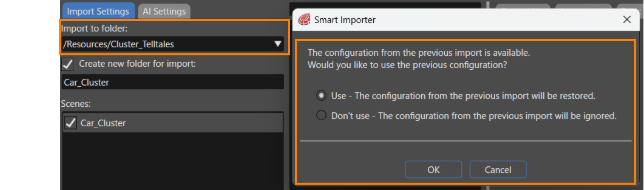
2. Enter `/Resources/Cluster_Telltales` in the **Import into folder** and clear the **Create new folder for import** check box.  
    
    - The Smart Importer dialog appears.
3. Select **Use**, and then click **OK** to restore and apply the Telltale control settings. 
    - A blue caution icon appears in **Scenes**.  
        <div drawio-diagram="8926"><img src="https://doc3161en.candera.eu/uploads/images/drawio/2026-02/drawing-7-1770712185.png" alt=""/></div>
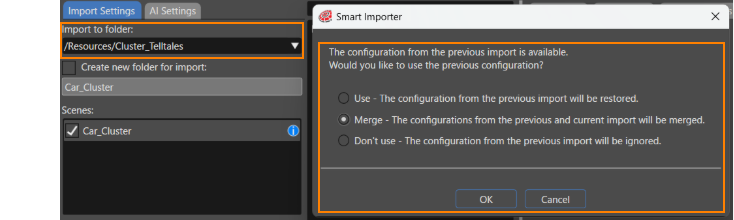
4. Change the import destination to `/Resources/Cluster_Gauge`.  
    
    - A dialog box similar to the one below appears.
5. Select **Merge**, and then click **OK**.  
    
    - The configured Gauge control is added to the previously configured Telltale control.  
        <div drawio-diagram="8934"><img src="https://doc3161en.candera.eu/uploads/images/drawio/2026-02/drawing-7-1770720061.png" alt=""/></div>
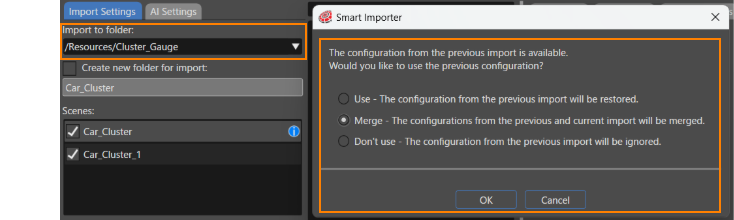
6. Similarly, change the import destination to `/Resources/Cluster_ProgressBar`.  
    
    - As in step 4, a dialog box similar to the one shown below appears.
7. Select **Merge,** and then click **OK**.  
    
    - The configured **ProgressBar** control is added.  
        <div drawio-diagram="8935"><img src="https://doc3161en.candera.eu/uploads/images/drawio/2026-02/drawing-7-1770720114.png" alt=""/></div>

These steps create a configuration with the TellTale, Gauge, and ProgressBar controls applied.

#### Configure a control image with multiple layers

In some cases, the imported image file may contain a complex structure, where elements such as the gauge background and needle are composed of multiple images or layers. However, the Gauge control in Scene Composer requires only one image for the background and one for the needle. To support complex image configurations while preserving control settings, Smart Importer allows multiple layers for each image used in the control.

This section uses the `Car_Cluster.psd` file as an example.

The Smart Importer window displays the following, after you selected `Car_Cluster.psd` as file to import with the Smart Importer (see also image below):

- The **Layer Tree** of the imported `Car_Cluster.psd` file
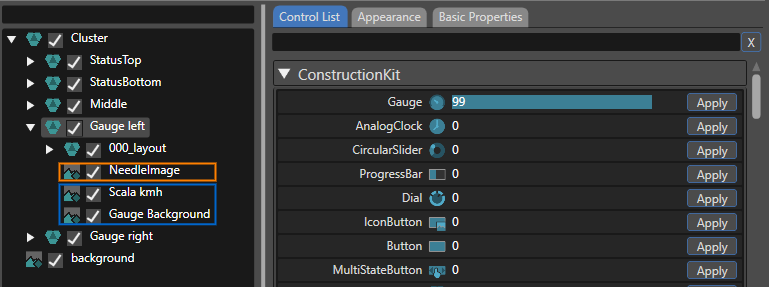
- **Gauge left** is the Gauge's root layer. 
    - The orange framed layer contains the **Gauge needle**.
    - The blue framed layer contains the **background**.
- The **Control List** tab lists the artificial intelligence (AI) automatic-control-detection results.

<div drawio-diagram="7038"><img src="https://doc3161en.candera.eu/uploads/images/drawio/2024-10/drawing-4-1729224666.png" alt=""/></div>

Follow the steps below to configure a Gauge control with a background image that has multiple layers:

1. In the **Layer Tree**, select the root layer of the target layer group (**Gauge left** in the image above). 
    - Smart Importer lists the results of AI generated automatic control detection in the **Control List** tab.
2. In the Control List, find the Gauge control and click the **Apply** button next to the **Gauge** control. 
    - Smart Importer assigns the **Gauge** control to the **Gauge left** layer group.
    - Smart Importer switches the focus to the **Appearance** tab. 
        
        <p class="callout info">When you select the root layer to which you apply the control, Smart Importer can configure the entire layer group, including all child layers.  
        To select multiple layers and set them all at once, hold `ctrl` or `shift` and click the target layer, or click and drag around the layer you want to select.</p>
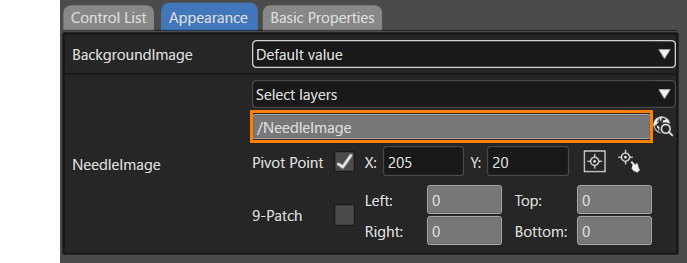
    - Smart Importer was able to configure the NeedleImage property with the NeedleImage layer, because the layer name of the file to import contains `NeedleImage`.
    
    <div drawio-diagram="7039"><img src="https://doc3161en.candera.eu/uploads/images/drawio/2024-10/drawing-4-1729225203.png" alt=""/></div>
    
    
    - The `Car_Cluster.psd` file contains multiple background-image layers.
3. Select **Select layers** from the **BackgroundImage** drop-down menu. <div drawio-diagram="7040"><img src="https://doc3161en.candera.eu/uploads/images/drawio/2024-10/drawing-4-1729225226.png" alt=""/></div>
    
    
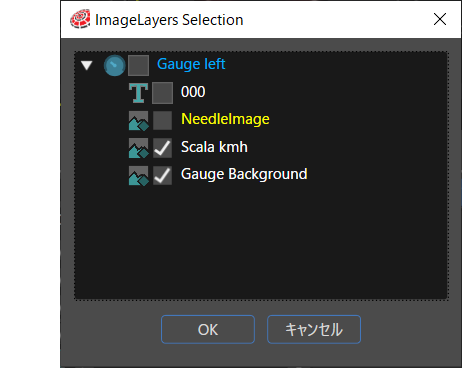
    - The **ImageLayers Selection** dialog box appears.
4. Select the layer you want to assign to **BackgroundImage** and click **OK**. <div drawio-diagram="7041"><img src="https://doc3161en.candera.eu/uploads/images/drawio/2024-10/drawing-4-1729225434.png" alt=""/></div>
5. After you finished your configuration in Smart Importer, click **OK** to start the import. 
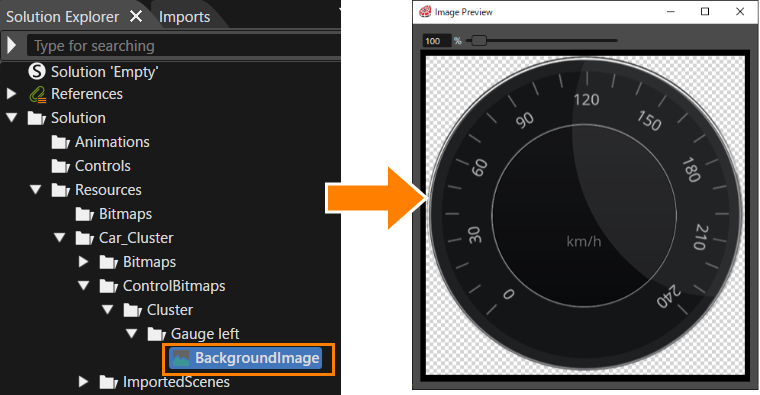
    - Smart Importer creates a background image by merging the specified layers and creating a new BackgroundImage.
    - You can see this newly created image in the SceneComposer's Solution Explorer.
6. Double-click this image 
    - The Image Preview window displays the BackgroundImage. <div drawio-diagram="7042"><img src="https://doc3161en.candera.eu/uploads/images/drawio/2024-10/drawing-4-1729225962.png" alt=""/></div>

<p class="callout info">Smart Importer places bitmaps merged from multiple layers for control properties in the **ControlBitmaps** folder in **Solution Explorer**.</p>

# Recommended Layers Structure for Smart Importer

<span style="vertical-align: inherit;"><span style="vertical-align: inherit;">This page shows you how to set up items so that Smart Importer automatically detects the items and their nested group items as controls when you import Adobe Photoshop (.psd), Adobe XD (.xd), o Figma (.fig) files.</span></span>

<p class="callout info"><span style="vertical-align: inherit;"><span style="vertical-align: inherit;">Smart Importer can automatically assign only controls in the ***Touchable, Common** and **Core*** categories.  
</span></span></p>

---

#### <span style="vertical-align: inherit;"><span style="vertical-align: inherit;">Creating Design Files</span></span>

To enable the automatic application of controls to group items in a design file and their subsequent import into Scene Composer, group items must be created following the recommended layer structure.

The recommended layer structure is primarily designed to support the text-related and image-related properties of a control. By creating layers that correspond to these properties and naming them according to the associated Scene Composer property names, the Smart Importer can automatically identify and map the layers to the appropriate control properties.

The following sections provide detailed instructions for creating the required layer structure.

##### <span style="vertical-align: inherit;"><span style="vertical-align: inherit;">For Adobe Photoshop（.psd）Files</span></span>

<span style="vertical-align: inherit;"><span style="vertical-align: inherit;">You can create controls from Photoshop layer data as follows:</span></span>

<div class="contents" id="bkmrk-create-a-group-item-"><div class="contents"><div class="contents"><div class="contents"><div class="textblock">

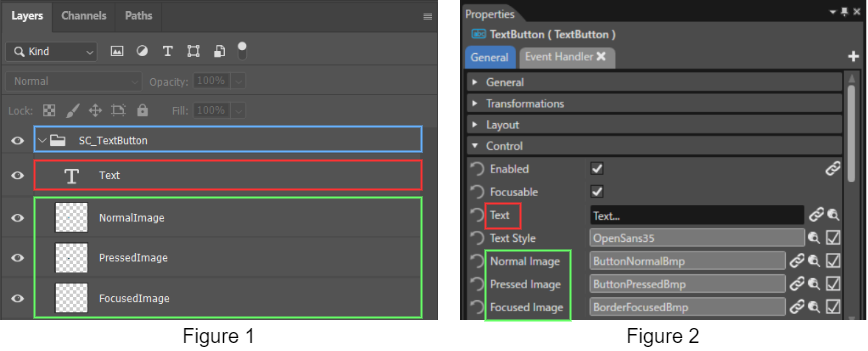
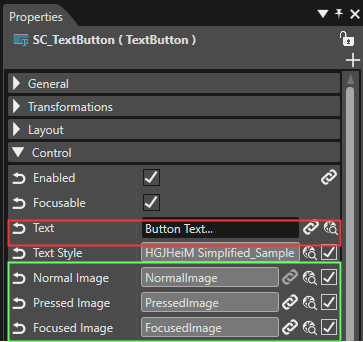
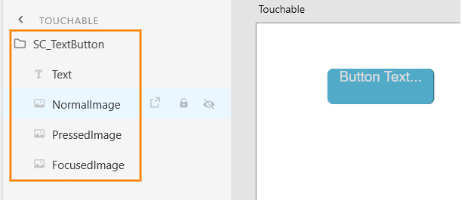
1. <span style="vertical-align: inherit;"><span style="vertical-align: inherit;">Create a group item for the control that you want Smart Importer to assign and name it "SC\_*&lt;ControlName&gt;*". For example, name the top layer "SC\_TextButton" to make a TextButton control (see blue box).</span></span>
2. <span style="vertical-align: inherit;"><span style="vertical-align: inherit;">Under the group item that you created in step 1, create property layers for the desired control (see red and green boxes).  
    These properties include text-related properties (e.g., Text, FirstText) and image-related properties (e.g., NormalImage, PressedImage).  
    </span></span>
3. <span style="vertical-align: inherit;"><span style="vertical-align: inherit;">Use the control properties names for the Photoshop layer names. Delete any spaces in Photoshop layer names (see green boxes for comparison)</span></span>

</div></div></div></div></div><div drawio-diagram="3874"><img src="https://doc3161en.candera.eu/uploads/images/drawio/2023-06/drawing-7-1686313199.png" alt=""/></div>

<div class="contents" id="bkmrk--0"><div class="contents">  
</div></div><p class="callout info">The Smart Importer automatically recognizes and maps a group item that is named SC\_&lt;ControlName&gt;” in the design file.  
You are not required to create layers for all text-related and image-related properties of the control. Even if only the required properties are created as layers, the control will still be applied correctly.</p>

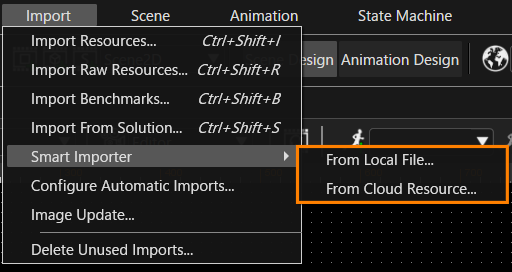
<span style="vertical-align: inherit;"><span style="vertical-align: inherit;">After following the steps above, select **Import &gt; Smart Importer &gt; From Local File... from the Scene Composer toolbar, then select the finished Photoshop file. Smart Importer opens the **Smart Importer** panel, loads the file according to the .psd layers that you configured, confirms the TextButtonControl, and applies it, as you can see in the image below.</span></span>

<div drawio-diagram="6772"><img src="https://doc3161en.candera.eu/uploads/images/drawio/2024-09/drawing-5-1726226385.png" alt=""/></div>

<div class="contents" id="bkmrk-each-property-on-the"><div class="contents"><div class="textblock">  
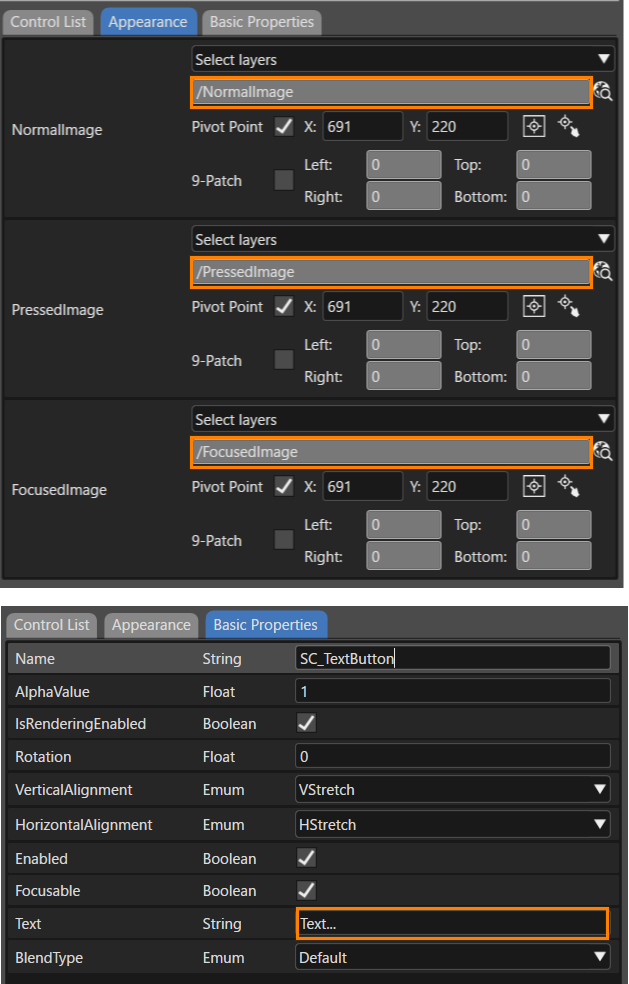
</div><div class="textblock">Each property on the **Appearance** and **Basic Properties** tabs reflects the layers that you set in the .psd file.   
</div><div class="textblock"><div drawio-diagram="7037"><img src="https://doc3161en.candera.eu/uploads/images/drawio/2024-10/drawing-4-1729219437.png" alt=""/></div>

</div></div></div><div class="contents" id="bkmrk--7"></div><span style="vertical-align: inherit;"><span style="vertical-align: inherit;">The **Properties** panel also reflects these settings after Smart Importer completes the import</span></span>.

<div drawio-diagram="6774"><img src="https://doc3161en.candera.eu/uploads/images/drawio/2024-09/drawing-5-1726226731.png" alt=""/></div>

<div class="contents" id="bkmrk--10"><div class="contents"><div class="textblock">  
</div></div></div><div class="contents" id="bkmrk-the-size-of-the-impo"><div class="contents"><div class="textblock"><dl class="note"><dt></dt><dd><p class="callout info"><span style="vertical-align: inherit;"><span style="vertical-align: inherit;">The imported control's size matches the width and height of the largest image layer that you applied.</span></span></p>

</dd><dd></dd></dl></div></div></div><span style="vertical-align: inherit;"><span style="vertical-align: inherit;">When Smart Importer imports nodes with mismatching layers and properties, it creates new group nodes and additional properties as child elements.</span></span>

##### For Adobe XD（.xd）Files

Prepare .xd files in the same way as described in<span style="color: rgb(230, 126, 35);"> [For Adobe Photoshop (.psd) Files](https://doc3161en.candera.eu/link/84#bkmrk-adobe-photoshop%EF%BC%88.psd)</span>. Structure the Adobe XD items to match the structure and property names of the controls that Smart Importer automatically applies.

<div drawio-diagram="3877"><img src="https://doc3161en.candera.eu/uploads/images/drawio/2023-06/drawing-7-1686313818.png" alt=""/></div>

##### For Figma（.fig）Files 

Prepare .fig files in the same way as described in <span style="color: rgb(230, 126, 35);">[For Adobe Photoshop (.psd) Files](https://doc3161en.candera.eu/link/84#bkmrk-adobe-photoshop%EF%BC%88.psd)</span>. Structure the Figma items to match the structure and property names of the controls that Smart Importer automatically applies.

<div drawio-diagram="3876"><img src="https://doc3161en.candera.eu/uploads/images/drawio/2023-06/drawing-7-1686313403.png" alt=""/></div>

---

<div class="contents" id="bkmrk--41"></div>#### Layer Structure and Naming Guideline for Controls

In general, keep the PSD layer format close to the standard controls. Use the following guide to format and name layers for some controls.

##### Touchable

- **Button**  
    SC\_Button  
    ├ NormalImage  
    ├ PressedImage  
    └ FocusedImage
- **CheckBox**  
    SC\_CheckBox  
    ├ Text  
    ├ NormalImage  
    ├ PressedImage  
    ├ SelectedImage  
    ├ SelectedPressedImage  
    └ FocusedImage
- **MultiStateButton**  
    SC\_MultiStateButton  
    ├ Text  
    ├ StateImages0  
    ├ StateImages1  
    ├ StateImages2  
    └ StateImages3
- **ToggleButton**  
    SC\_ToggelButton  
    ├ FirstText  
    ├ SecondText  
    ├ FirstImage  
    ├ FirstPressedImage  
    ├ SecondImage  
    └ SecondPressedImage

<div class="scriptor-paragraph" id="bkmrk-%60%60%60plaintext"></div><div class="scriptor-paragraph" id="bkmrk-sc_button"></div>##### Common

- **AnalogClock**  
     SC\_AnalogClock  
      ├ SecondsNeedleImage  
      ├ MinutesNeedleImage  
      ├ HoursNeedleImage  
      └ FaceImage
- **Gauge** SC\_Gauge  
      ├ BackgroundImage  
      └ NeedleImage
- **Menu Icon**  
    SC\_MenuIcon  
      ├ Image  
      └ BackgroundImage
- **Mesh2D**  
    SC\_Mesh2D  
      └ Image

##### Core

- **CoreDial**  
    SC\_CoreDial  
      ├ KnobImage  
      ├ BackgroundImages0  
      ├ BackgroundImages1  
      └ BackgroundImages2
- **CoreTextButton**  
    SC\_CoreTextButton  
      ├ NormalImage  
      ├ PressedImage  
      ├ DisabledImage  
      └ Text
- **CoreRadioButton**  
    SC\_CoreRadioButton  
      ├ Text  
      ├ NormalImage  
      ├ SelectedImage  
      ├ NormalDisabledImage  
      └ SelectedDisabledImage
- **CoreSlider**  
    SC\_CoreSlider  
      ├ TrackImage  
      ├ TrackDisabledImage  
      ├ TrackFillImage  
      ├ TrackDisabledFillImage  
      ├ KnobNormalImage  
      ├ KnobPressedImage  
      └ KnobDisabledImage

<div class="contents" id="bkmrk-analogclock-secondsn"><div class="contents"></div></div>

# Adobe XD Importing

#### Description

This section explains about Adobe XD file format, its layer structure, naming conventions, and an import example that uses a sample file.

---

#### Layer Structure and Naming Guideline

As with Photoshop Document (PSD) file format, the SmartImporter's AI analyzes imported files to detect, propose, and create Controls for the solution. Keep the Adobe XD layer format close to the standard Controls in Scene Composer. The naming guideline is as same as the PSD guideline. For details, refer to the <span style="color: rgb(230, 126, 35);">[Recommended Layers Structure for Smart Importer](https://doc3161en.candera.eu/link/84#bkmrk-page-title "Recommended Layers Structure for Smart Importer")</span>.
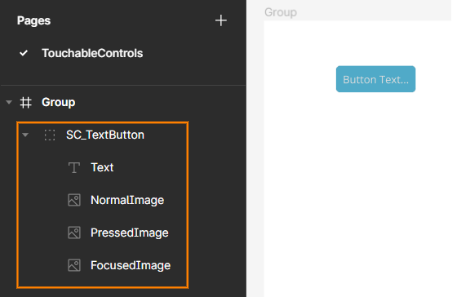
Additional naming conventions exist for efficiently importing AdobeXD files, such as the following.

##### Control: Text

The Smart Importer creates **Text Control** for each **text layer**.

<div drawio-diagram="6795"><img src="https://doc3161en.candera.eu/uploads/images/drawio/2024-09/drawing-5-1726235688.png" alt=""/></div>

<div class="contents" id="bkmrk--87"><div class="contents"><div class="textblock">  
</div></div></div>##### Control: Tell Tale

The Smart Importer creates a **Tell Tale Control** when the **group name** has the `_telltale` **suffix and contains a child image layer**.

<div class="contents" id="bkmrk--89"><div class="contents"><div class="textblock"><div drawio-diagram="6785"><img src="https://doc3161en.candera.eu/uploads/images/drawio/2024-09/drawing-5-1726233615.png" alt=""/></div>

</div></div></div>##### Control: TextButton

The Smart Importer creates a **TextButton** Control when the layer meets either of the following conditions:

- the group layer contains a **child text layer**
- the text layer name has a `_Button` **suffix**.

<div drawio-diagram="6796"><img src="https://doc3161en.candera.eu/uploads/images/drawio/2024-09/drawing-5-1726235918.png" alt=""/></div>

<div class="contents" id="bkmrk-the-rectangle-shape-"><div class="textblock"><dl class="note"><dd><p class="callout info">Smart Importer supports only rectangle shapes; it does not support other shapes, such as polygons.</p>

</dd></dl></div></div><div class="contents" id="bkmrk--0"><div class="contents"><div class="textblock">---

</div></div></div>#### AdobeXD Features Supported by CGI Studio Smart Importer

The Smart Importer supports importing the following Adobe XD features:

<div class="contents" id="bkmrk-artboards-components"><div class="contents"><div class="contents"><div class="textblock">

- <span style="color: rgb(230, 126, 35);">[Artboards](#bkmrk-artboards)</span>
- <span style="color: rgb(230, 126, 35);">[Components](#bkmrk-components)</span>
- <span style="color: rgb(230, 126, 35);">[Texts](#bkmrk-texts)</span>
    - Text
    - Font
    - FontStyle
    - FontSize
    - FillColor
    - Position
    - Size
- <span style="color: rgb(230, 126, 35);">[Images](#bkmrk-images)</span>
    - Position
    - Size
- <span style="color: rgb(230, 126, 35);">[Solid Rectangles](#bkmrk-solid-rectangles)</span>
    - Color
    - Position
    - Size
- <span style="color: rgb(230, 126, 35);">[Buttons](#bkmrk-buttons)</span>
    - Text
- <span style="color: rgb(230, 126, 35);">[Transitions](#bkmrk-transitions)</span>
- [<span style="color: rgb(230, 126, 35);">TellTales</span>](#bkmrk-telltales)

</div></div></div></div>##### Artboards

The Smart Importer converts each AdobeXD Artboard into a **Scene** in SceneComposer.

##### Components

Adobe XD has a component system where you can define components once and instantiate them multiple times. If an artboard references a component, the Adobe XD converter looks up and instantiates components as needed.

##### Texts

The Smart Importer converts Adobe XD **text areas** into **Text Nodes** in SceneComposer.

It reads the configuration of the Adobe XD text and applies the following properties to the SceneComposer Text Node:

<table border="1" id="bkmrk-property-description" style="border-collapse: collapse; width: 100%;"><colgroup><col style="width: 16.5741%;"></col><col style="width: 50.1455%;"></col><col style="width: 33.3598%;"></col></colgroup><tbody><tr><td style="background-color: rgb(53, 152, 219);"><span style="color: rgb(236, 240, 241);">**Property**</span></td><td style="background-color: rgb(53, 152, 219);"><span style="color: rgb(236, 240, 241);">**Description**</span></td><td style="background-color: rgb(53, 152, 219);"><span style="color: rgb(236, 240, 241);">**Example**</span></td></tr><tr><td>Text</td><td>the text to display</td><td>  
</td></tr><tr><td>Font</td><td>the font's PostScript name</td><td>OpenSans-Light</td></tr><tr><td>FontStyle</td><td>the font's style</td><td>Light</td></tr><tr><td>FontSize</td><td>the font's point size</td><td>72</td></tr><tr><td>FillColor</td><td>a fill color (if the Adobe XD file configures a <code>solid</code>-style)</td><td>  
</td></tr><tr><td>Position</td><td>the position of the text area in the scene</td><td>  
</td></tr><tr><td>Size</td><td>the size of the text area (see note below)</td><td>  
</td></tr></tbody></table>

<div class="contents" id="bkmrk-if-an-adobexd-text-a"><div class="contents"><div class="contents"><div class="textblock"><dl class="note"><dd><p class="callout info">If the AdobeXD file defines a text area with <code>Auto Width</code> and <code>Auto Height</code>, the Smart Importer cannot calculate the text area bounding box. </p>

</dd></dl></div></div></div></div>See section <span style="color: rgb(230, 126, 35);">[Text Controls](#bkmrk-text-controls)</span> in the<span style="color: rgb(0, 0, 0);"> Adobe XD import example.</span>

##### Images

The Smart Importer converts Adobe XD shapes (`"type": "shape"`) with a pattern fill (a `fill` of `"type": "solid"`) to **RenderNodes**.

It applies the following properties to the SceneComposer RenderNode:

<div class="contents" id="bkmrk-position-size"><div class="contents"><div class="contents"><div class="textblock">

- *Position*
- *Size*

</div></div></div></div>##### Solid Rectangles

The Smart Importer converts rectangles (`shape`s of `"type": "rect"`) with a solid fill (a `fill` of `"type": "solid"`) to **SolidColorNodes**.

It applies the following properties to the SceneComposer SolidColorNode:

<div class="contents" id="bkmrk-color-position-size"><div class="contents"><div class="textblock">

- *Color*
- *Position*
- *Size*

</div></div></div>See section<span style="color: rgb(230, 126, 35);"> [Rectangle](#bkmrk-rectangle)</span> in the<span style="color: rgb(0, 0, 0);"> Adobe XD import example.</span>

##### Buttons

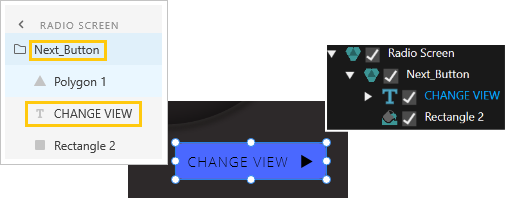
If the Adobe XD resource contains a group whose name ends with` _Button`, the Smart Importer creates a **TextButton**.

<div class="contents" id="bkmrk-smart-importer-check"><div class="contents"><div class="textblock"><dl class="note"><dd><p class="callout info">The Smart Importer checks the suffix in a **case insensitive** way, so <code>&#95;button</code> or <code>&#95;BUTTON</code>, and similar also work.</p>

</dd></dl></div></div></div>The Smart Importer applies the following properties to the SceneComposer TextButton:

<div class="contents" id="bkmrk-text---the-first-tex"><div class="contents"><div class="contents"><div class="textblock">

- *Text* - The Smart Importer uses the first text label inside the Adobe XD group as the TextButton's Text.

</div></div></div></div><div drawio-diagram="9201"><img src="https://doc3161en.candera.eu/uploads/images/drawio/2026-09/drawing-5-1788512522.png" alt=""/></div>

<div class="contents" id="bkmrk--7"><div class="contents"><div class="textblock">  
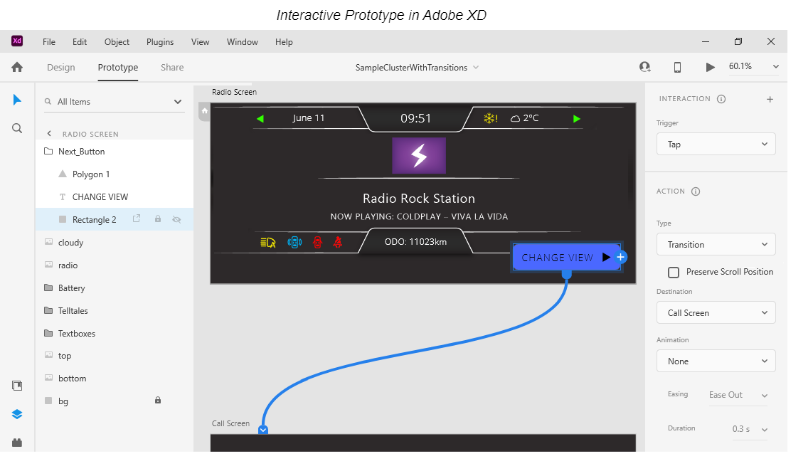
</div></div></div><div class="contents" id="bkmrk-the-button-depicted-"><div class="contents"><div class="textblock"><dl class="note"><dd><p class="callout info">The button depicted above provokes a Scene transition. The Smart Importer takes this transition from the first artboard transition inside the group. See <span style="color: rgb(230, 126, 35);">[Transitions](#bkmrk-transitions)</span>.</p>
</dd></dl></div></div></div>#####  

##### Transitions

Adobe XD supports building interactive prototypes with several kinds of transitions. A button can trigger a navigation transition to a different artboard, and a component can support transitions between different states. SceneComposer supports button-triggered Scene transitions that Scene Composer generates from artboard transitions in the XD file.

<div drawio-diagram="544"><img src="https://doc3161en.candera.eu/uploads/images/drawio/2023-02/drawing-4-1676360249.png" alt=""/></div>

<div class="textblock" id="bkmrk--9"></div><div class="textblock" id="bkmrk--10"></div><div class="textblock" id="bkmrk--11"><div drawio-diagram="6791"><img src="https://doc3161en.candera.eu/uploads/images/drawio/2024-09/drawing-5-1726235118.png" alt=""/></div>

</div><div class="textblock" id="bkmrk--12"></div>See <span style="color: rgb(230, 126, 35);">[Transition](#bkmrk-transition) </span>in th<span style="color: rgb(0, 0, 0);">e Adobe XD import example.</span>

##### Tell Tales

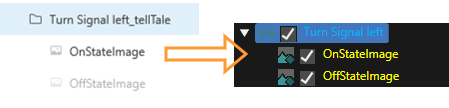
The Smart Importer creates a **Tell Tale Control** for an Adobe XD group whose name ends with `_TellTale`.

- If the group contains an image with `OnState` in its name, the Smart Importer sets it as the Tell Tale Control's **On State Image**.
- If the group contains an image with `OffState` in its name, the Smart Importer sets it as the Tell Tale Control's **Off State Image**.

<div class="contents" id="bkmrk-smart-importer-check-0"><div class="contents"><div class="textblock"><dl class="note"><dd><p class="callout info">The Smart Importer checks the group name's suffix and the image names in a **case insensitive** way, so <code>&#95;Telltale </code>or <code>&#95;telltale</code>, <code>ONSTATE&#95;pic</code>,  <code>image&#95;offstate&#95;picture</code> and similar variants also work.</p>

</dd></dl></div></div></div>See <span style="color: rgb(230, 126, 35);">[Tell Tale Control](#bkmrk-tell-tale-control)</span> in the Adobe XD import example.

---

#### Adobe XD import example

This sample explains the layer structure and restrictions for Adobe XD.

Get the sample Adobe XD file from the following location:

**"...\\cgi\_studio\_content\\2D\\XD\\XD\_SampleCluster.xd"**

##### Rectangle

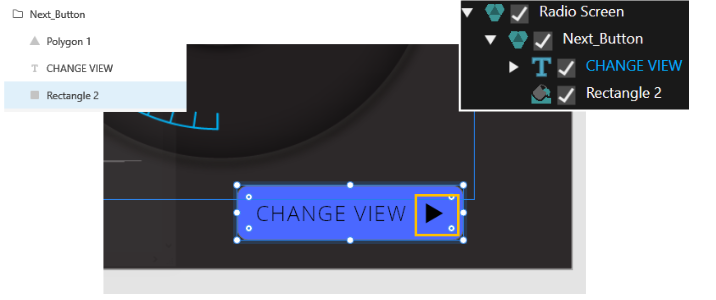
The Smart Importer supports only rectangle shapes for import, therefore it does not import the polygon in the "Next\_Button" group as depicted below.

<div drawio-diagram="9200"><img src="https://doc3161en.candera.eu/uploads/images/drawio/2026-09/drawing-5-1788512471.png" alt=""/></div>

<div class="contents" id="bkmrk--17"><div class="contents"><div class="textblock"></div></div></div>##### Text Controls

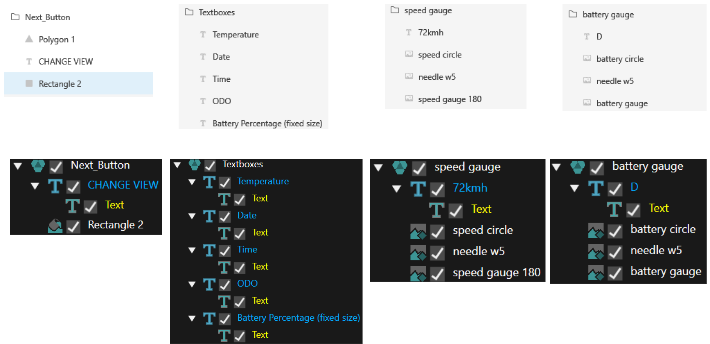
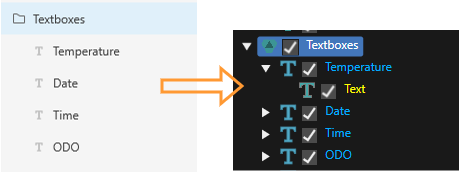
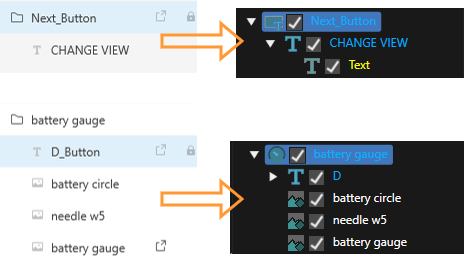
The Smart Importer sets a text layer as a Text Control, as it does for other file formats. In this sample, the following layers are text layers:

<div class="contents" id="bkmrk-change-view-under-%22n"><div class="contents"><div class="contents"><div class="textblock">

- Change view under "Next\_Button"
- All child layers under "Textboxes".
- The 72kmh label under "Speed gauge"
- D under "Battery gauge"

</div></div></div></div><div drawio-diagram="9202"><img src="https://doc3161en.candera.eu/uploads/images/drawio/2026-09/drawing-5-1788512848.png" alt=""/></div>

<div class="contents" id="bkmrk--19"><div class="contents"><div class="textblock"></div></div></div>##### Tell Tale Control

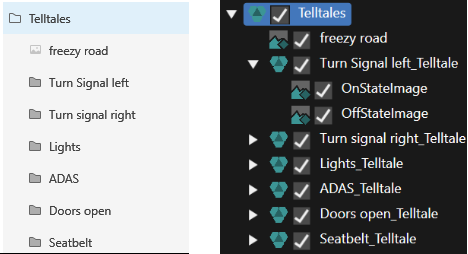
Because the sample file contains a "TellTale" group whose name has the `_telltale` suffix, the Smart Importer sets its child image layers as Tell Tale Control.

<div drawio-diagram="9199"><img src="https://doc3161en.candera.eu/uploads/images/drawio/2026-09/drawing-5-1788512239.png" alt=""/></div>

<div class="contents" id="bkmrk--21"><div class="contents"><div class="textblock"></div></div></div>##### Transition

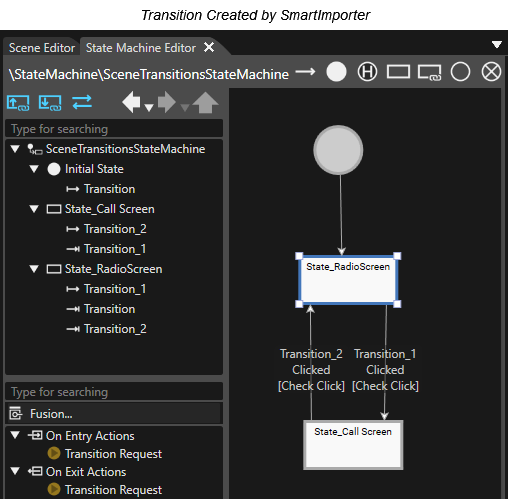
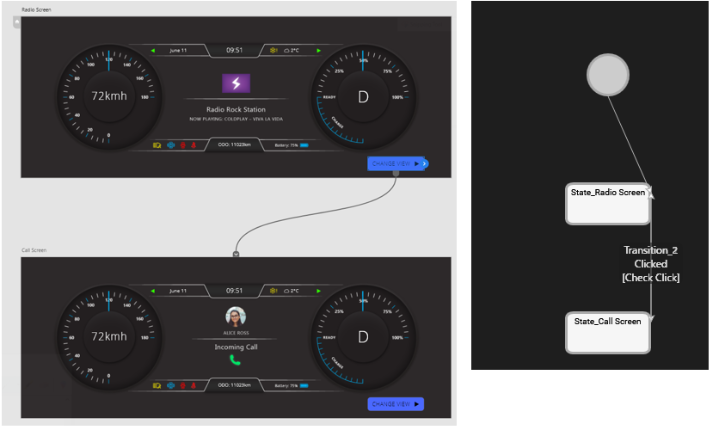
The Smart Importer transfers the transition setting that is included in the Adobe XD file to State Machine Editor.

<div drawio-diagram="541"><img src="https://doc3161en.candera.eu/uploads/images/drawio/2023-02/drawing-4-1676360124.png" alt=""/></div>

<div class="contents" id="bkmrk--23"><div class="contents"><div class="textblock"></div></div></div>##### Other options

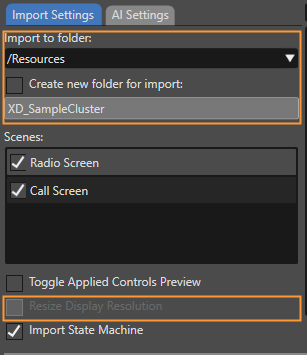
If necessary, change the **Import to folder** setting and its related options. Check **Resize Display Resolution** if needed.

<div drawio-diagram="6805"><img src="https://doc3161en.candera.eu/uploads/images/drawio/2024-09/drawing-5-1726236863.png" alt=""/></div>

<div class="contents" id="bkmrk--49"><div class="contents"><div class="textblock"></div></div></div>##### Check the Import Result in the Player

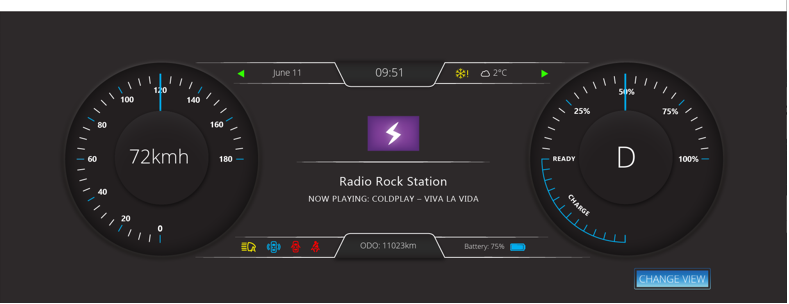
1. After configuring these settings, click **OK** in the Smart Importer dialog to proceed with the import.
2. Click **Play** with **Generate and Play** selected.
3. When the Player application starts, clear "Scenes#Scene2D" to view the import result.
4. Click **Change view** in the lower-right corner to transition to the other scene according to the transition defined in Adobe XD.

<div drawio-diagram="543"><img src="https://doc3161en.candera.eu/uploads/images/drawio/2023-02/drawing-4-1676360178.png" alt=""/></div>

<div class="contents" id="bkmrk--53"><div class="textblock">  
</div></div>

# Figma

Smart Importer can import Figma data. This page explains how to import Figma data with Smart Importer and how to work with the results.

<p class="callout warning">You cannot import Figma data for which you do not have editing privileges.</p>

---

### Preparations for Importing Figma Data

#### Preparing the URL and Access Token  


Before you import Figma data with Smart Importer, acquire the URL and access token for the Figma data.

Obtain the URL and access token in the Figma Desktop App as follows.

<p class="callout info">Ensure that you have access to the Figma REST API (<span style="color: rgb(230, 126, 35);">[https://api.figma.com](https://api.figma.com)</span>). In case of a connectivity issue, contact your IT department because a firewall might block the API.  
</p>

##### Acquiring the URL

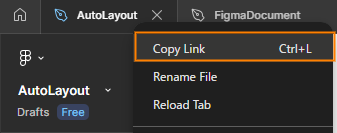
In the top bar of the Figma Desktop App, right-click the relevant project tab, and then select **Copy Link** from the context menu.

<div drawio-diagram="8004"><img src="https://doc3161en.candera.eu/uploads/images/drawio/2025-02/drawing-7-1740621465.png" alt=""/></div>

##### Acquiring the Access Token

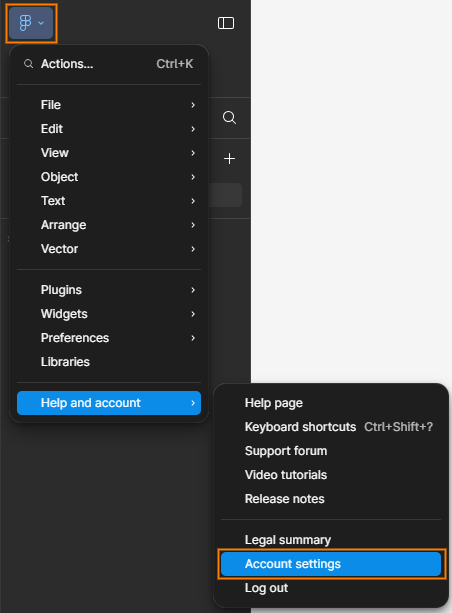
1. In the Figma Desktop App, select **Figma Icon &gt; Help and Account &gt; Account Settings** to open the dialog.  
    <div drawio-diagram="8005"><img src="https://doc3161en.candera.eu/uploads/images/drawio/2025-02/drawing-7-1740621587.png" alt=""/></div>
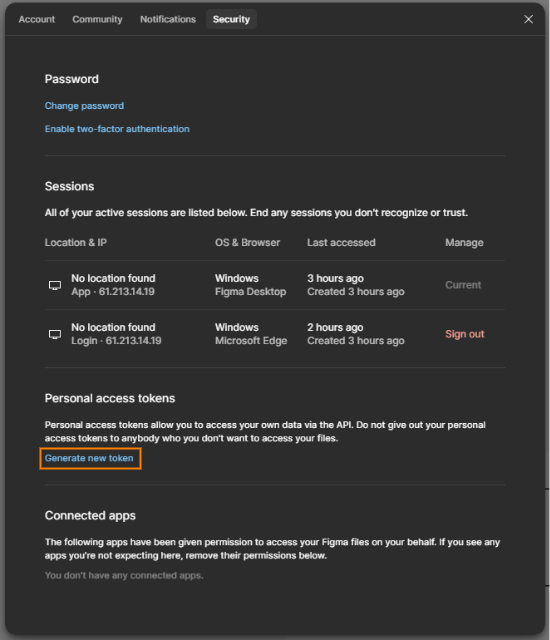
2. In the **Security** tab of the dialog, click **Generate new token** under **Personal access tokens**.  
    <div drawio-diagram="8006"><img src="https://doc3161en.candera.eu/uploads/images/drawio/2025-02/drawing-7-1740621955.png" alt=""/></div>
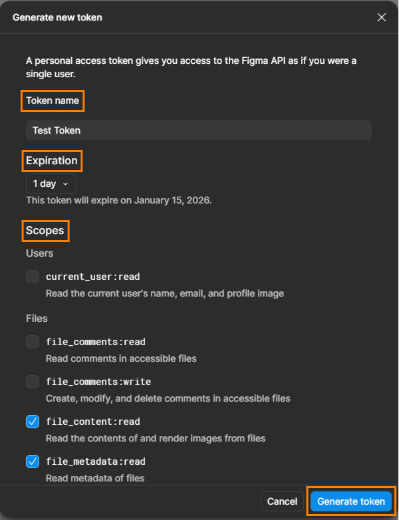
3. In the **Generate new token** dialog, set the **Token name, Expiration**, and **Scopes**, and then click **Generate token**.  
    <div drawio-diagram="8907"><img src="https://doc3161en.candera.eu/uploads/images/drawio/2026-01/drawing-7-1768380041.png" alt=""/></div>
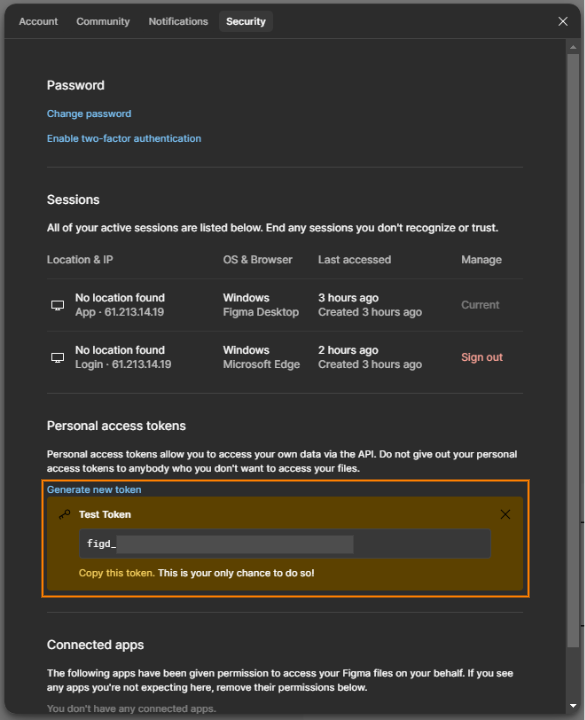
4. Figma displays the created access token under **Personal access tokens** on the **Security** tab of the dialog.  
    <div drawio-diagram="8008"><img src="https://doc3161en.candera.eu/uploads/images/drawio/2025-02/drawing-7-1740622348.png" alt=""/></div>

<p class="callout info">The instructions on how to obtain the URL and access token apply to Figma Desktop App version 125.10.8.</p>

---

### How to Import Figma Data

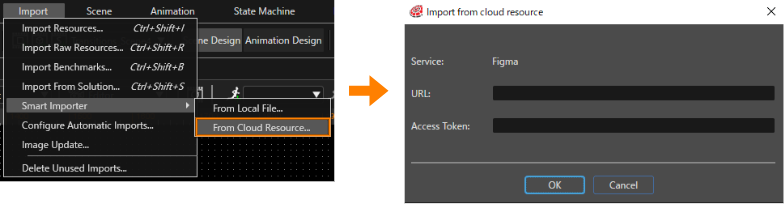
1. From the Scene Composer toolbar, select **Import &gt; Smart Importer &gt; From Cloud Resource...**
    - Scene Composer displays a new dialog titled **Import from cloud resource**.
    
    <div drawio-diagram="7111"><img src="https://doc3161en.candera.eu/uploads/images/drawio/2024-10/drawing-7-1729497030.png" alt=""/></div>
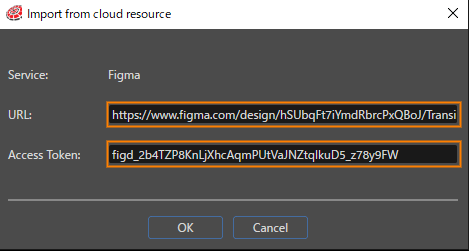
2.  Enter the URL and access token in the respective fields and click **OK**. For information about acquiring the URL and access token, see <span style="color: rgb(0, 0, 0);"><span style="color: rgb(230, 126, 35);">[Preparing the URL and Access Token](#bkmrk-PreparingTheURLAndAccessToken)</span>.</span><div drawio-diagram="7110"><img src="https://doc3161en.candera.eu/uploads/images/drawio/2024-10/drawing-7-1729496909.png" alt=""/></div>
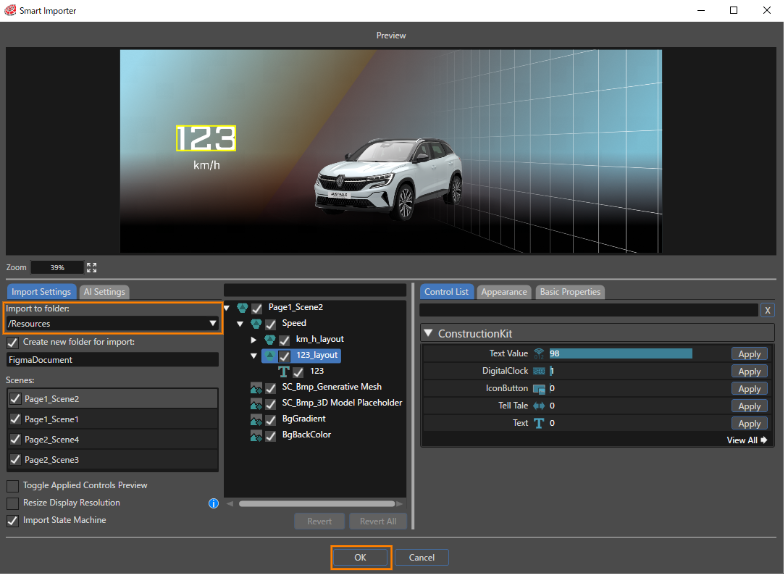
3. The Smart Importer dialog opens. The procedure for using Smart Importer is the same as for other file types. 
    - For details, see <span style="color: rgb(230, 126, 35);">[3. Scene Composer &gt; Import of Resources &gt; Smart Importer &gt; Basic Operation](https://doc3161en.candera.eu/books/import-of-resources/page/basic-operations "Smart Importer")</span>.
4. Adjust the necessary settings, and then click **OK**. 
    - Smart Importer imports the data into the folder that you specified <span style="color: rgb(0, 0, 0);">in **Import to folder**.</span><div drawio-diagram="7112"><img src="https://doc3161en.candera.eu/uploads/images/drawio/2024-10/drawing-7-1729497265.png" alt=""/></div>
        
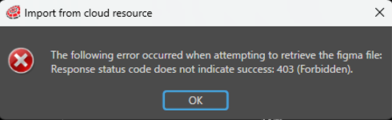
        <p class="callout info">If you entered an incorrect or invalid URL or access token in the **Import from cloud resource** dialog, Smart Importer stops the import and displays the following error dialog.</p>
        
        <div drawio-diagram="9126"><img src="https://doc3161en.candera.eu/uploads/images/drawio/2026-07/drawing-7-1784179561.png" alt=""/></div>

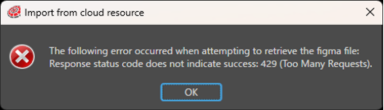
<p class="callout info">API access limits vary depending on your subscription plan. If your API requests exceed that limit, Smart Importer stops the import and displays the following error dialog. For details on each plan, see Figma’s official website.</p>
<div drawio-diagram="9127"><img src="https://doc3161en.candera.eu/uploads/images/drawio/2026-07/drawing-7-1784179587.png" alt=""/></div>

---

### Importing Figma Data - Advanced  


#### Importing as a scene

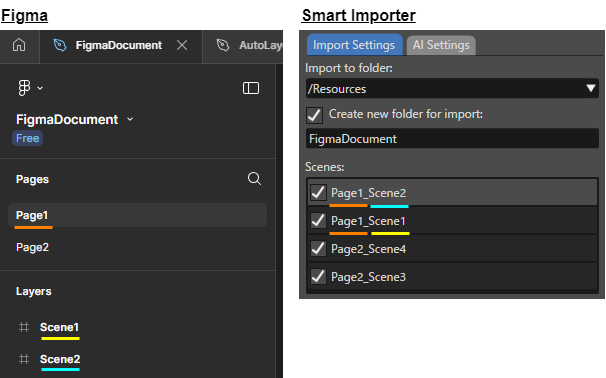
Smart Importer imports the topmost item of each page in the Figma data as a scene.   
Use the following naming : `<span style="color: rgb(0, 0, 0);"><Page name>_<Parent item name></span>`

<div drawio-diagram="7113"><img src="https://doc3161en.candera.eu/uploads/images/drawio/2024-10/drawing-7-1729498578.png" alt=""/></div>

#### Relationship between Figma items and Scene Composer Nodes   


When you import Figma items with Smart Importer, Smart Importer imports each item as a specific type of node, as shown in the following table.

<table border="1" id="bkmrk-scene-composer-node-" style="border-collapse: collapse; width: 100%; height: 327.766px; border-width: 1px;"><colgroup><col style="width: 23.3622%;"></col><col style="width: 25.8344%;"></col><col style="width: 17.1817%;"></col><col style="width: 16.6891%;"></col><col style="width: 16.809%;"></col></colgroup><tbody><tr style="height: 29.7969px;"><td colspan="2" rowspan="2" style="height: 59.5938px; border-width: 1px;">  
</td><td class="align-center" colspan="3" style="height: 29.7969px; border-width: 1px;">Scene Composer node type  
</td></tr><tr style="height: 29.7969px;"><td class="align-center" style="height: 29.7969px; border-width: 1px;">Group</td><td class="align-center" style="height: 29.7969px; border-width: 1px;">Bitmap</td><td class="align-center" style="height: 29.7969px; border-width: 1px;">Text</td></tr><tr style="height: 29.7969px;"><td rowspan="14" style="height: 268.172px; border-width: 1px;">Figma item type  
</td><td style="height: 29.7969px; border-width: 1px;">Component</td><td class="align-center" style="height: 29.7969px; border-width: 1px;">✓</td><td class="align-center" style="height: 29.7969px; border-width: 1px;">  
</td><td class="align-center" style="height: 29.7969px; border-width: 1px;">  
</td></tr><tr style="height: 29.7969px;"><td style="height: 29.7969px; border-width: 1px;">ComponentSet</td><td class="align-center" style="height: 29.7969px; border-width: 1px;">✓</td><td class="align-center" style="height: 29.7969px; border-width: 1px;">  
</td><td class="align-center" style="height: 29.7969px; border-width: 1px;">  
</td></tr><tr style="height: 29.7969px;"><td style="height: 29.7969px; border-width: 1px;">Ellipse</td><td class="align-center" style="height: 29.7969px; border-width: 1px;">  
</td><td class="align-center" style="height: 29.7969px; border-width: 1px;">✓</td><td class="align-center" style="height: 29.7969px; border-width: 1px;">  
</td></tr><tr style="height: 29.7969px;"><td style="height: 29.7969px; border-width: 1px;">Frame</td><td class="align-center" style="height: 29.7969px; border-width: 1px;">✓</td><td class="align-center" style="height: 29.7969px; border-width: 1px;">  
</td><td class="align-center" style="height: 29.7969px; border-width: 1px;">  
</td></tr><tr style="height: 29.7969px;"><td style="height: 29.7969px; border-width: 1px;">Group</td><td class="align-center" style="height: 29.7969px; border-width: 1px;">✓</td><td class="align-center" style="height: 29.7969px; border-width: 1px;">  
</td><td class="align-center" style="height: 29.7969px; border-width: 1px;">  
</td></tr><tr style="height: 29.7969px;"><td style="height: 29.7969px; border-width: 1px;">Instance</td><td class="align-center" style="height: 29.7969px; border-width: 1px;">✓</td><td class="align-center" style="height: 29.7969px; border-width: 1px;">  
</td><td class="align-center" style="height: 29.7969px; border-width: 1px;">  
</td></tr><tr style="height: 29.7969px;"><td style="height: 29.7969px; border-width: 1px;">Line</td><td class="align-center" style="height: 29.7969px; border-width: 1px;">  
</td><td class="align-center" style="height: 29.7969px; border-width: 1px;">✓</td><td class="align-center" style="height: 29.7969px; border-width: 1px;">  
</td></tr><tr style="height: 29.7969px;"><td style="height: 29.7969px; border-width: 1px;">Polygon</td><td class="align-center" style="height: 29.7969px; border-width: 1px;">  
</td><td class="align-center" style="height: 29.7969px; border-width: 1px;">✓</td><td class="align-center" style="height: 29.7969px; border-width: 1px;">  
</td></tr><tr style="height: 29.7969px;"><td style="height: 29.7969px; border-width: 1px;">Rectangle</td><td class="align-center" style="height: 29.7969px; border-width: 1px;">  
</td><td class="align-center" style="height: 29.7969px; border-width: 1px;">✓</td><td class="align-center" style="height: 29.7969px; border-width: 1px;">  
</td></tr><tr><td style="border-width: 1px;">Section</td><td class="align-center" style="border-width: 1px;">✓</td><td class="align-center" style="border-width: 1px;">  
</td><td class="align-center" style="border-width: 1px;">  
</td></tr><tr><td style="border-width: 1px;">Slice</td><td class="align-center" style="border-width: 1px;">  
</td><td class="align-center" style="border-width: 1px;">✓</td><td class="align-center" style="border-width: 1px;">  
</td></tr><tr><td style="border-width: 1px;">Star</td><td class="align-center" style="border-width: 1px;">  
</td><td class="align-center" style="border-width: 1px;">✓</td><td class="align-center" style="border-width: 1px;">  
</td></tr><tr><td style="border-width: 1px;">Text</td><td class="align-center" style="border-width: 1px;">  
</td><td class="align-center" style="border-width: 1px;">  
</td><td class="align-center" style="border-width: 1px;">✓</td></tr><tr><td style="border-width: 1px;">Vector</td><td class="align-center" style="border-width: 1px;">  
</td><td class="align-center" style="border-width: 1px;">✓</td><td class="align-center" style="border-width: 1px;">  
</td></tr></tbody></table>

<p class="callout info">Smart Importer imports bitmap and text items only when Figma provides their render data. For example, if you set a Figma item to **hidden**, Smart Importer cannot import it.</p>

#### Importing as Controls or Bitmaps

Smart Importer can import any Figma item as a control or bitmap. The imported item can contain the following child items:

- Component
- ComponentSet
- Frame
- Group
- Instance
- Section

##### Importing as a control

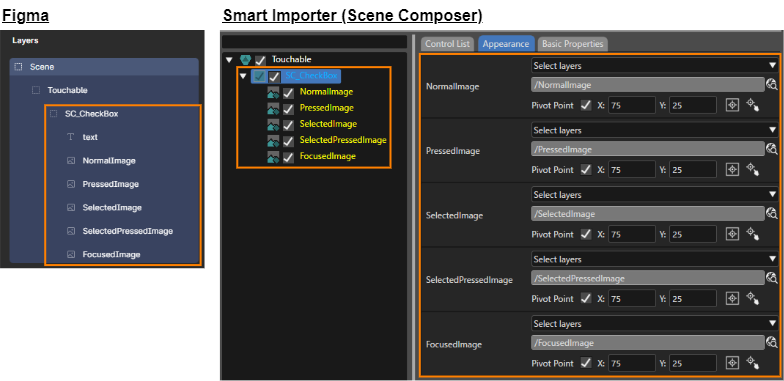
Smart Importer imports an item as a control when the name is <span style="color: rgb(0, 0, 0);">`SC_<control name>`</span>. You can also specify control property values by naming child items after the corresponding control properties. If a child item name matches a control property name in Scene Composer, Smart Importer can automatically map the bitmap from the Figma file to that property.

For example, Scene Composer's **CheckBox** control provides multiple image properties. When a Figma file contains an item named **SC\_CheckBox** with child items whose names match these properties, Smart Importer automatically assigns the corresponding bitmaps to the correct control properties (see the image below). This way, no manual assignment of image properties is necessary in Smart Importer.

<div drawio-diagram="7115"><img src="https://doc3161en.candera.eu/uploads/images/drawio/2024-10/drawing-7-1729499805.png" alt=""/></div>

<p class="callout info">Smart Importer supports this functionality only for *Touchable* and *Common* controls.  
</p>

##### Importing as bitmaps

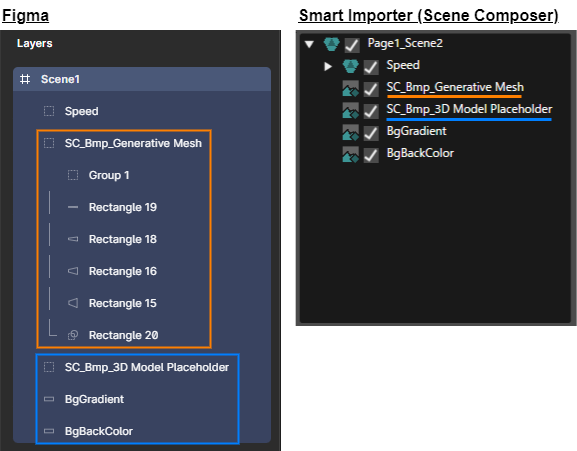
Smart Importer can import group items that contain child items as bitmaps when you prefix the group item name with <span style="color: rgb(0, 0, 0);">`SC_Bmp`.</span>

<div drawio-diagram="7116"><img src="https://doc3161en.candera.eu/uploads/images/drawio/2024-10/drawing-7-1729501904.png" alt=""/></div>

---

#### Import as a State Machine  


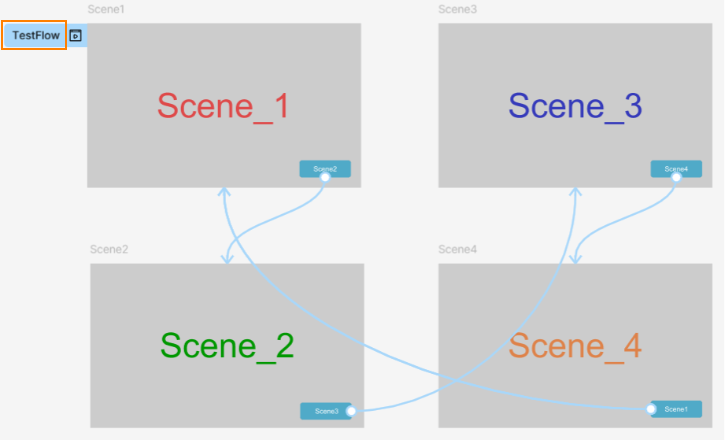
When you define flows (screen transitions) in Figma, Smart Importer imports the structure of screen transitions into Scene Composer as a state machine.    
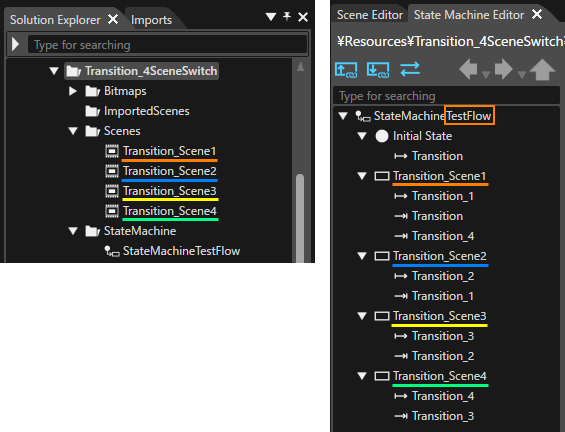
You can review the imported state machine in the **State Machine Editor** in **Scene Composer**.

##### Figma Settings: Scenes and Flows

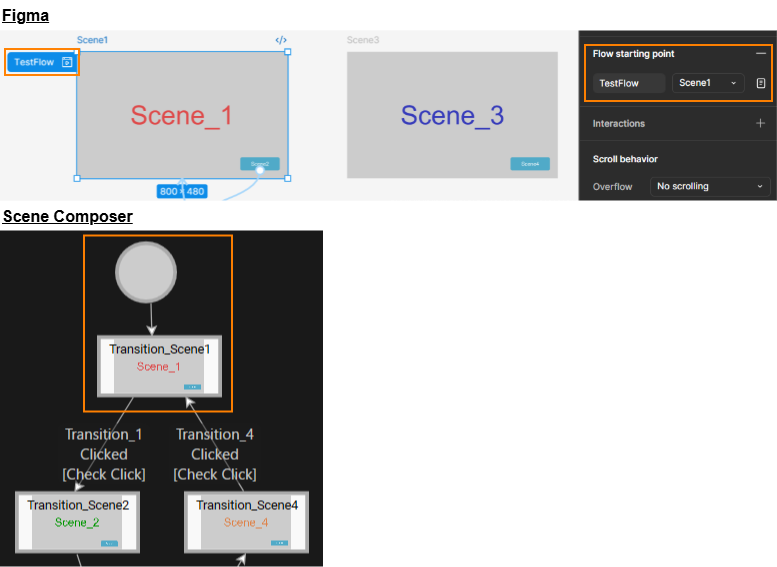
In Figma, define multiple scenes and the flows that connect them. Create screen transitions beginning with the scene designated as the flow start point.

<div drawio-diagram="8980"><img src="https://doc3161en.candera.eu/uploads/images/drawio/2026-04/drawing-7-1776928546.png" alt=""/></div>

##### The Import Result in Scene Composer

Smart Importer imports the flow structure defined in Figma into CGI Studio as a state machine.

<div drawio-diagram="8981"><img src="https://doc3161en.candera.eu/uploads/images/drawio/2026-04/drawing-7-1776928764.png" alt=""/></div>

The state machine starts from the state that corresponds to the scene that you set as the flow start point in Figma. After importing, for each generated state, Smart Importer automatically creates a screenshot of the corresponding Figma scene. Scene Composer's State Machine Editor displays this screenshot as a Scene Image.

<div drawio-diagram="8983"><img src="https://doc3161en.candera.eu/uploads/images/drawio/2026-04/drawing-7-1776929717.png" alt=""/></div>

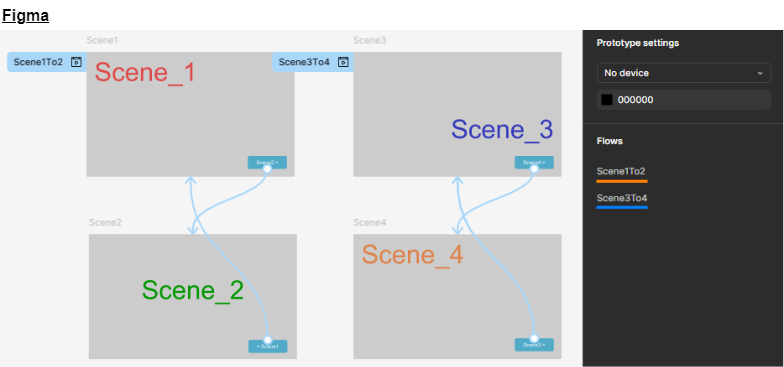
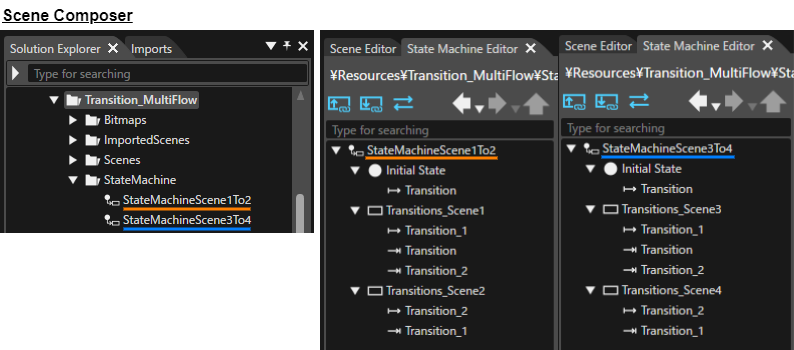
If a Figma file contains multiple flows, Smart Importer imports each flow as an independent state machine.

<div drawio-diagram="7125"><img src="https://doc3161en.candera.eu/uploads/images/drawio/2024-10/drawing-7-1729503521.png" alt=""/></div>

<div drawio-diagram="7124"><img src="https://doc3161en.candera.eu/uploads/images/drawio/2024-10/drawing-7-1729503495.png" alt=""/></div>

<p class="callout info">If you include a transition from one flow in a separate flow (that is, when a transition is duplicated), Smart Importer does not import the separate flow.   
</p>

##### Names and Behavior After Importing as a State Machine

- Names After Import 
    - The name of the state machine after import is `StateMachine<Flow Name>`.
    - After import, each state has the same name as the Figma item that Smart Importer imports as a scene.
- <div class="scriptor-paragraph">In Figma, you can select the interaction that triggers screen transitions, such as click, drag, or mouse over. </div><div class="scriptor-paragraph">Regardless of the interaction that you defined in Figma, Smart Importer sets Scene Composer's Transition properties as follows:  
    </div>
    
    
    - **Event**: &#96;Clicked&#96;
    - **Condition**: &#96;Check Click&#96;

---

#### Importing a Layout

##### Auto layout

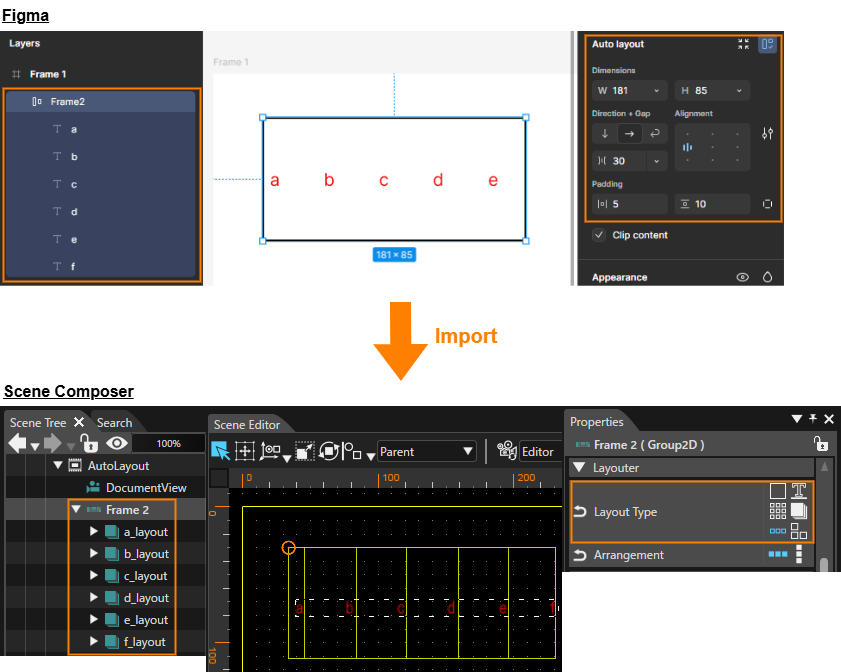
If you set **Auto layout** on a Figma **Frame**, Smart Importer imports the frame as a **Stack Layout** in **Scene Composer** and applies each Auto layout setting as a Stack Layout property.

<div drawio-diagram="8009"><img src="https://doc3161en.candera.eu/uploads/images/drawio/2025-02/drawing-7-1740634409.png" alt=""/></div>

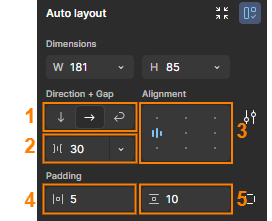
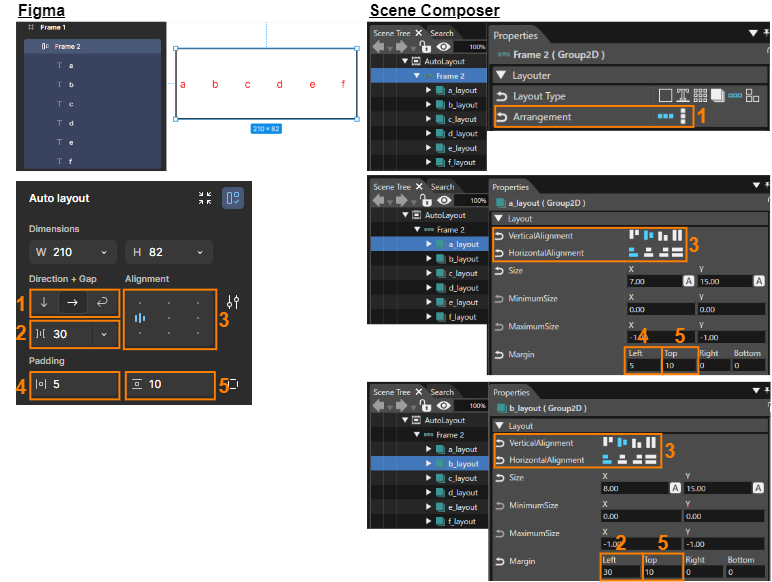
Smart Importer applies Figma Auto layout settings as properties of Scene Composer's Stack Layout:

<div drawio-diagram="7128"><img src="https://doc3161en.candera.eu/uploads/images/drawio/2024-10/drawing-7-1729578499.png" alt=""/></div>

<table border="1" id="bkmrk-auto-layout-%EF%BC%88figma%EF%BC%89-" style="border-collapse: collapse; width: 97.037%; height: 648.266px;"><colgroup><col style="width: 4.45869%;"></col><col style="width: 22.0387%;"></col><col style="width: 73.5046%;"></col></colgroup><tbody><tr style="height: 57.7812px;"><td style="height: 57.7812px; background-color: rgb(230, 126, 35);">  
</td><td class="align-center" style="height: 57.7812px; background-color: rgb(230, 126, 35);"><span style="color: rgb(255, 255, 255);">**Auto layout**</span>

<span style="color: rgb(255, 255, 255);">**(Figma)**</span>

</td><td class="align-center" style="height: 57.7812px; background-color: rgb(230, 126, 35);"><span style="color: rgb(255, 255, 255);">**Stack Layout Properties**</span>

<span style="color: rgb(255, 255, 255);">**(Scene Composer)**</span>

</td></tr><tr style="height: 57.7812px;"><td rowspan="2" style="height: 214.422px; background-color: rgb(230, 126, 35);"><span style="color: rgb(255, 255, 255);">**1**</span>  
<span style="color: rgb(255, 255, 255);">  
</span><span style="color: rgb(255, 255, 255);">  
</span></td><td style="height: 57.7812px;">**Direction**

</td><td style="height: 57.7812px;">Stack Layout

**Layouter &gt; Arrangement**

</td></tr><tr style="height: 156.641px;"><td colspan="2" style="height: 156.641px;"><table border="1" style="width: 100.137%; height: 119.188px;"><colgroup><col style="width: 22.5412%;"></col><col style="width: 77.4588%;"></col></colgroup><tbody><tr style="height: 29.7969px;"><td class="align-center" style="background-color: rgb(230, 126, 35); height: 29.7969px;"><span style="color: rgb(255, 255, 255);">Direction</span></td><td class="align-center" style="background-color: rgb(230, 126, 35); height: 29.7969px;"><span style="color: rgb(255, 255, 255);">Arrangement</span></td></tr><tr style="height: 29.7969px;"><td style="height: 29.7969px;">**Vertical layout**</td><td style="height: 29.7969px;">Vertical</td></tr><tr style="height: 29.7969px;"><td style="height: 29.7969px;">**Horizontal layout**</td><td rowspan="2" style="height: 59.5938px;">Horizontal  
</td></tr><tr style="height: 29.7969px;"><td style="height: 29.7969px;">**Wrap**</td></tr></tbody></table>

</td></tr><tr style="height: 46.0156px;"><td rowspan="2" style="background-color: rgb(230, 126, 35); height: 202.719px;"><span style="color: rgb(255, 255, 255);">**2**</span>  
<span style="color: rgb(255, 255, 255);">  
</span></td><td style="height: 46.0156px;">**Gap**</td><td style="height: 46.0156px;">Each node after the first node in the Stack Layout  
**Layout &gt; Margin &gt; Left or Top**

</td></tr><tr style="height: 156.703px;"><td colspan="2" style="height: 156.703px;"><table border="1" style="border-collapse: collapse; width: 100.137%;"><colgroup><col style="width: 22.4044%;"></col><col style="width: 77.5956%;"></col></colgroup><tbody><tr><td class="align-center" style="height: 29.8785px; background-color: rgb(230, 126, 35);"><span style="color: rgb(255, 255, 255);">Direction</span></td><td class="align-center" style="height: 29.8785px; background-color: rgb(230, 126, 35);"><span style="color: rgb(255, 255, 255);">Margin</span></td></tr><tr><td>**Vertical layout**</td><td>Top</td></tr><tr><td>**Horizontal layout**</td><td rowspan="2">Left  
</td></tr><tr><td>**Wrap**</td></tr></tbody></table>

</td></tr><tr style="height: 57.7812px;"><td style="background-color: rgb(230, 126, 35); height: 57.7812px;"><span style="color: rgb(255, 255, 255);">**3**</span></td><td style="height: 57.7812px;">**Alignment**</td><td style="height: 57.7812px;">Nodes included in a Stack Layout

**Layout &gt; VerticalAlignment and HorizontalAlignment**

</td></tr><tr style="height: 57.7812px;"><td style="height: 57.7812px; background-color: rgb(230, 126, 35);"><span style="color: rgb(255, 255, 255);">**4**</span></td><td style="height: 57.7812px;">**Padding (Horizontal)**</td><td style="height: 57.7812px;">The node to be placed at the leftmost position of the Stack Layout  
**Layout &gt; Margin &gt; Left**

</td></tr><tr style="height: 57.7812px;"><td style="height: 57.7812px; background-color: rgb(230, 126, 35);"><span style="color: rgb(255, 255, 255);">**5**</span></td><td style="height: 57.7812px;">**Padding (Vertical)**</td><td style="height: 57.7812px;">The topmost node in the Stack Layout  
**Layout &gt; Margin &gt; Top**

</td></tr></tbody></table>

The following example shows how Scene Composer's Stack Layout inherits Figma's horizontal Auto layout settings.

<div drawio-diagram="7189"><img src="https://doc3161en.candera.eu/uploads/images/drawio/2024-10/drawing-7-1730094273.png" alt=""/></div>

##### Text Layout

When Smart Importer imports a Figma text layer into Scene Composer, it creates a Group node with LayoutType **Overlay**, and additionally a TextNode under that group.

<div drawio-diagram="7574"><img src="https://doc3161en.candera.eu/uploads/images/drawio/2024-11/drawing-5-1732891835.png" alt=""/></div>

In addition, Scene Composer's TextNode layout property inherits the Typography Alignment settings from the Figma text layer.

<div drawio-diagram="7575"><img src="https://doc3161en.candera.eu/uploads/images/drawio/2024-11/drawing-5-1732891908.png" alt=""/></div>

---

#### Importing Fonts

When importing Figma data with Smart Importer, you can import any fonts that are used in the Figma design but are not available in the current Scene Composer solution.

During import, Smart Importer compares the fonts used in the Figma design with the fonts available in the solution. If it detects a missing font, Smart Importer opens the Smart Importer dialog and displays font-selection options.

In the Smart Importer dialog, select one of the following options for each missing font:

<div id="bkmrk-replace-it-with-an-e">

- Replace it with an existing font (select an existing font from the dropdown menu)
- Import the font as a new resource (select **Import** from the dropdown menu)

</div><div drawio-diagram="9020"><img src="https://doc3161en.candera.eu/uploads/images/drawio/2026-06/drawing-7-1780564485.png" alt=""/></div>

<div id="bkmrk--54"></div><div id="bkmrk-if-import-is-selecte">If you select **Import**, Smart Importer adds the corresponding font to the solution and stores it in the <code>Resources&#92;Fonts</code> folder. <div>If you select an existing font, Smart Importer applies that font to the imported data.</div></div><p class="callout info">In the Smart Importer dialog, Smart Importer displays the **Import** option for each font in the dropdown menu only when it can import the corresponding font.</p>

<p class="callout info">If the `Resources\Fonts` folder does not exist in the solution, Smart Importer automatically creates it.</p>

---

#### Automatic Text Mapping

During the import of Figma data, Smart Importer can compare the TextNode content with the Language Table and automatically assign matching Text IDs. Previously, you had to manually assign a Text ID to each TextNode after import. This feature enables automation of the mapping process.

Smart Importer compares the displayed text Strings in the Figma data with the Master Language Strings in the Language Table. If it finds a matching String, it automatically assigns the corresponding Text ID for that String.

##### Configuration

<div id="bkmrk-smart-importer-123"><div>Enable or disable this feature in the Smart Importer dialog under the **Import Settings** tab using the **Map language table to texts** option. Smart Importer enables this setting by default.</div><div><div drawio-diagram="9021"><img src="https://doc3161en.candera.eu/uploads/images/drawio/2026-06/drawing-7-1780564599.png" alt=""/></div>

</div></div>
##### Behavior

The feature workflow includes the following three steps: Smart Importer retrieves the text, compares it with the Language Table and assigns the Text ID.

1. Smart Importer retrieves the text String from the TextNode  
    In the following example, it retrieves the String "TEST".  
    <div drawio-diagram="9025"><img src="https://doc3161en.candera.eu/uploads/images/drawio/2026-06/drawing-7-1781072528.png" alt=""/></div>
2. Smart Importer compares the retrieved String with the master language in the Language Table  
    
    In the following example, it compares the String retrieved in step 1 with the master language \[00\] in the **Language Table**.
    
    <div drawio-diagram="9022"><img src="https://doc3161en.candera.eu/uploads/images/drawio/2026-06/drawing-7-1780564721.png" alt=""/></div>
3. If Smart Importer finds a match, it assigns the Text ID  
    <div>In the example below, it assigns the Text ID of the matching Language Table entry to the TextNode <div drawio-diagram="9024"><img src="https://doc3161en.candera.eu/uploads/images/drawio/2026-06/drawing-7-1780564930.png" alt=""/></div>
    
    </div>

<p class="callout info">If multiple Text IDs exist for the same text String, Smart Importer uses the first matching Text ID.</p>

<p class="callout info">If there is no matching text String, Smart Importer does not assign a Text ID.</p>

---

# The example file of Figma

This section describes how to use the instrument cluster as a Figma design file. The example file is stored in the following location.

<span style="color: rgb(0, 0, 0);">`<root>/cgi_studio_content/2D/Figma/AI_Cluster_Sample.fig`</span>

Due to technical limitations, Scene Composer cannot open Figma design files directly. For this reason, the first step is to import them into your personal Figma account.

1. Log in to your Figma account.  
    <div drawio-diagram="3723"><img src="https://doc3161en.candera.eu/uploads/images/drawio/2023-06/drawing-4-1686099974.png" alt=""/></div>
2. In your Figma account, click **Import Files** and load the ***AI\_Cluster\_Sample.fig*** file.  
    <div drawio-diagram="3724"><img src="https://doc3161en.candera.eu/uploads/images/drawio/2023-06/drawing-4-1686099989.png" alt=""/></div>
3. Figma uploads the ***AI\_Cluster\_Sample.fig*** file to your account.  
    <div drawio-diagram="3725"><img src="https://doc3161en.candera.eu/uploads/images/drawio/2023-06/drawing-4-1686100005.png" alt=""/></div>
4. After Figma uploads the file, ***AI\_Cluster\_Sample*** appears in your file list.  
    <div drawio-diagram="3726"><img src="https://doc3161en.candera.eu/uploads/images/drawio/2023-06/drawing-4-1686100021.png" alt=""/></div>

To import this sample file using the Smart Importer, select **Import &gt; Smart Importer &gt; Import from Cloud Resource...** from the menu and follow the import instructions. See <span style="background-color: rgb(255, 255, 255);"><span style="color: rgb(230, 126, 35);">[Figma import instructions](https://doc3161en.candera.eu/books/import-of-resources/page/figma)</span> </span>for more information.