# Basic Operations

This section describes the basic operations in Smart Importer.

#### Import File Formats

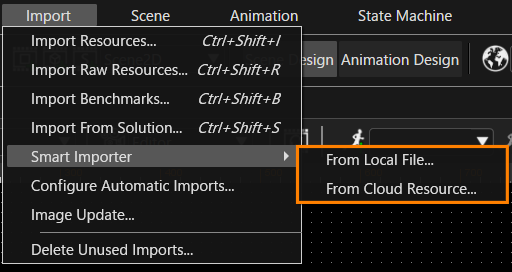
The Smart Importer imports files using one of the following two methods, depending on the file format:

- Local files: \*.psd, \*.xscil, \*.xd
- Cloud resources: Figma data

<div drawio-diagram="6896"><img src="https://doc3161en.candera.eu/uploads/images/drawio/2024-10/drawing-4-1727940873.png" alt=""/></div>

<p class="callout info">For more information on the Photoshop layer structure format, see <span style="color: rgb(230, 126, 35);">[Recommended Layers Structure for Smart Importer](https://doc3161en.candera.eu/books/import-of-resources/page/recommended-layers-structure-for-smart-importer)</span>.</p>

#### Restore Settings

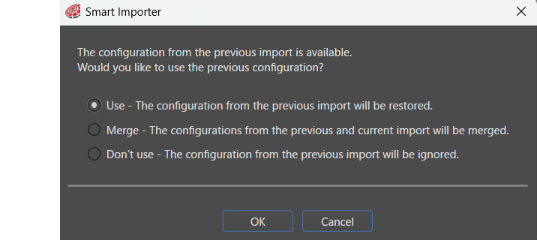
The Smart Importer saves the settings that you applied when configuring the import in the solution along with the imported scene. Therefore, when you importing the same file again to the same path in **Solution Explorer**, the Smart Importer displays a dialog asking if you want to use the saved settings.
<div drawio-diagram="8929"><img src="https://doc3161en.candera.eu/uploads/images/drawio/2026-02/drawing-7-1770713035.png" alt=""/></div>

<table border="1" class="align-center" id="bkmrk-restore-saved-settin" style="border-collapse: collapse; width: 700px; border-width: 1px; height: 59.4034px;"><colgroup><col style="width: 24.7475%;"></col><col style="width: 75.3648%;"></col></colgroup><tbody><tr style="height: 29.7017px;"><td class="align-left" style="border-width: 1px; height: 29.7017px;">Use</td><td class="align-left" style="border-width: 1px; height: 29.7017px;">The Smart Importer applies the saved settings.</td></tr><tr><td class="align-left" style="border-width: 1px;">Merge</td><td class="align-left" style="border-width: 1px;">Merges both the saved settings and the new settings.</td></tr><tr style="height: 29.7017px;"><td class="align-left" style="border-width: 1px; height: 29.7017px;">Don't use</td><td class="align-left" style="border-width: 1px; height: 29.7017px;">The Smart Importer does not apply saved settings and creates new settings.</td></tr></tbody></table>

If an image has been replaced in an imported file, select the **Use** Radiobutton to replace the old image in the scene with the updated image while maintaining the previous mapping between layers and colors.

For other behaviors when reimporting files, see <span style="color: rgb(230, 126, 35);">[reimporting files](https://doc3161en.candera.eu/link/1150#bkmrk-re-importing-a-file-)</span>.

#### Conversion to 2D Nodes

During import, Smart Importer converts specific elements, such as Photoshop artboards and Color Pickers, to optimal nodes in Scene Composer.

<table border="1" class="align-center" id="bkmrk-artboards-artboards-" style="border-collapse: collapse; width: 700px; border-width: 1px;"><colgroup><col style="width: 120px;"></col><col style="width: 580px;"></col></colgroup><tbody><tr><td class="align-left" style="border-width: 1px;">Artboards</td><td class="align-left" style="border-width: 1px;">Smart Importer can treat artboards in the file you imported as Group Node.

</td></tr><tr><td class="align-left" style="border-width: 1px;">Color Picker</td><td class="align-left" style="border-width: 1px;">Smart Importer can treat Color Pickers in the file you imported as Solid Color Nodes. In this case, the solid color layer uses the same icon as the Solid Color Node in Smart Importer.

</td></tr></tbody></table>

You cannot edit the **Appearance** tab under any of the following conditions:

- The layer of the file to be imported does not have image information.
- The applied control does not have a properties that refers to an image.

In all other cases, the same options are available as for image layers. For example, the **Layer Mapping** section can generate image resources after you map control properties to a layer. Similarly, other prototyping tools do the same with Color Pickers.

<p class="callout info">For each node in a 2D scene, see <span style="color: rgb(230, 126, 35);">[2D scene nodes](https://doc3161en.candera.eu/link/147#bkmrk-create-2d-nodes)</span>.</p>

#### Control instance configured with Smart Importer

After you finished applying the detected controls and configuring images, pivot points, and other properties, click **OK** at the bottom of the Smart Importer dialog to import the configured file.

<p class="callout info">See the <span style="color: rgb(230, 126, 35);">[Smart Importer UI](https://doc3161en.candera.eu/books/import-of-resources/page/smart-impoter-ui)</span> for details on what to configure in each part of the Smart Importer dialog.</p>

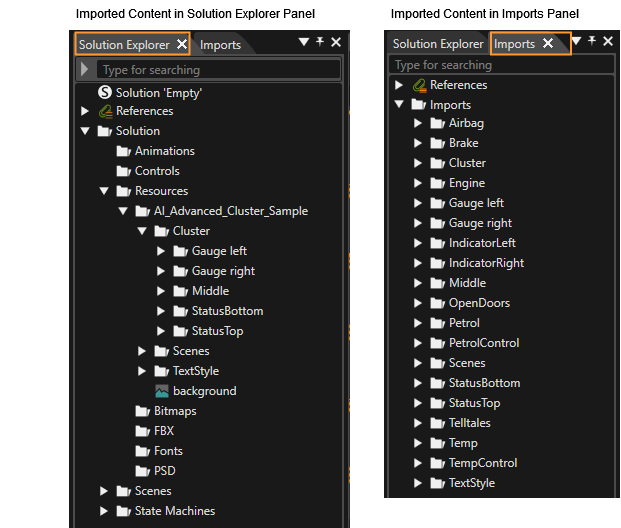
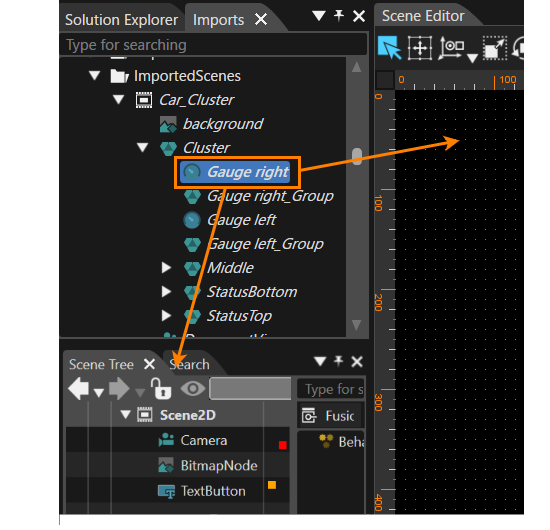
The Smart Importer imports the configured file to the location specified in the <span style="color: rgb(230, 126, 35);">[Import Settings Tab](https://doc3161en.candera.eu/link/1148#bkmrk-%E3%82%A4%E3%83%B3%E3%83%9D%E3%83%BC%E3%83%88%E8%A8%AD%E5%AE%9A)</span> using the configured settings. Note that you can view the control instance configured in Smart Importer , such as **Gauge left** in the image below, in the **Imports** panel.
<div drawio-diagram="6738"><img src="https://doc3161en.candera.eu/uploads/images/drawio/2024-09/drawing-5-1725628567.png" alt=""/></div>

You can use control instances configured in Smart Importer in the Scene Editor or drag them into the Scene Tree.

<div drawio-diagram="7570"><img src="https://doc3161en.candera.eu/uploads/images/drawio/2024-11/drawing-5-1732885515.png" alt=""/></div>

#### Configure Scenes

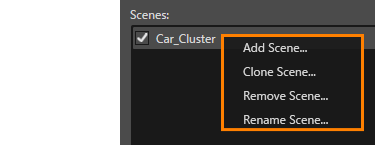
The **Import Settings** tab allows you to manage scenes that you import into Scene Composer. To see the available options, select a target scene from **Scenes**, then right-click the target scene:

<div drawio-diagram="5367"><img src="https://doc3161en.candera.eu/uploads/images/drawio/2024-03/drawing-4-1710298666.png" alt=""/></div>

<table border="1" class="align-center" id="bkmrk-%E3%82%B7%E3%83%BC%E3%83%B3%E3%82%92%E8%BF%BD%E5%8A%A0-%E6%96%B0%E8%A6%8F%E3%82%B7%E3%83%BC%E3%83%B3%E3%82%92%E8%BF%BD%E5%8A%A0%E3%81%97%E3%81%BE%E3%81%99%E3%80%82%E3%81%AA" style="border-collapse: collapse; width: 695px; border-width: 1px; height: 193.183px;"><colgroup><col style="width: 136px;"></col><col style="width: 558px;"></col></colgroup><tbody><tr style="height: 79.8667px;"><td class="align-left" style="border-width: 1px; height: 79.8667px;">**Add Scene**</td><td class="align-left" style="border-width: 1px; height: 79.8667px;">Adds a new scene. The Smart Importer clears all checkboxes for each element displayed in the Layer Tree.

After you select this option, the **Add Scene...** dialog box appears. Enter a name for the new scene.

</td></tr><tr style="height: 63.0667px;"><td class="align-left" style="border-width: 1px; height: 63.0667px;">**Clone Scene**</td><td class="align-left" style="border-width: 1px; height: 63.0667px;">The Smart Importer duplicates the scene while maintaining the configuration on the current Layer Tree.

After you select this option, the **Add Scene...** dialog box appears. Enter a name for the new scene.

</td></tr><tr style="height: 29.4667px;"><td class="align-left" style="border-width: 1px; height: 29.4667px;">**Remove Scene**

</td><td class="align-left" style="border-width: 1px; height: 29.4667px;">Deletes the selected scene.</td></tr><tr style="height: 20.7833px;"><td class="align-left" style="border-width: 1px; height: 20.7833px;">**Rename Scene**</td><td class="align-left" style="border-width: 1px; height: 20.7833px;">Rename the scene. You can also double-click the target scene name to change the name.

</td></tr></tbody></table>

#### TextStyle

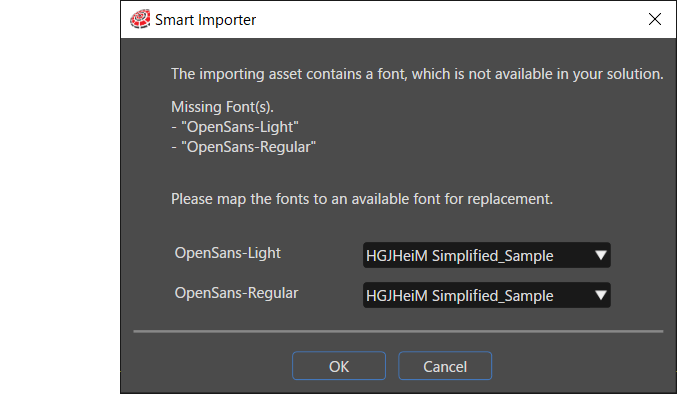
When you import a Text Layer into Scene Composer, Scene Composer creates a a new TextStyle. Its name combines the font name and font size used in the Text Layer of the PSD file. When Scene Composer creates a new TextStyle, it checks whether the Scene Composer solution includes a font resource with the corresponding name. If Scene Composer cannot find the appropriate font resources in the solution, it displays a dialog box like the one below.

If the font does not exist in the solution, you can use an existing font resource by specifying an alternative font on this dialog.

<div drawio-diagram="6869"><img src="https://doc3161en.candera.eu/uploads/images/drawio/2024-09/drawing-4-1727138202.png" alt=""/></div>

#### Text and text-containing controls

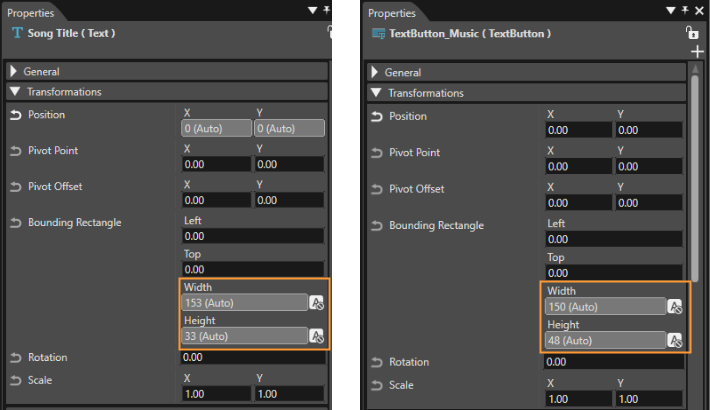
Scene Composer imports the bounding rectangle (width and height) of text and controls containing text as automatic values.

<div drawio-diagram="6741"><img src="https://doc3161en.candera.eu/uploads/images/drawio/2024-09/drawing-5-1725631019.png" alt=""/></div>

#### Global State Machine

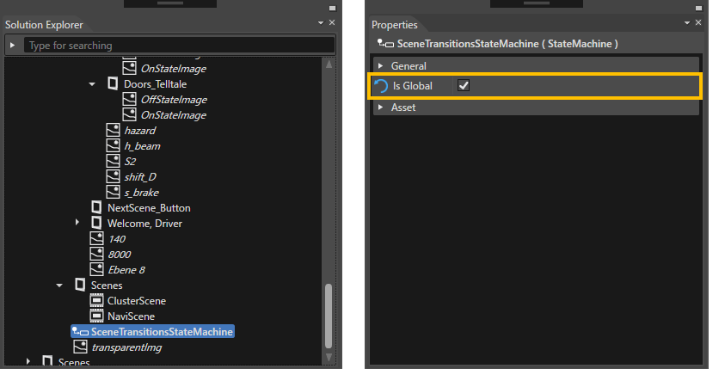
Scene Composer imports all State Machine elements as Global State Machine elements and does not display a confirmation dialog.

<div drawio-diagram="5371"><img src="https://doc3161en.candera.eu/uploads/images/drawio/2024-03/drawing-4-1710298910.png" alt=""/></div>

<div drawio-diagram="501"></div>