# Figma

Smart Importer can import Figma data. This page explains how to import Figma data with Smart Importer and how to work with the results.

<p class="callout warning">You cannot import Figma data for which you do not have editing privileges.</p>

---

### Preparations for Importing Figma Data

#### Preparing the URL and Access Token  


Before you import Figma data with Smart Importer, acquire the URL and access token for the Figma data.

Obtain the URL and access token in the Figma Desktop App as follows.

<p class="callout info">Ensure that you have access to the Figma REST API (<span style="color: rgb(230, 126, 35);">[https://api.figma.com](https://api.figma.com)</span>). In case of a connectivity issue, contact your IT department because a firewall might block the API.  
</p>

##### Acquiring the URL

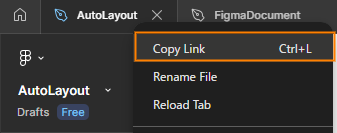
In the top bar of the Figma Desktop App, right-click the relevant project tab, and then select **Copy Link** from the context menu.

<div drawio-diagram="8004"><img src="https://doc3161en.candera.eu/uploads/images/drawio/2025-02/drawing-7-1740621465.png" alt=""/></div>

##### Acquiring the Access Token

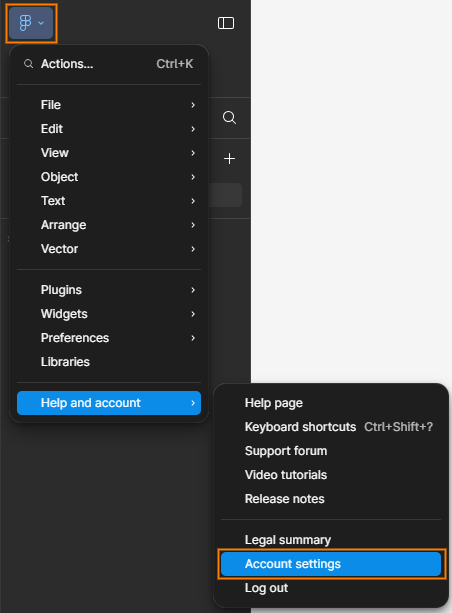
1. In the Figma Desktop App, select **Figma Icon &gt; Help and Account &gt; Account Settings** to open the dialog.  
    <div drawio-diagram="8005"><img src="https://doc3161en.candera.eu/uploads/images/drawio/2025-02/drawing-7-1740621587.png" alt=""/></div>
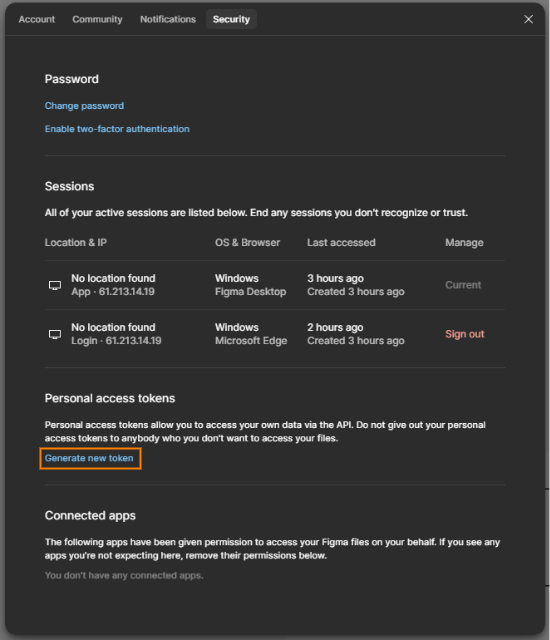
2. In the **Security** tab of the dialog, click **Generate new token** under **Personal access tokens**.  
    <div drawio-diagram="8006"><img src="https://doc3161en.candera.eu/uploads/images/drawio/2025-02/drawing-7-1740621955.png" alt=""/></div>
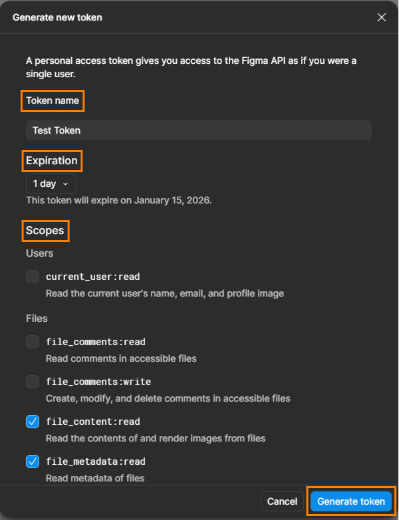
3. In the **Generate new token** dialog, set the **Token name, Expiration**, and **Scopes**, and then click **Generate token**.  
    <div drawio-diagram="8907"><img src="https://doc3161en.candera.eu/uploads/images/drawio/2026-01/drawing-7-1768380041.png" alt=""/></div>
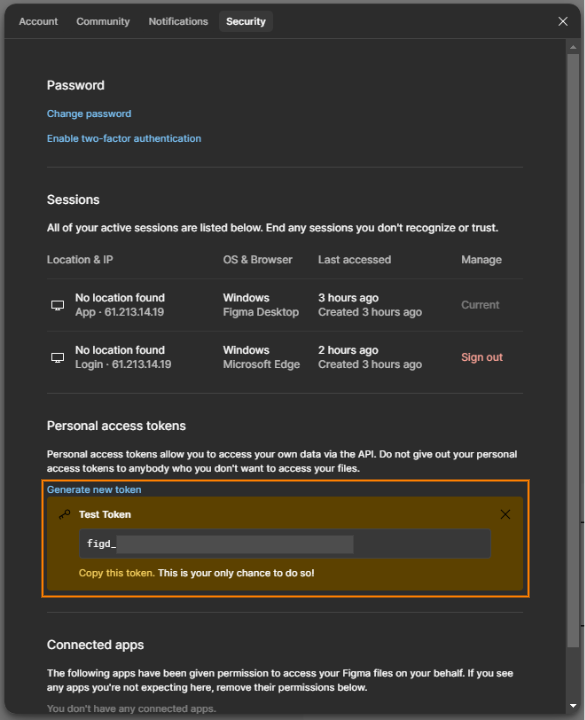
4. Figma displays the created access token under **Personal access tokens** on the **Security** tab of the dialog.  
    <div drawio-diagram="8008"><img src="https://doc3161en.candera.eu/uploads/images/drawio/2025-02/drawing-7-1740622348.png" alt=""/></div>

<p class="callout info">The instructions on how to obtain the URL and access token apply to Figma Desktop App version 125.10.8.</p>

---

### How to Import Figma Data

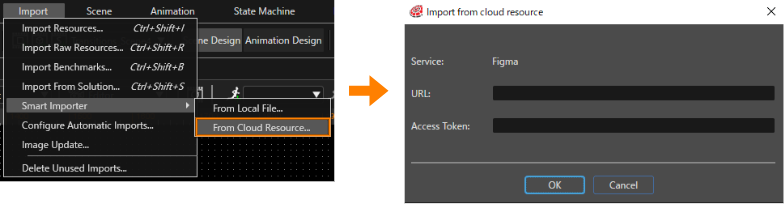
1. From the Scene Composer toolbar, select **Import &gt; Smart Importer &gt; From Cloud Resource...**
    - Scene Composer displays a new dialog titled **Import from cloud resource**.
    
    <div drawio-diagram="7111"><img src="https://doc3161en.candera.eu/uploads/images/drawio/2024-10/drawing-7-1729497030.png" alt=""/></div>
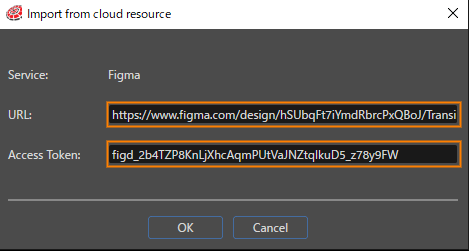
2.  Enter the URL and access token in the respective fields and click **OK**. For information about acquiring the URL and access token, see <span style="color: rgb(0, 0, 0);"><span style="color: rgb(230, 126, 35);">[Preparing the URL and Access Token](#bkmrk-PreparingTheURLAndAccessToken)</span>.</span><div drawio-diagram="7110"><img src="https://doc3161en.candera.eu/uploads/images/drawio/2024-10/drawing-7-1729496909.png" alt=""/></div>
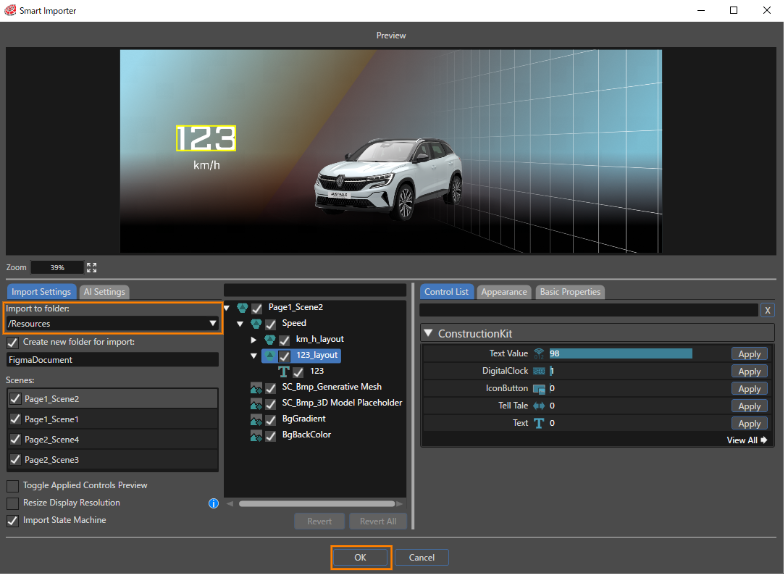
3. The Smart Importer dialog opens. The procedure for using Smart Importer is the same as for other file types. 
    - For details, see <span style="color: rgb(230, 126, 35);">[3. Scene Composer &gt; Import of Resources &gt; Smart Importer &gt; Basic Operation](https://doc3161en.candera.eu/books/import-of-resources/page/basic-operations "Smart Importer")</span>.
4. Adjust the necessary settings, and then click **OK**. 
    - Smart Importer imports the data into the folder that you specified <span style="color: rgb(0, 0, 0);">in **Import to folder**.</span><div drawio-diagram="7112"><img src="https://doc3161en.candera.eu/uploads/images/drawio/2024-10/drawing-7-1729497265.png" alt=""/></div>
        
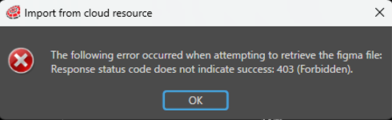
        <p class="callout info">If you entered an incorrect or invalid URL or access token in the **Import from cloud resource** dialog, Smart Importer stops the import and displays the following error dialog.</p>
        
        <div drawio-diagram="9126"><img src="https://doc3161en.candera.eu/uploads/images/drawio/2026-07/drawing-7-1784179561.png" alt=""/></div>

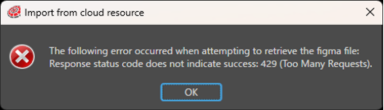
<p class="callout info">API access limits vary depending on your subscription plan. If your API requests exceed that limit, Smart Importer stops the import and displays the following error dialog. For details on each plan, see Figma’s official website.</p>

<div drawio-diagram="9127"><img src="https://doc3161en.candera.eu/uploads/images/drawio/2026-07/drawing-7-1784179587.png" alt=""/></div>

---

### Importing Figma Data - Advanced  


#### Importing as a scene

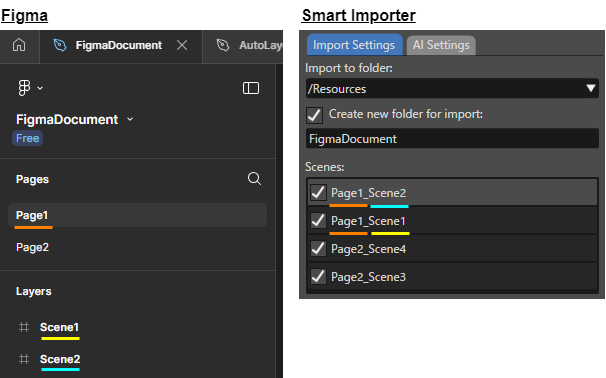
Smart Importer imports the topmost item of each page in the Figma data as a scene.   
Use the following naming : `<span style="color: rgb(0, 0, 0);"><Page name>_<Parent item name></span>`

<div drawio-diagram="7113"><img src="https://doc3161en.candera.eu/uploads/images/drawio/2024-10/drawing-7-1729498578.png" alt=""/></div>

#### Relationship between Figma items and Scene Composer Nodes   


When you import Figma items with Smart Importer, Smart Importer imports each item as a specific type of node, as shown in the following table.

<table border="1" id="bkmrk-scene-composer-node-" style="border-collapse: collapse; width: 100%; height: 327.766px; border-width: 1px;"><colgroup><col style="width: 23.3622%;"></col><col style="width: 25.8344%;"></col><col style="width: 17.1817%;"></col><col style="width: 16.6891%;"></col><col style="width: 16.809%;"></col></colgroup><tbody><tr style="height: 29.7969px;"><td colspan="2" rowspan="2" style="height: 59.5938px; border-width: 1px;">  
</td><td class="align-center" colspan="3" style="height: 29.7969px; border-width: 1px;">Scene Composer node type  
</td></tr><tr style="height: 29.7969px;"><td class="align-center" style="height: 29.7969px; border-width: 1px;">Group</td><td class="align-center" style="height: 29.7969px; border-width: 1px;">Bitmap</td><td class="align-center" style="height: 29.7969px; border-width: 1px;">Text</td></tr><tr style="height: 29.7969px;"><td rowspan="14" style="height: 268.172px; border-width: 1px;">Figma item type  
</td><td style="height: 29.7969px; border-width: 1px;">Component</td><td class="align-center" style="height: 29.7969px; border-width: 1px;">✓</td><td class="align-center" style="height: 29.7969px; border-width: 1px;">  
</td><td class="align-center" style="height: 29.7969px; border-width: 1px;">  
</td></tr><tr style="height: 29.7969px;"><td style="height: 29.7969px; border-width: 1px;">ComponentSet</td><td class="align-center" style="height: 29.7969px; border-width: 1px;">✓</td><td class="align-center" style="height: 29.7969px; border-width: 1px;">  
</td><td class="align-center" style="height: 29.7969px; border-width: 1px;">  
</td></tr><tr style="height: 29.7969px;"><td style="height: 29.7969px; border-width: 1px;">Ellipse</td><td class="align-center" style="height: 29.7969px; border-width: 1px;">  
</td><td class="align-center" style="height: 29.7969px; border-width: 1px;">✓</td><td class="align-center" style="height: 29.7969px; border-width: 1px;">  
</td></tr><tr style="height: 29.7969px;"><td style="height: 29.7969px; border-width: 1px;">Frame</td><td class="align-center" style="height: 29.7969px; border-width: 1px;">✓</td><td class="align-center" style="height: 29.7969px; border-width: 1px;">  
</td><td class="align-center" style="height: 29.7969px; border-width: 1px;">  
</td></tr><tr style="height: 29.7969px;"><td style="height: 29.7969px; border-width: 1px;">Group</td><td class="align-center" style="height: 29.7969px; border-width: 1px;">✓</td><td class="align-center" style="height: 29.7969px; border-width: 1px;">  
</td><td class="align-center" style="height: 29.7969px; border-width: 1px;">  
</td></tr><tr style="height: 29.7969px;"><td style="height: 29.7969px; border-width: 1px;">Instance</td><td class="align-center" style="height: 29.7969px; border-width: 1px;">✓</td><td class="align-center" style="height: 29.7969px; border-width: 1px;">  
</td><td class="align-center" style="height: 29.7969px; border-width: 1px;">  
</td></tr><tr style="height: 29.7969px;"><td style="height: 29.7969px; border-width: 1px;">Line</td><td class="align-center" style="height: 29.7969px; border-width: 1px;">  
</td><td class="align-center" style="height: 29.7969px; border-width: 1px;">✓</td><td class="align-center" style="height: 29.7969px; border-width: 1px;">  
</td></tr><tr style="height: 29.7969px;"><td style="height: 29.7969px; border-width: 1px;">Polygon</td><td class="align-center" style="height: 29.7969px; border-width: 1px;">  
</td><td class="align-center" style="height: 29.7969px; border-width: 1px;">✓</td><td class="align-center" style="height: 29.7969px; border-width: 1px;">  
</td></tr><tr style="height: 29.7969px;"><td style="height: 29.7969px; border-width: 1px;">Rectangle</td><td class="align-center" style="height: 29.7969px; border-width: 1px;">  
</td><td class="align-center" style="height: 29.7969px; border-width: 1px;">✓</td><td class="align-center" style="height: 29.7969px; border-width: 1px;">  
</td></tr><tr><td style="border-width: 1px;">Section</td><td class="align-center" style="border-width: 1px;">✓</td><td class="align-center" style="border-width: 1px;">  
</td><td class="align-center" style="border-width: 1px;">  
</td></tr><tr><td style="border-width: 1px;">Slice</td><td class="align-center" style="border-width: 1px;">  
</td><td class="align-center" style="border-width: 1px;">✓</td><td class="align-center" style="border-width: 1px;">  
</td></tr><tr><td style="border-width: 1px;">Star</td><td class="align-center" style="border-width: 1px;">  
</td><td class="align-center" style="border-width: 1px;">✓</td><td class="align-center" style="border-width: 1px;">  
</td></tr><tr><td style="border-width: 1px;">Text</td><td class="align-center" style="border-width: 1px;">  
</td><td class="align-center" style="border-width: 1px;">  
</td><td class="align-center" style="border-width: 1px;">✓</td></tr><tr><td style="border-width: 1px;">Vector</td><td class="align-center" style="border-width: 1px;">  
</td><td class="align-center" style="border-width: 1px;">✓</td><td class="align-center" style="border-width: 1px;">  
</td></tr></tbody></table>

<p class="callout info">Smart Importer imports bitmap and text items only when Figma provides their render data. For example, if you set a Figma item to **hidden**, Smart Importer cannot import it.</p>

#### Importing as Controls or Bitmaps

Smart Importer can import any Figma item as a control or bitmap. The imported item can contain the following child items:

- Component
- ComponentSet
- Frame
- Group
- Instance
- Section

##### Importing as a control

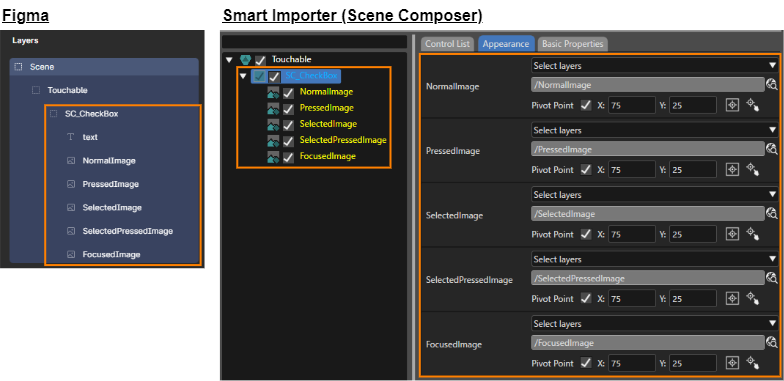
Smart Importer imports an item as a control when the name is <span style="color: rgb(0, 0, 0);">`SC_<control name>`</span>. You can also specify control property values by naming child items after the corresponding control properties. If a child item name matches a control property name in Scene Composer, Smart Importer can automatically map the bitmap from the Figma file to that property.

For example, Scene Composer's **CheckBox** control provides multiple image properties. When a Figma file contains an item named **SC\_CheckBox** with child items whose names match these properties, Smart Importer automatically assigns the corresponding bitmaps to the correct control properties (see the image below). This way, no manual assignment of image properties is necessary in Smart Importer.

<div drawio-diagram="7115"><img src="https://doc3161en.candera.eu/uploads/images/drawio/2024-10/drawing-7-1729499805.png" alt=""/></div>

<p class="callout info">Smart Importer supports this functionality only for *Touchable* and *Common* controls.  
</p>

##### Importing as bitmaps

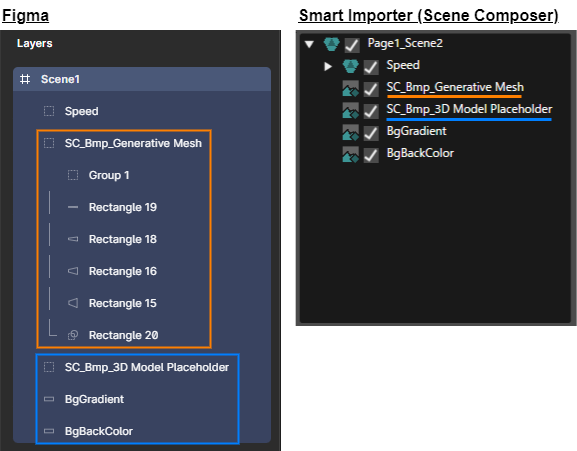
Smart Importer can import group items that contain child items as bitmaps when you prefix the group item name with <span style="color: rgb(0, 0, 0);">`SC_Bmp`.</span>

<div drawio-diagram="7116"><img src="https://doc3161en.candera.eu/uploads/images/drawio/2024-10/drawing-7-1729501904.png" alt=""/></div>

---

#### Import as a State Machine  


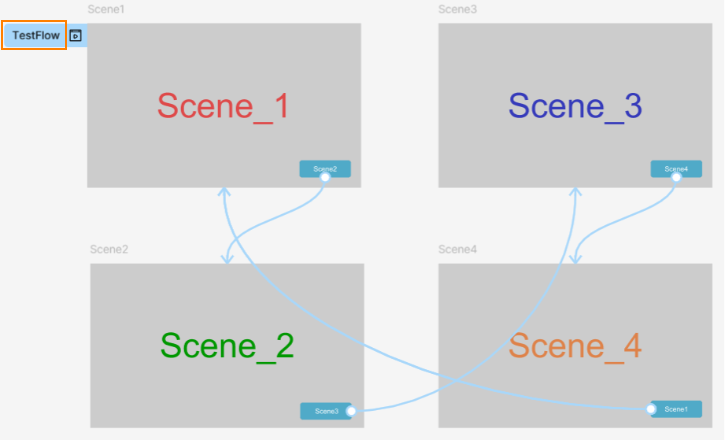
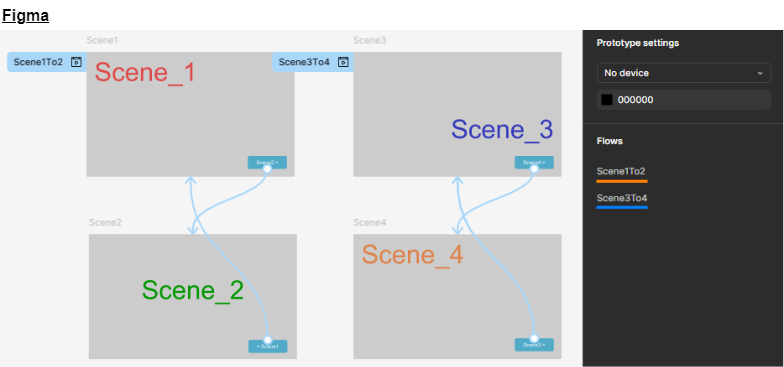
When you define flows (screen transitions) in Figma, Smart Importer imports the structure of screen transitions into Scene Composer as a state machine.    
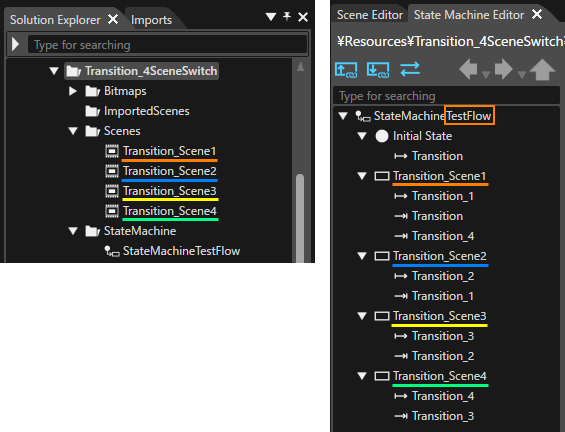
You can review the imported state machine in the **State Machine Editor** in **Scene Composer**.

##### Figma Settings: Scenes and Flows

In Figma, define multiple scenes and the flows that connect them. Create screen transitions beginning with the scene designated as the flow start point.

<div drawio-diagram="8980"><img src="https://doc3161en.candera.eu/uploads/images/drawio/2026-04/drawing-7-1776928546.png" alt=""/></div>

##### The Import Result in Scene Composer

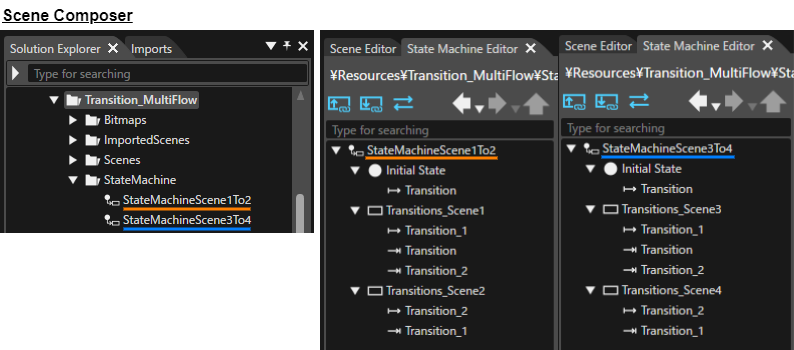
Smart Importer imports the flow structure defined in Figma into CGI Studio as a state machine.

<div drawio-diagram="8981"><img src="https://doc3161en.candera.eu/uploads/images/drawio/2026-04/drawing-7-1776928764.png" alt=""/></div>

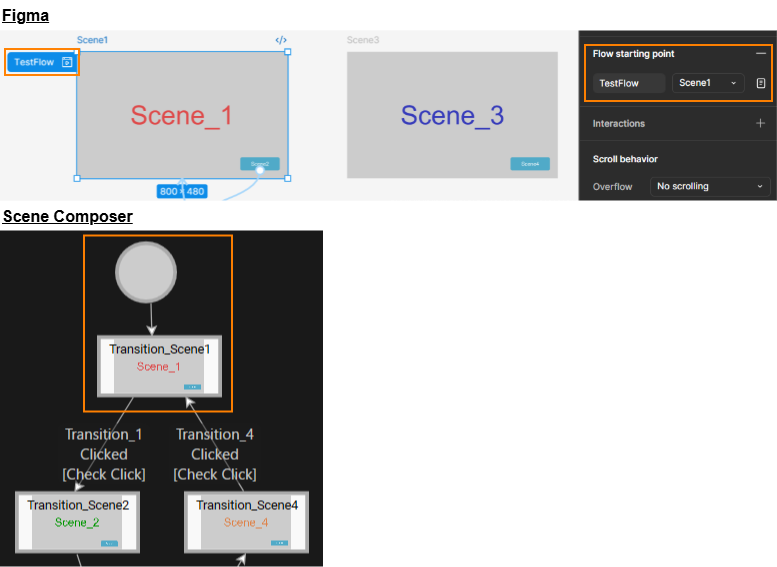
The state machine starts from the state that corresponds to the scene that you set as the flow start point in Figma. After importing, for each generated state, Smart Importer automatically creates a screenshot of the corresponding Figma scene. Scene Composer's State Machine Editor displays this screenshot as a Scene Image.

<div drawio-diagram="8983"><img src="https://doc3161en.candera.eu/uploads/images/drawio/2026-04/drawing-7-1776929717.png" alt=""/></div>

If a Figma file contains multiple flows, Smart Importer imports each flow as an independent state machine.

<div drawio-diagram="7125"><img src="https://doc3161en.candera.eu/uploads/images/drawio/2024-10/drawing-7-1729503521.png" alt=""/></div>

<div drawio-diagram="7124"><img src="https://doc3161en.candera.eu/uploads/images/drawio/2024-10/drawing-7-1729503495.png" alt=""/></div>

<p class="callout info">If you include a transition from one flow in a separate flow (that is, when a transition is duplicated), Smart Importer does not import the separate flow.   
</p>

##### Names and Behavior After Importing as a State Machine

- Names After Import 
    - The name of the state machine after import is `StateMachine<Flow Name>`.
    - After import, each state has the same name as the Figma item that Smart Importer imports as a scene.
- <div class="scriptor-paragraph">In Figma, you can select the interaction that triggers screen transitions, such as click, drag, or mouse over. </div><div class="scriptor-paragraph">Regardless of the interaction that you defined in Figma, Smart Importer sets Scene Composer's Transition properties as follows:  
    </div>
    
    
    - **Event**: &#96;Clicked&#96;
    - **Condition**: &#96;Check Click&#96;

---

#### Importing a Layout

##### Auto layout

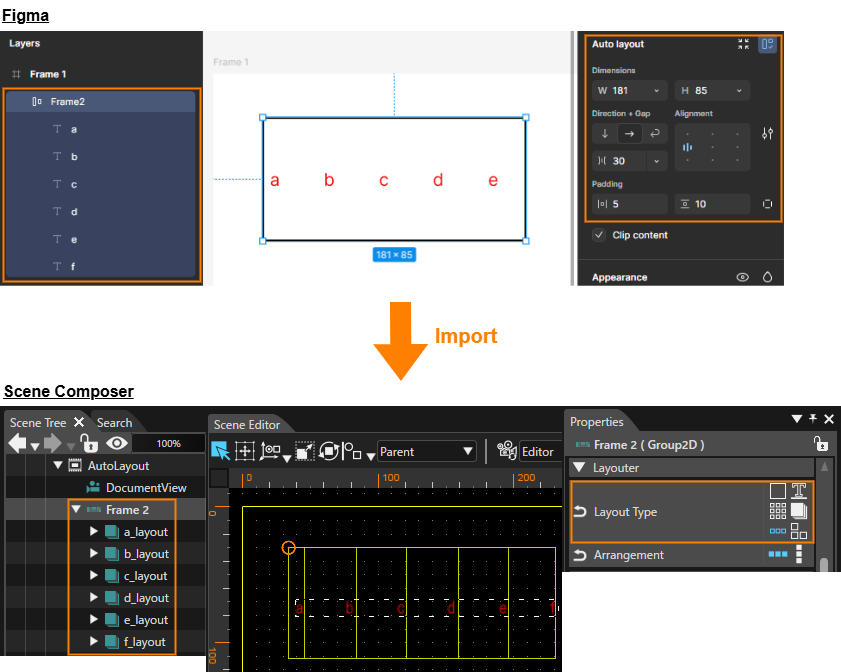
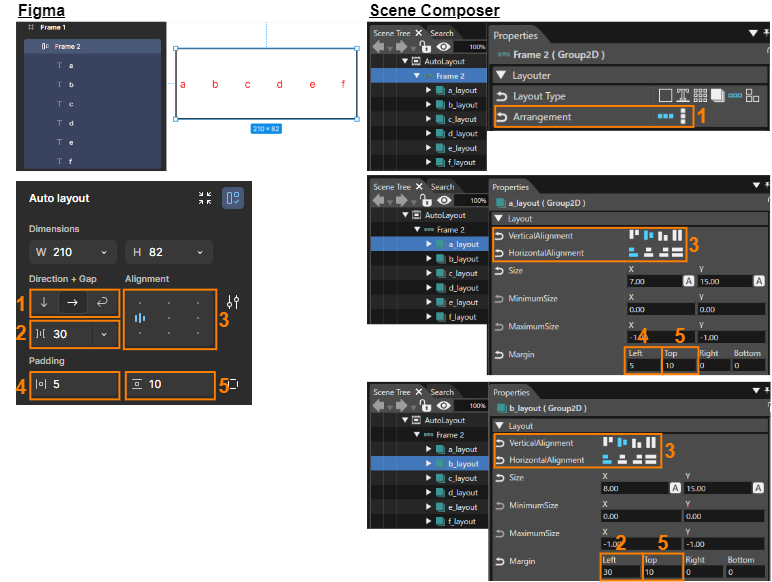
If you set **Auto layout** on a Figma **Frame**, Smart Importer imports the frame as a **Stack Layout** in **Scene Composer** and applies each Auto layout setting as a Stack Layout property.

<div drawio-diagram="8009"><img src="https://doc3161en.candera.eu/uploads/images/drawio/2025-02/drawing-7-1740634409.png" alt=""/></div>

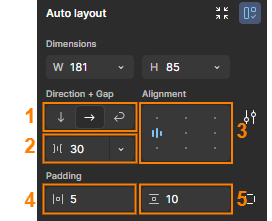
Smart Importer applies Figma Auto layout settings as properties of Scene Composer's Stack Layout:

<div drawio-diagram="7128"><img src="https://doc3161en.candera.eu/uploads/images/drawio/2024-10/drawing-7-1729578499.png" alt=""/></div>

<table border="1" id="bkmrk-auto-layout-%EF%BC%88figma%EF%BC%89-" style="border-collapse: collapse; width: 97.037%; height: 648.266px;"><colgroup><col style="width: 4.45869%;"></col><col style="width: 22.0387%;"></col><col style="width: 73.5046%;"></col></colgroup><tbody><tr style="height: 57.7812px;"><td style="height: 57.7812px; background-color: rgb(230, 126, 35);">  
</td><td class="align-center" style="height: 57.7812px; background-color: rgb(230, 126, 35);"><span style="color: rgb(255, 255, 255);">**Auto layout**</span>

<span style="color: rgb(255, 255, 255);">**(Figma)**</span>

</td><td class="align-center" style="height: 57.7812px; background-color: rgb(230, 126, 35);"><span style="color: rgb(255, 255, 255);">**Stack Layout Properties**</span>

<span style="color: rgb(255, 255, 255);">**(Scene Composer)**</span>

</td></tr><tr style="height: 57.7812px;"><td rowspan="2" style="height: 214.422px; background-color: rgb(230, 126, 35);"><span style="color: rgb(255, 255, 255);">**1**</span>  
<span style="color: rgb(255, 255, 255);">  
</span><span style="color: rgb(255, 255, 255);">  
</span></td><td style="height: 57.7812px;">**Direction**

</td><td style="height: 57.7812px;">Stack Layout

**Layouter &gt; Arrangement**

</td></tr><tr style="height: 156.641px;"><td colspan="2" style="height: 156.641px;"><table border="1" style="width: 100.137%; height: 119.188px;"><colgroup><col style="width: 22.5412%;"></col><col style="width: 77.4588%;"></col></colgroup><tbody><tr style="height: 29.7969px;"><td class="align-center" style="background-color: rgb(230, 126, 35); height: 29.7969px;"><span style="color: rgb(255, 255, 255);">Direction</span></td><td class="align-center" style="background-color: rgb(230, 126, 35); height: 29.7969px;"><span style="color: rgb(255, 255, 255);">Arrangement</span></td></tr><tr style="height: 29.7969px;"><td style="height: 29.7969px;">**Vertical layout**</td><td style="height: 29.7969px;">Vertical</td></tr><tr style="height: 29.7969px;"><td style="height: 29.7969px;">**Horizontal layout**</td><td rowspan="2" style="height: 59.5938px;">Horizontal  
</td></tr><tr style="height: 29.7969px;"><td style="height: 29.7969px;">**Wrap**</td></tr></tbody></table>

</td></tr><tr style="height: 46.0156px;"><td rowspan="2" style="background-color: rgb(230, 126, 35); height: 202.719px;"><span style="color: rgb(255, 255, 255);">**2**</span>  
<span style="color: rgb(255, 255, 255);">  
</span></td><td style="height: 46.0156px;">**Gap**</td><td style="height: 46.0156px;">Each node after the first node in the Stack Layout  
**Layout &gt; Margin &gt; Left or Top**

</td></tr><tr style="height: 156.703px;"><td colspan="2" style="height: 156.703px;"><table border="1" style="border-collapse: collapse; width: 100.137%;"><colgroup><col style="width: 22.4044%;"></col><col style="width: 77.5956%;"></col></colgroup><tbody><tr><td class="align-center" style="height: 29.8785px; background-color: rgb(230, 126, 35);"><span style="color: rgb(255, 255, 255);">Direction</span></td><td class="align-center" style="height: 29.8785px; background-color: rgb(230, 126, 35);"><span style="color: rgb(255, 255, 255);">Margin</span></td></tr><tr><td>**Vertical layout**</td><td>Top</td></tr><tr><td>**Horizontal layout**</td><td rowspan="2">Left  
</td></tr><tr><td>**Wrap**</td></tr></tbody></table>

</td></tr><tr style="height: 57.7812px;"><td style="background-color: rgb(230, 126, 35); height: 57.7812px;"><span style="color: rgb(255, 255, 255);">**3**</span></td><td style="height: 57.7812px;">**Alignment**</td><td style="height: 57.7812px;">Nodes included in a Stack Layout

**Layout &gt; VerticalAlignment and HorizontalAlignment**

</td></tr><tr style="height: 57.7812px;"><td style="height: 57.7812px; background-color: rgb(230, 126, 35);"><span style="color: rgb(255, 255, 255);">**4**</span></td><td style="height: 57.7812px;">**Padding (Horizontal)**</td><td style="height: 57.7812px;">The node to be placed at the leftmost position of the Stack Layout  
**Layout &gt; Margin &gt; Left**

</td></tr><tr style="height: 57.7812px;"><td style="height: 57.7812px; background-color: rgb(230, 126, 35);"><span style="color: rgb(255, 255, 255);">**5**</span></td><td style="height: 57.7812px;">**Padding (Vertical)**</td><td style="height: 57.7812px;">The topmost node in the Stack Layout  
**Layout &gt; Margin &gt; Top**

</td></tr></tbody></table>

The following example shows how Scene Composer's Stack Layout inherits Figma's horizontal Auto layout settings.

<div drawio-diagram="7189"><img src="https://doc3161en.candera.eu/uploads/images/drawio/2024-10/drawing-7-1730094273.png" alt=""/></div>

##### Text Layout

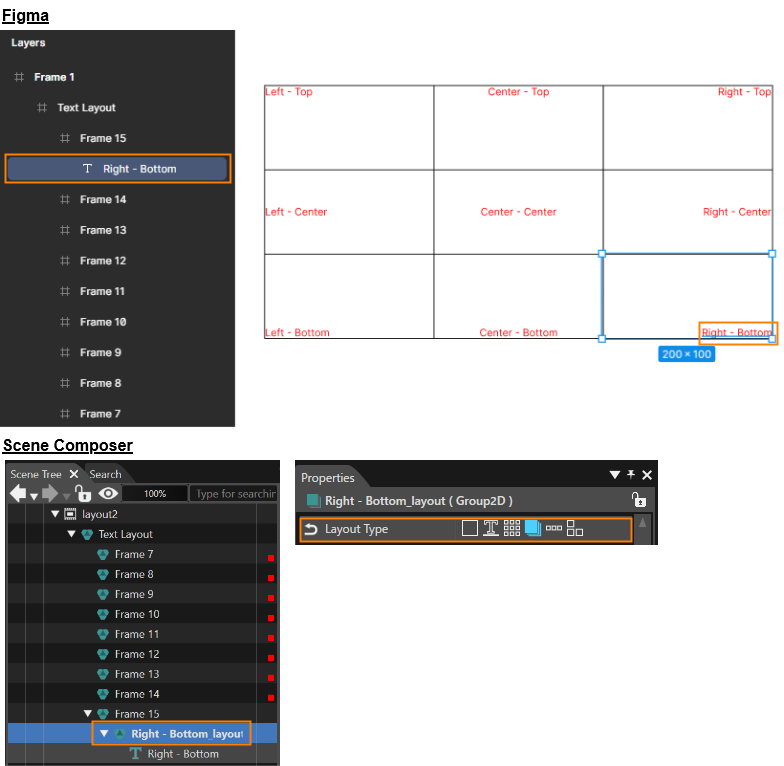
When Smart Importer imports a Figma text layer into Scene Composer, it creates a Group node with LayoutType **Overlay**, and additionally a TextNode under that group.

<div drawio-diagram="7574"><img src="https://doc3161en.candera.eu/uploads/images/drawio/2024-11/drawing-5-1732891835.png" alt=""/></div>

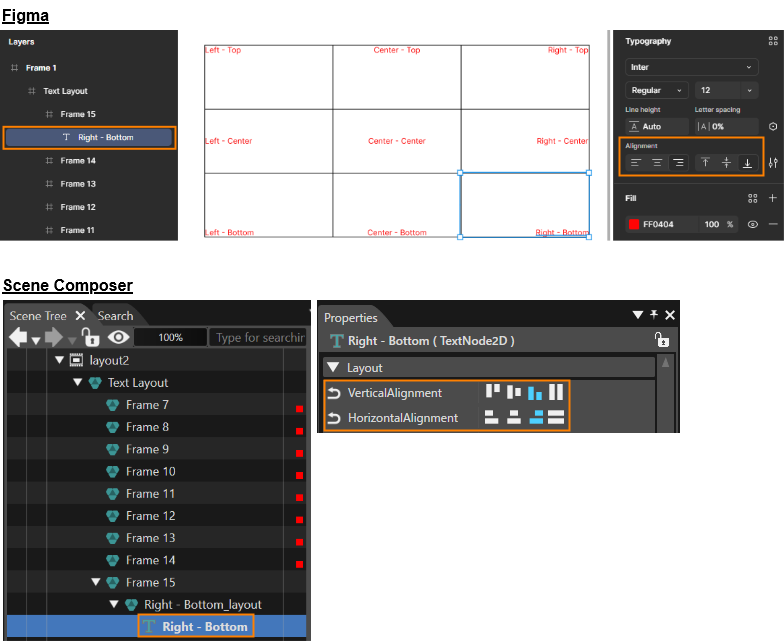
In addition, Scene Composer's TextNode layout property inherits the Typography Alignment settings from the Figma text layer.

<div drawio-diagram="7575"><img src="https://doc3161en.candera.eu/uploads/images/drawio/2024-11/drawing-5-1732891908.png" alt=""/></div>

---

#### Importing Fonts

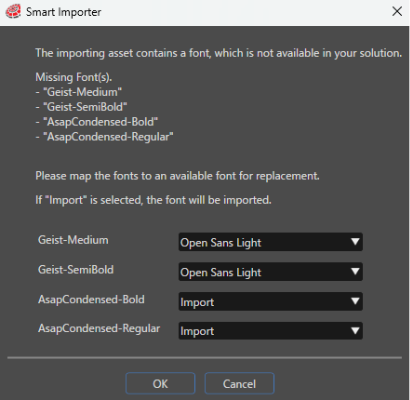
When importing Figma data with Smart Importer, you can import any fonts that are used in the Figma design but are not available in the current Scene Composer solution.

During import, Smart Importer compares the fonts used in the Figma design with the fonts available in the solution. If it detects a missing font, Smart Importer opens the Smart Importer dialog and displays font-selection options.

In the Smart Importer dialog, select one of the following options for each missing font:

<div id="bkmrk-replace-it-with-an-e">

- Replace it with an existing font (select an existing font from the dropdown menu)
- Import the font as a new resource (select **Import** from the dropdown menu)

</div><div drawio-diagram="9020"><img src="https://doc3161en.candera.eu/uploads/images/drawio/2026-06/drawing-7-1780564485.png" alt=""/></div>

<div id="bkmrk--54"></div><div id="bkmrk-if-import-is-selecte">If you select **Import**, Smart Importer adds the corresponding font to the solution and stores it in the <code>Resources&#92;Fonts</code> folder. <div>If you select an existing font, Smart Importer applies that font to the imported data.</div></div><p class="callout info">In the Smart Importer dialog, Smart Importer displays the **Import** option for each font in the dropdown menu only when it can import the corresponding font.</p>

<p class="callout info">If the `Resources\Fonts` folder does not exist in the solution, Smart Importer automatically creates it.</p>

---

#### Automatic Text Mapping

During the import of Figma data, Smart Importer can compare the TextNode content with the Language Table and automatically assign matching Text IDs. Previously, you had to manually assign a Text ID to each TextNode after import. This feature enables automation of the mapping process.

Smart Importer compares the displayed text Strings in the Figma data with the Master Language Strings in the Language Table. If it finds a matching String, it automatically assigns the corresponding Text ID for that String.

##### Configuration

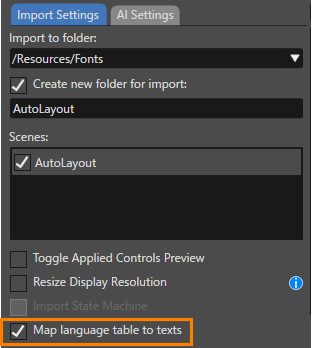
<div id="bkmrk-smart-importer-123"><div>Enable or disable this feature in the Smart Importer dialog under the **Import Settings** tab using the **Map language table to texts** option. Smart Importer enables this setting by default.</div><div><div drawio-diagram="9021"><img src="https://doc3161en.candera.eu/uploads/images/drawio/2026-06/drawing-7-1780564599.png" alt=""/></div>

</div></div>
##### Behavior

The feature workflow includes the following three steps: Smart Importer retrieves the text, compares it with the Language Table and assigns the Text ID.

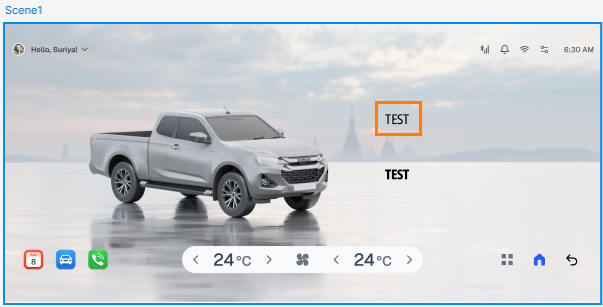
1. Smart Importer retrieves the text String from the TextNode  
    In the following example, it retrieves the String "TEST".  
    <div drawio-diagram="9025"><img src="https://doc3161en.candera.eu/uploads/images/drawio/2026-06/drawing-7-1781072528.png" alt=""/></div>
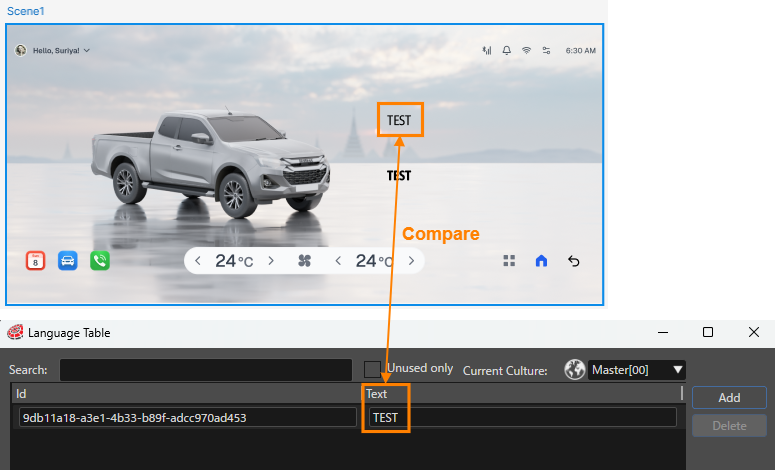
2. Smart Importer compares the retrieved String with the master language in the Language Table  
    
    In the following example, it compares the String retrieved in step 1 with the master language \[00\] in the **Language Table**.
    
    <div drawio-diagram="9022"><img src="https://doc3161en.candera.eu/uploads/images/drawio/2026-06/drawing-7-1780564721.png" alt=""/></div>
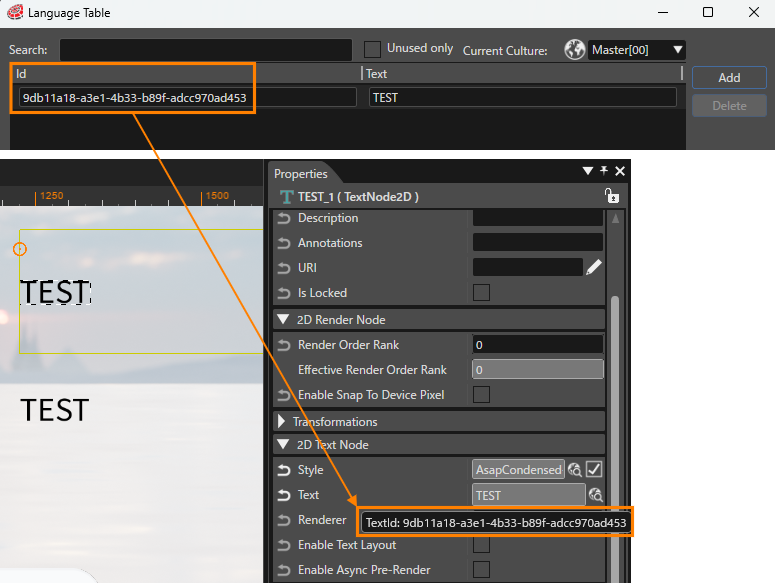
3. If Smart Importer finds a match, it assigns the Text ID  
    <div>In the example below, it assigns the Text ID of the matching Language Table entry to the TextNode <div drawio-diagram="9024"><img src="https://doc3161en.candera.eu/uploads/images/drawio/2026-06/drawing-7-1780564930.png" alt=""/></div>
    
    </div>

<p class="callout info">If multiple Text IDs exist for the same text String, Smart Importer uses the first matching Text ID.</p>

<p class="callout info">If there is no matching text String, Smart Importer does not assign a Text ID.</p>

---