# Smart Importer UI

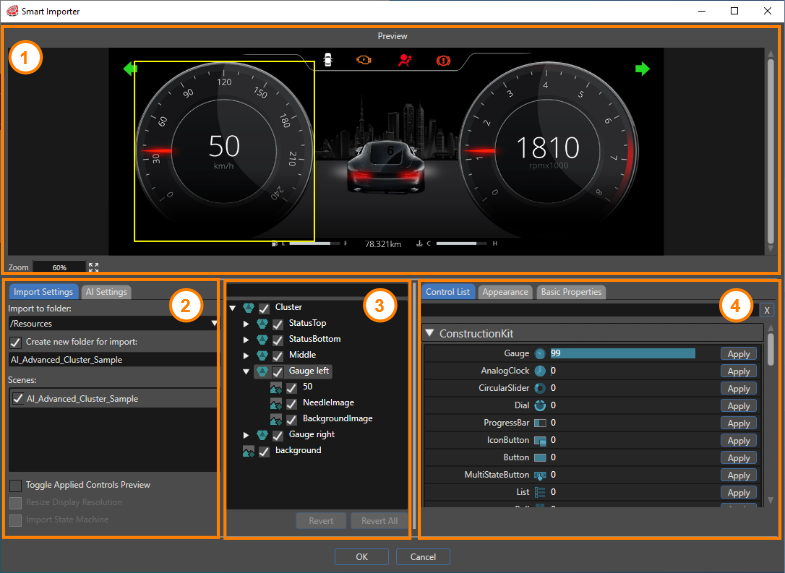
This page describes the Smart Importer dialog. The Smart Importer dialog consists of the following four parts.

1. <span style="color: rgb(230, 126, 35);">[Preview](#bkmrk-Preview)</span>
2. <span style="color: rgb(230, 126, 35);">[Import](#bkmrk-Import)</span>
3. <span style="color: rgb(230, 126, 35);">[Layer Tree](#bkmrk-Layer-tree)</span>
4. <span style="color: rgb(230, 126, 35);">[Control](#bkmrk-Control)</span>

<div drawio-diagram="6726"><img src="https://doc3161en.candera.eu/uploads/images/drawio/2024-09/drawing-5-1725626895.png" alt=""/></div>

### Preview

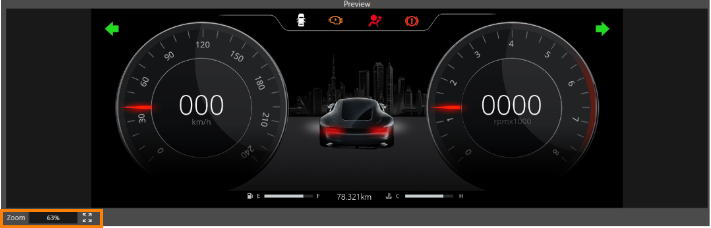
The Preview panel displays a preview of the file to be imported.

##### Zoom factor of the preview

The current zoom factor is displayed in the lower-left corner. To adjust the zoom factor of the preview:

1. Use the mouse wheel to zoom in and out.
2. Click the button with the four arrows to preview the file at the maximum zoom factor within the display area.

<div drawio-diagram="5392"><img src="https://doc3161en.candera.eu/uploads/images/drawio/2024-03/drawing-4-1710316832.png" alt=""/></div>

Select an element on the preview image. Artificial intelligence (AI) detects controls on the selected element and lists them in the **Control** section.

### Import

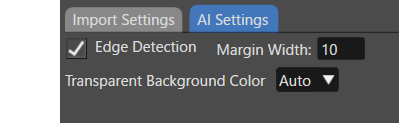
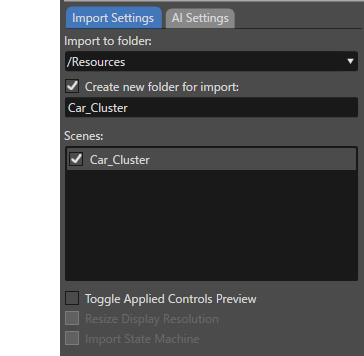
The import section consists of two tabs, **Import Settings** and **AI Settings**.

<div drawio-diagram="5393"><img src="https://doc3161en.candera.eu/uploads/images/drawio/2024-03/drawing-4-1710316951.png" alt=""/></div>

##### Import Settings Tab

The **Import Settings** tab contains the following settings.

<table border="1" id="bkmrk-%%82%A8" style="border-collapse: collapse; width: 700px; border-width: 1px;"><colgroup><col style="width: 200px;"></col><col style="width: 500px;"></col></colgroup><tbody><tr><td>Import to folder</td><td>Select a destination folder for the imported resources. To change the destination folder, use the pull-down menu. create a new destination folder, use the **Create new folder for import** section. The destination folder can be any location in Solution Explorer.

</td></tr><tr><td>Create new folder for import</td><td>When this option is enabled, a new import folder can be created with any name. The created folder is located in the import destination folder specified in **Import to folder**.

</td></tr><tr><td>Scenes</td><td>Edit scenes with the Smart Importer. See the <span style="color: rgb(230, 126, 35);">[Basic Operations](https://doc3161en.candera.eu/books/import-of-resources/page/basic-operations#bkmrk-%E3%82%B7%E3%83%BC%E3%83%B3%E3%81%AE%E6%A7%8B%E6%88%90 "Basic Operations") </span>guide for editing scenes with Smart Importer.

</td></tr><tr><td>Toggle Applied Controls Preview</td><td>When this option is enabled, a green frame appears where the control is applied. The green frame allows you to visually check where the control is applied on the preview.

</td></tr><tr><td>Resize Display Resolution</td><td>This option is enabled when the resolution of the file to be imported is larger than the solution's display resolution. When this option is enabled, the Smart Importer automatically resizes the resolution of the imported file to fit the display resolution.

</td></tr><tr><td>Import State Machine</td><td>When this option is enabled,the Smart Importer imports state machines from your design file directly into your CGI Studio solution. If a global state machine already exists within your solution, the Smart Importer displays a prompt where you can choose whether to import the new state machines with the **Is Global** property enabled.

</td></tr></tbody></table>

##### AI Settings Tab

Configure AI detection settings on this tab.

<div drawio-diagram="7027"><img src="https://doc3161en.candera.eu/uploads/images/drawio/2024-10/drawing-4-1729212783.png" alt=""/></div>

The Smart Importer uses the value specified in the <span style="color: rgb(230, 126, 35);">[Preferences](https://doc3161en.candera.eu/books/preferences/page/configure-the-smart-importer)</span> for **Edge Detection**. For details, see the [<span style="color: rgb(230, 126, 35);">Preferences</span> ](https://doc3161en.candera.eu/books/preferences/page/configure-the-smart-importer)page.

AI uses the color selected under **Transparent background color** to analyze the image being imported. The best background color for detecting controls depends greatly on the image content.

If AI has problems detecting controls, change this setting.

### Layer Tree

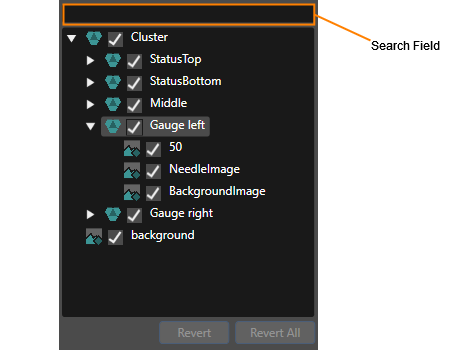
The Layer Tree displays a tree view of each element from the file being imported. The list displayed here corresponds to the scene tree in Scene Composer. When you select one or more elements in this list, AI detects controls on the selected elements and lists them in the **Control** section.

Enter keywords in the search field at the top of the Layer Tree to narrow the list to those layers that contain those keywords.

<div drawio-diagram="6727"><img src="https://doc3161en.candera.eu/uploads/images/drawio/2024-09/drawing-5-1725626973.png" alt=""/></div>

Check the checkbox to the left of each layer element to include it in the scene. The Smart Importer does not import cleared elements.

#### Revert/Revert All button

To cancel the applied control settings, select the target item in the Layer Tree panel and click **Revert**.

To cancel all applied control settings in the Layer Tree, click **Revert All**. The Smart Importer displays a confirmation dialog before continuing.

###   
Control

#### Control List Tab

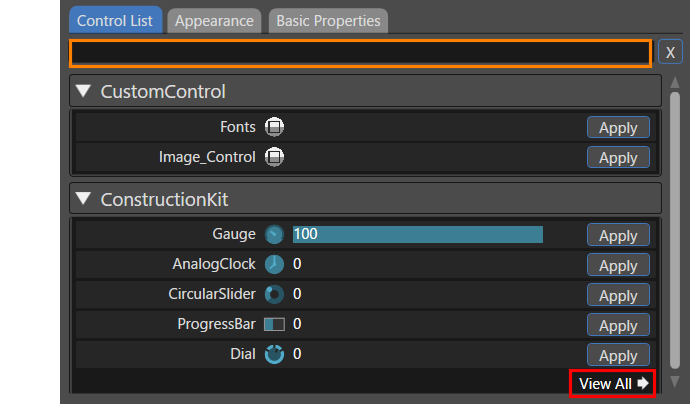
Select any layer in the Layer Tree, and AI detects the most suitable controls. The **Control List** tab displays the analysis results and lists candidate controls in order of probability.

The Smart Importer categorizes the controls by solution and reference, such as ConstructionKit and Custom Controls.

- For controls in ConstructionKit, the probability of matching with the AI is displayed as a number (and bar) to the right of the control name, and they are listed in descending order from the highest number. 
    - Custom controls that are not included in ConstructionKit are displayed in order of control name.
- By default, each category displays five controls. Clicking **View All** (red box in the image below) displays a list of all controls.
- The list of controls that is displayed can be narrowed down by entering keywords in the search field at the top (orange box in the image below).
- To apply the controls to the selected element, use **Apply** in the **Control List**.

<div drawio-diagram="7029"><img src="https://doc3161en.candera.eu/uploads/images/drawio/2024-10/drawing-4-1729213292.png" alt=""/></div>

To configure the display settings, click the triangle icon on the left side of the search field. The settings section lets you configure which controls appear according to the detection value.

To apply a control to a selected element, click **Apply** in the **Control List**. When you apply a control with a low AI detection probability, a dialog box appears to confirm your selection.

#### Appearance Tab

When you apply any control, the display automatically switches to the **Appearance** tab. Configure the appearance properties for the applied control. Some controls, such as TextValue, do not require appearance settings.

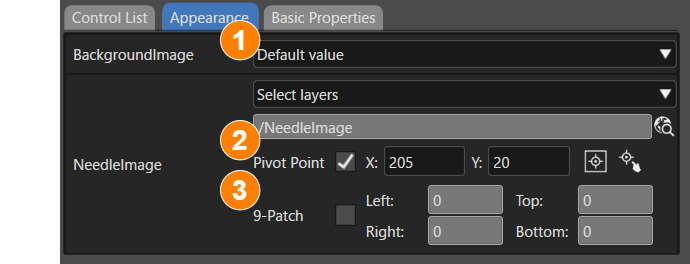
The **Appearance** tab is made up of the following three main sections.

1. <span style="color: rgb(230, 126, 35);">[<span style="color: rgb(230, 126, 35);">Image</span>](#bkmrk-layer-mapping)</span>
2. <span style="color: rgb(230, 126, 35);">[Pivot Point](#bkmrk-configure-the-pivot-)</span>
3. <span style="color: rgb(230, 126, 35);">[9-Patch](#bkmrk-9-patch)</span>

<div drawio-diagram="7030"><img src="https://doc3161en.candera.eu/uploads/images/drawio/2024-10/drawing-4-1729213616.png" alt=""/></div>

##### Image

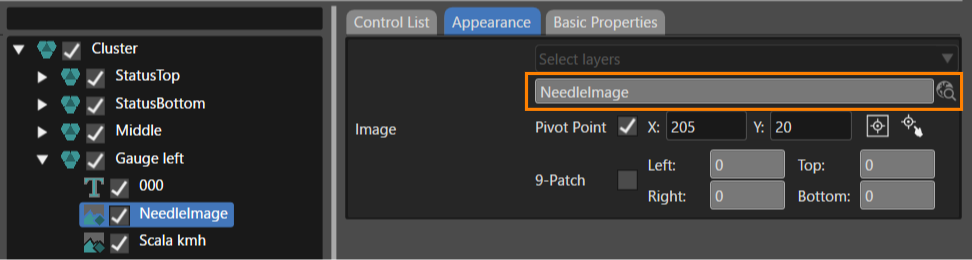
For each control image properties, select the layer image from the file to import. If the control image property name matches the layer name, the Smart Importer automatically sets the layer image. You cannot edit the image layer.

<p class="callout info">For example, when you apply the Gauge control, the Control Image has a NeedleImage property. Therefore, if NeedleImage exists in the layer name of the file to import, the Smart Importer automatically sets it to the NeedleImage property.</p>

<div drawio-diagram="7031"><img src="https://doc3161en.candera.eu/uploads/images/drawio/2024-10/drawing-4-1729213753.png" alt=""/></div>

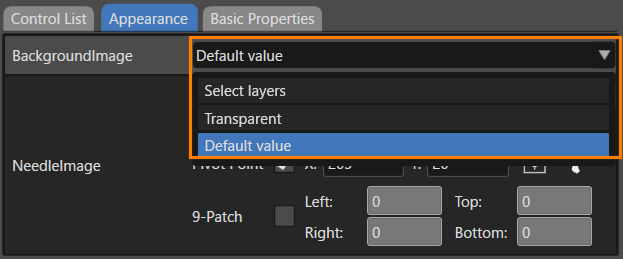
When you assign a control to a group layer, you can choose from the following options for the control image.

<div drawio-diagram="7032"><img src="https://doc3161en.candera.eu/uploads/images/drawio/2024-10/drawing-4-1729213848.png" alt=""/></div>

<table border="1" class="align-center" id="bkmrk-select-layers-select" style="border-collapse: collapse; width: 700px; border-width: 1px;"><colgroup><col style="width: 22.7385%;"></col><col style="width: 77.2368%;"></col></colgroup><tbody><tr><td class="align-left" style="border-width: 1px;">Select layers</td><td class="align-left" style="border-width: 1px;">Select any image layer from the group layer. You can use composite images with multiple layers. For more information, please refer to <span style="color: rgb(230, 126, 35);">[Configure a control image with multiple layers](https://doc3161en.candera.eu/link/1150#bkmrk-configure-a-control-)</span>.

After importing, the Smart Importer places the composite image in the **ControlBitmaps** folder and sets the bitmap name to the property name specified here.

If you select a single layer, the Smart Importer uses the original bitmap placed in the **Bitmaps** folder. For folder locations, see <span style="color: rgb(230, 126, 35);">[Folder structure after import](#bkmrk-folder-structure-aft)</span>.

</td></tr><tr><td class="align-left" style="border-width: 1px;">Transparent</td><td class="align-left" style="border-width: 1px;">The Smart Importer uses a transparent image.</td></tr><tr><td class="align-left" style="border-width: 1px;">Default value</td><td class="align-left" style="border-width: 1px;">The Smart Importer uses the default image for the applied control.</td></tr></tbody></table>

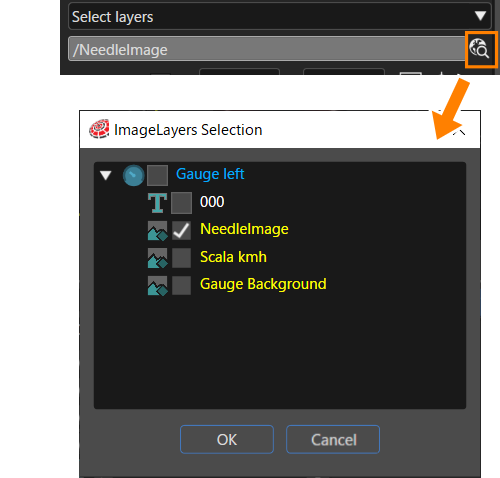
Select images included in the group layer by clicking the selection icon on the right of the image.

- Select images from the descendant layers and the current layer as property values
- You cannot select layers other than images (except for bitmap layers to which controls have been applied).
- After you selected the image, the Smart Importer sets the pivot point to the center of the composite image.

<div drawio-diagram="9227"><img src="https://doc3161en.candera.eu/uploads/images/drawio/2026-09/drawing-5-1789127376.png" alt=""/></div>

For each control image properties, set the layer image in the file to import. If the control image property name and the layer name match, the Smart Importer automatically sets the layer image.

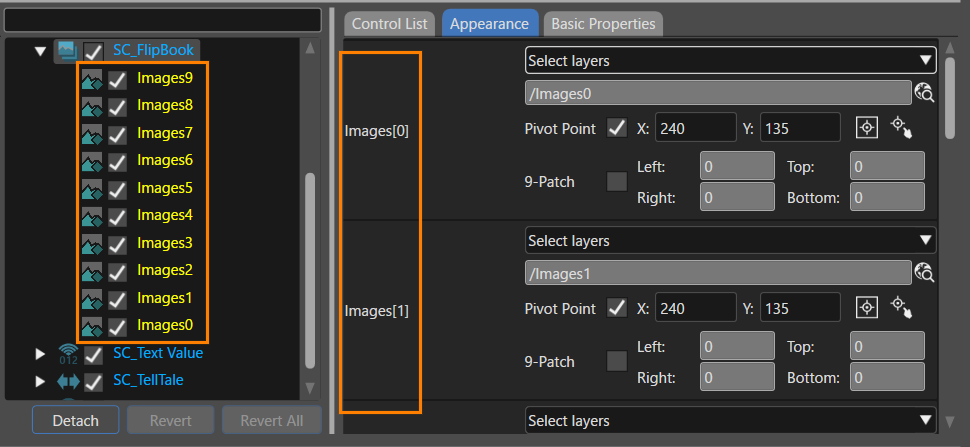
##### Image Array Properties

The Smart Importer supports image array properties and automatically assigns images in the FlipBook control. The numbers attached to each Image element on the Appearance tab correspond to the values displayed in descending order in the layer tree.

<div drawio-diagram="7044"><img src="https://doc3161en.candera.eu/uploads/images/drawio/2024-10/drawing-4-1729230884.png" alt=""/></div>

##### Folder structure after import

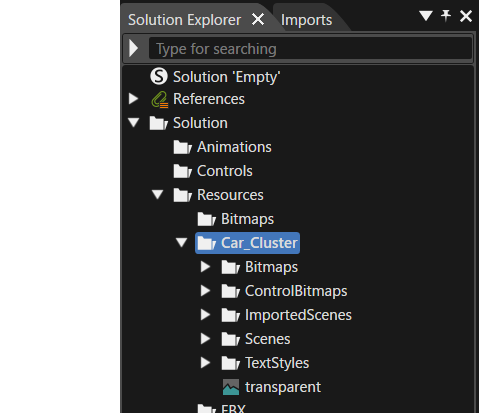
After import, the Smart Importer creates the **Bitmaps**, **ControlBitmaps**, and **TextStyles** folders in the Solution Explorer.

<table border="1" class="align-center" id="bkmrk-bitmaps-the-imported" style="border-collapse: collapse; width: 700px; border-width: 1px;"><colgroup><col style="width: 159px;"></col><col style="width: 540px;"></col></colgroup><tbody><tr><td class="align-left" style="border-width: 1px;">Bitmaps</td><td class="align-left" style="border-width: 1px;">Smart Importer places the imported bitmap for each layer in this folder.</td></tr><tr><td class="align-left" style="border-width: 1px;">ControlBitmaps</td><td class="align-left" style="border-width: 1px;">Smart Importer places the bitmap composed of multiple layers in this folder for the control properties.</td></tr><tr><td class="align-left" style="border-width: 1px;">ImportedScenes</td><td class="align-left" style="border-width: 1px;">Smart Importer places the scene imported as a template in this folder.</td></tr><tr><td class="align-left" style="border-width: 1px;">Scenes</td><td class="align-left" style="border-width: 1px;">When you import a StateMachine (screen transition), the Smart Importer places the target scene in this folder.</td></tr><tr><td class="align-left" style="border-width: 1px;">TextStyles</td><td class="align-left" style="border-width: 1px;">Smart Importer places the created text style in this folder.</td></tr></tbody></table>

<div drawio-diagram="7136"><img src="https://doc3161en.candera.eu/uploads/images/drawio/2024-10/drawing-4-1729754524.png" alt=""/></div>

##### Pivot Point

When you set up a control image with layer mapping, the Smart Importer automatically sets the pivot point. The pivot point values that the Smart Importer sets automatically are as follows. (However, if the pivot point values are specified with the layer names mentioned later, the specified values are used as the set values.)

- Pivot point X value: 0
- Pivot point Y value: 0

In addition, when you select the **Pivot Point** check box (No.1 in the image below), you can use the following options:

<div drawio-diagram="7034"><img src="https://doc3161en.candera.eu/uploads/images/drawio/2024-10/drawing-4-1729214188.png" alt=""/></div>

- Enter values for the X and Y coordinates of the pivot point. You can enter decimal values.
- Set the pivot point to the center of the image by clicking No.2 in the image above).
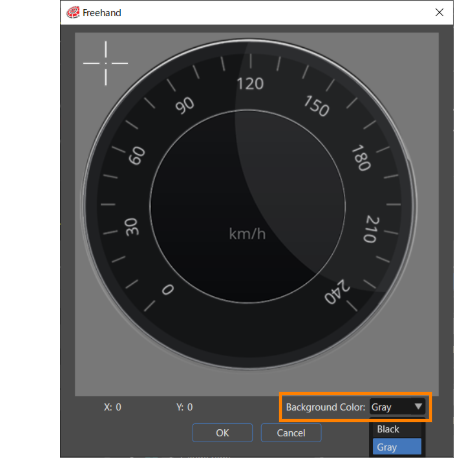
- Click No. 3 in the image above to open the **Freehand** dialog box. Move the crosshair cursor in the dialog box to configure the pivot point.
- Set the background color of the **Freehand** dialog to black or gray from **Background Color** in the lower-right corner of the dialog (highlighted in the orange box in the figure below). Additionally, configure the default background color in **<span style="color: rgb(230, 126, 35);">[Preferences &gt; Smart Importer](https://doc3161en.candera.eu/books/preferences/page/configure-the-smart-importer)</span>**.

<div drawio-diagram="8022"><img src="https://doc3161en.candera.eu/uploads/images/drawio/2025-03/drawing-4-1741158028.png" alt=""/></div>

Alternatively, you can apply any pivot point value by specifying it in the layer name of the image to import.

- If the layer name in the target file to be imported is something like `***@X10@Y20`, the pivot point values are automatically set as X = 10 and Y = 20.
- If the layer name in the file to be imported is `***@X10.5`, the pivot point value is automatically set as X = 10.5 and Y = 0.

##### 9-Patch

This option appears when the **Enable editing 9-Patch** option is enabled in the **<span style="color: rgb(230, 126, 35);">[Preferences &gt; Smart Importer](https://doc3161en.candera.eu/books/preferences/page/configure-the-smart-importer)</span>** settings. When enabled, the 9-Patch feature can be configured (input values must be positive numbers only).


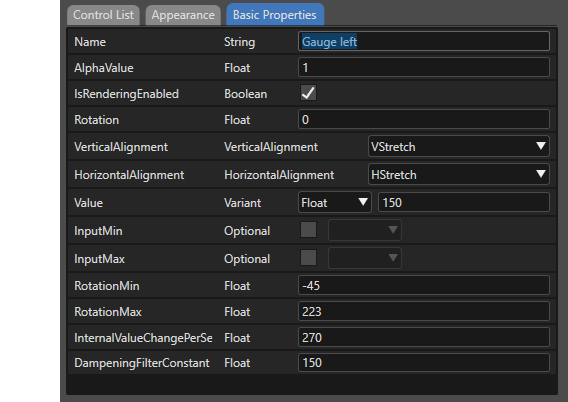
#### Basic Properties Tab

This section lets you set properties for the applied control. After importing, select the target control and configure it on the **Properties** panel.

<div drawio-diagram="6735"><img src="https://doc3161en.candera.eu/uploads/images/drawio/2024-09/drawing-5-1725628096.png" alt=""/></div>

<p class="callout info">If the layer name is the same as the control's property name, the Smart Importer automatically maps the individual properties from the file to import.</p>