For instructions on creating a **View**, see the [View feature overview page](https://doc3161en.candera.eu/books/view-editor/page/view).
#### View composition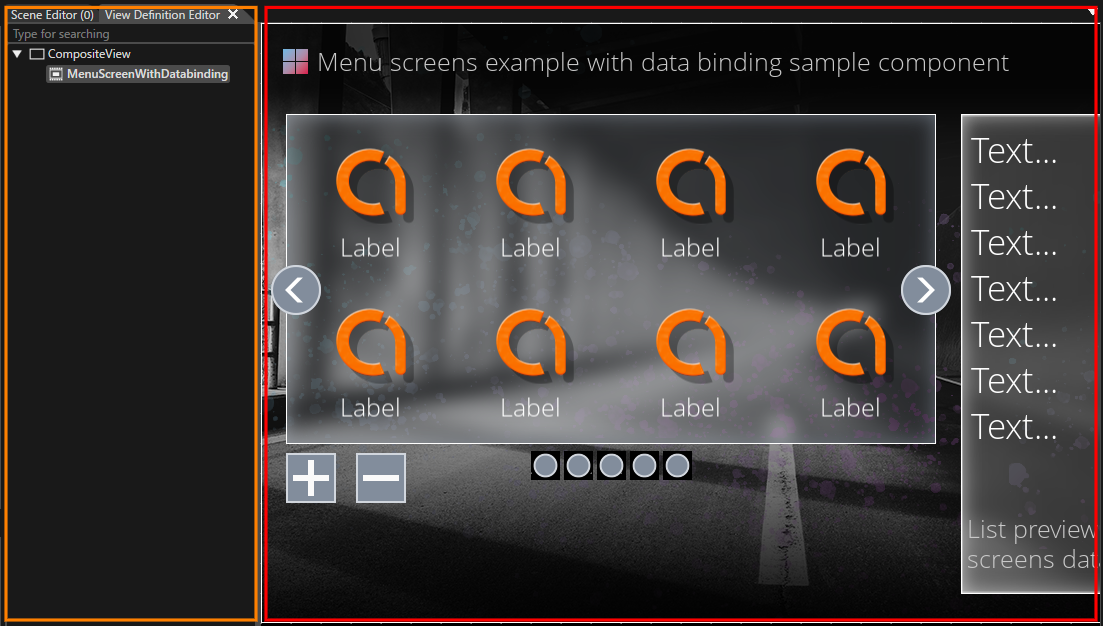
| **UI item** | **Description** |
|---|---|
| **View Composition pane** (orange frame in the figure above) | Lists which **Scenes/Views** the selected **View** is composed of. Add or remove Scenes and existing Views by **drag and drop**. |
| **Preview area** (red frame in the figure above) | Displays preview images of the **Scenes/Views** associated with the View in the right pane, where you can also adjust their layout positions. Useful for improving visual identification when referencing this View from the **State Machine** or **View Tree**. |
For instructions on creating a **View**, see the [View feature overview page](https://doc3161en.candera.eu/books/view-editor/page/view).
#### View compositionThe composition editing described here applies to Views created as Composite Views. A Scene with IsView=true is treated as a standalone single-screen View, so you cannot edit its tree structure or add child elements in the View Definition Editor (it is always treated as a leaf node).
1. In the Solution Explorer, double-click the **View** (Composite View) whose composition you want to edit. 2. In the View composition pane, edit the elements to include in the View. - You can drag and drop a **Scene with IsView=true** or an existing View from the Solution Explorer to add it. - To remove an unnecessary element, select it and then select **Delete** from the context menu. ##### Behavior When You Drag and Drop a Scene with IsView=true Only **Views** appear as nodes in the tree of the View Definition Editor panel. However, because a Scene with **IsView=true** is treated as a View on its own, you can add it directly to the tree. - When you drag and drop a Scene with **IsView=true** from the Solution Explorer onto the composition pane of the Composite View open in the View Definition Editor, the Scene is added as a child element. - A Scene with **IsView=false** is not included as a View candidate, so you cannot drag and drop it onto the composition pane. You must first select **IsView** in the Properties panel. With this mechanism, the View Definition Editor tree can consistently treat the unit of screen transitions and visibility control as **Views**, while still allowing you to build Scene-based content within those Views. ##### Grandchild View In the View Definition Editor panel, a single operation can add only "a child View one level below the View you have opened." To build structures with three or more levels — such as parent View > child View > grandchild View — start from a **Composite View** (a View that bundles multiple Views). - Place **Composite Views** at the parent and intermediate levels (because they are not leaf nodes, they can hold child Views beneath them). - A **Scene with IsView=true** is always treated as a leaf node and cannot be used as an intermediate node in a grandchild hierarchy. Using a View that meets these requirements as the starting point, create a three-level structure (**Parent View > Child View > Grandchild View**) as follows: 1. Open the View you want to use as the parent level, and add a child View under it (**Parent View > Child View**). 2. Double-click the View you added as the child View in step 1 to open it, and then add another View under it as its child (**Child View > Grandchild View**). After performing these steps, reopen the original parent View. You can then confirm in the tree that a three-level hierarchy (**Parent View > Child View > Grandchild View**) is displayed.