
Figma
Smart Importer can import Figma data. This page explains how to to import Figma data with Smart Importer and how to work with the results.
Please note that youYou cannot import Figma data for which you do not have editing privileges.
Preparations for Importing Figma Data
Preparing the URL/URL and Access Token
InBefore orderyou to performimport Figma data imports with Smart Importer, aacquire the URL and Accessaccess Tokentoken that corresponds withfor the Figma Data needs to be acquired in advance.data.
TheAcquire the URL and Accessaccess Tokentoken can be acquired usingin the Figma desktop applicationapplicationas as below.follows.
PleaseEnsure ensurethat you have access to the Figma REST API (https://api.figma.com)com). In case of a connectivity issue, please contact your IT asdepartment itbecause the API might be blocked by a firewall.
Acquiring the URL
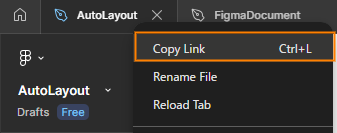
AtIn the topmosttop bar inof the Figma desktop application, right-click the relevant project tabtab, and then select Copy Link from the context menu select [Copy Link].menu.
Acquiring the Access Token
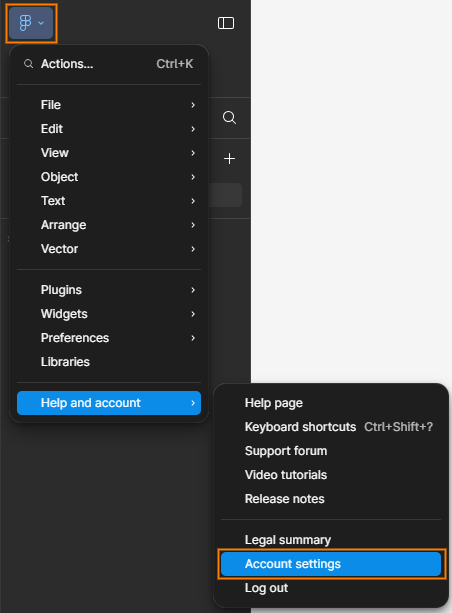
- In the Figma desktop app, select
[Figma Icon > Help and Account > Account Settings]to open the dialog.
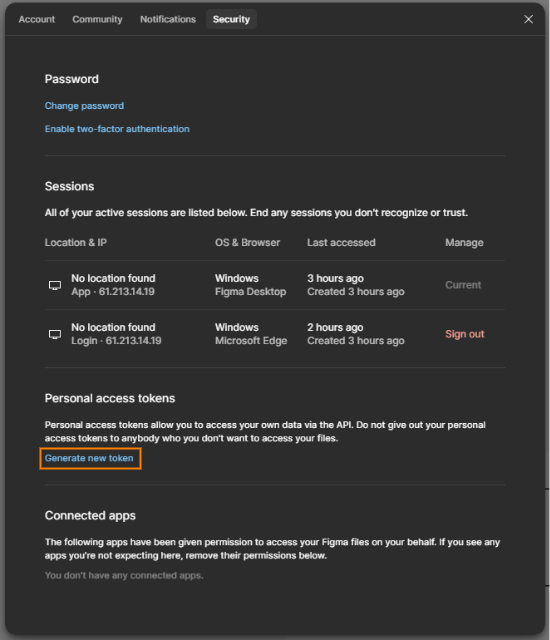
- In the Security tab of the dialog, click
[Generate new token]under Personal accesstokens.tokens.
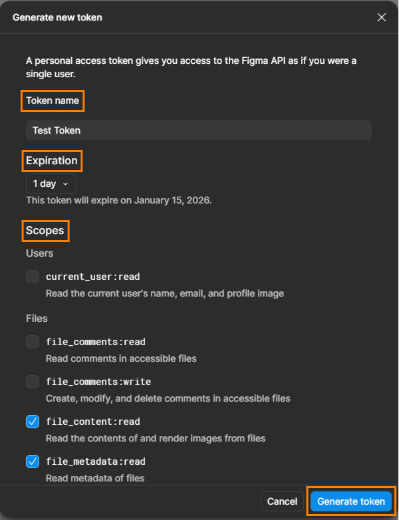
- In the
"Generate newtoken"token dialog, set the Token name,Expiration,Expiration, andScopes,Scopes, and then click[Generate token].
TheFigma displays the created access tokenwill be displayedunder Personal access tokens on the Security tab of the dialog.
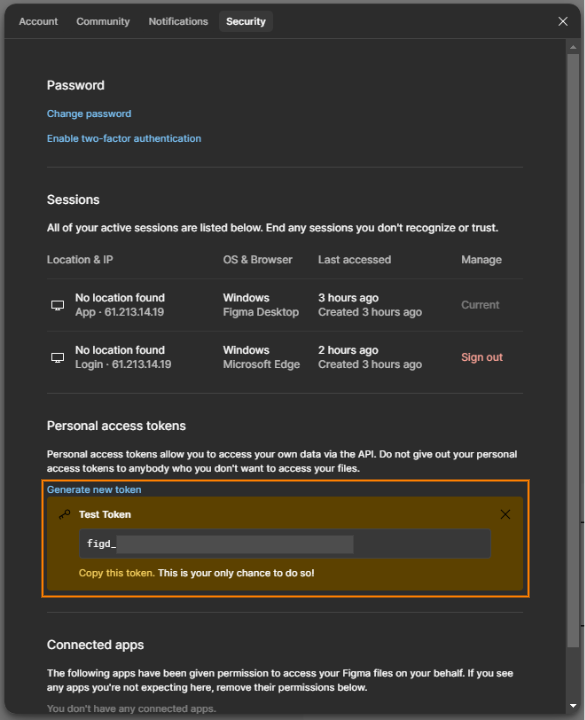
The instructions on how to obtain the URL and access token are for Figma Desktop App version 125.10.8.
How to Import Figma Data
1.
- From the Scene Composer
toolbartoolbar, select[Import]Import >[SmartImporter]Importer >[From Cloud Resource...],and - Scene Composer displays a new dialog
paneltitled[Import from cloudresource] will be displayed.resource.
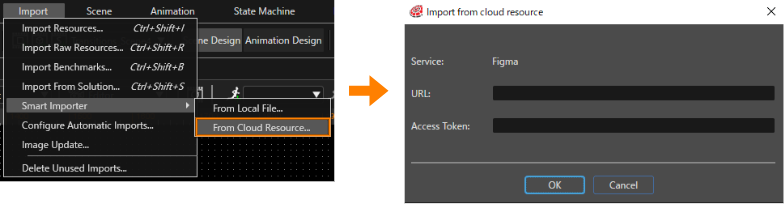
2.
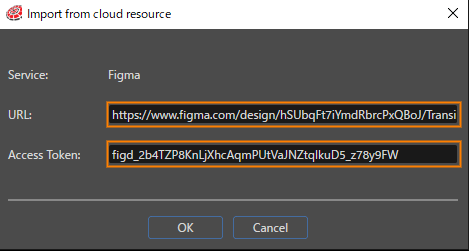
3.
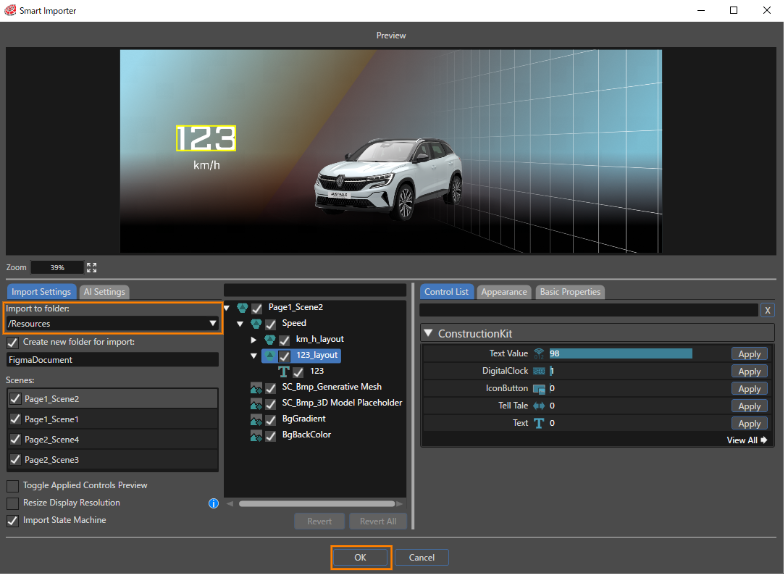
If the URL or Accessaccess Tokentoken entered in the "Import from cloud resource"resource dialog is incorrect (or inappropriate),invalid, Smart Importer interrupts the import will be interrupted,import, and displays the following error dialog will appear.dialog.
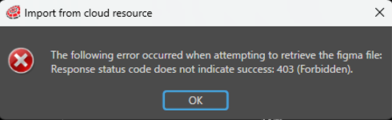
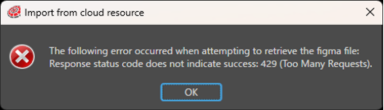
API access limits vary depending on your subscription plan. Therefore, ifIf that limit is exceeded, Smart Importer interrupts the import willand be interrupted anddisplays the following error dialogdialog. willFor beDetails displayed.on Pleaseeach checkplan, see Figma’s official website for details on each plan.website.
Importing Figma Data - Advanced
Importing as a scene
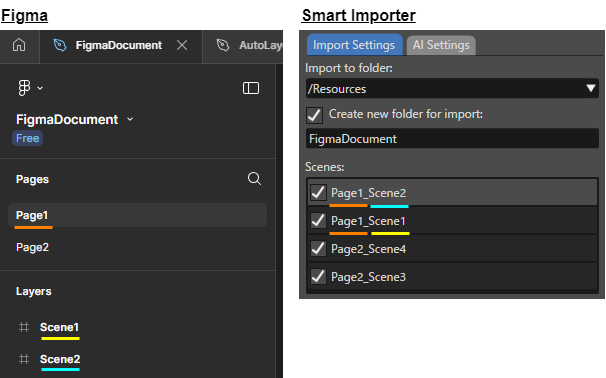
TheSmart Importer imports the topmost item of each page included in the Figma data will be imported into Smart Importer as a scene. For this, useUse the following naming convention:convention to import a top-level item as a scene: <Page name>_<Parent item name>
Relationship between Figma items and Scene Composer Nodes
When importingyou import Figma items with Smart Importer, Smart Importer imports each item will be imported as a specific type of node, as seenshown in the tablefollowing below.table.
| Scene Composer node type |
||||
| Group | Bitmap | Text | ||
| Figma item type |
Component | ✓ | ||
| ComponentSet | ✓ | |||
| Ellipse | ✓ | |||
| Frame | ✓ | |||
| Group | ✓ | |||
| Instance | ✓ | |||
| Line | ✓ | |||
| Polygon | ✓ | |||
| Rectangle | ✓ | |||
| Section | ✓ | |||
| Slice | ✓ | |||
| Star | ✓ | |||
| Text | ✓ | |||
| Vector | ✓ | |||
BitmapsSmart Importer imports bitmap and textstext canitems only bewhen importedFigma whenprovides their render data is made available.data. For example, shouldif you set a Figma item be set to "hidden"hidden, itSmart Importer cannot beimport imported.
it.
Importing as Controls or Bitmaps
It is possible with Smart Importer tocan import any Figma item as a control or bitmapbitmap. anyThe Figmaimported itemsitem thatmay can holdcontain the following child items:
- Component
- ComponentSet
- Frame
- Group
- Instance
- Section
Importing as a control
AnSmart Importer imports an item can be imported as a control when itthe name is named [SC_<control name>]. Furthermore,You can also specify control property values canby alsonaming bechild setitems when usingafter the corresponding control properties. If a child item name matches a control property name in Scene Composer, Smart Importer can automatically map the bitmap from the Figma file to that property.
For example, Scene Composer's CheckBox control provides multiple image properties. When a Figma file contains an item named SC_CheckBox with child items whose names ofmatch these properties, Smart Importer automatically assigns the corresponding bitmaps to the correct control properties for(see theimage namesbelow). This way, no manual assignment of childimage items.
properties is necessary in Smart Importer.
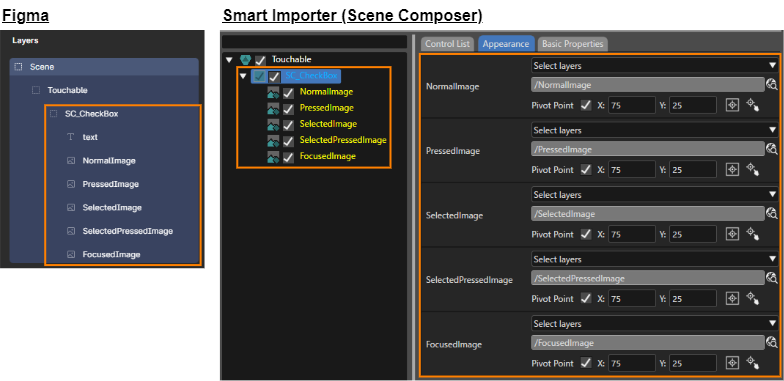
This functionality is supported only supported withfor Touchable and Common controls.
Importing as bitmaps
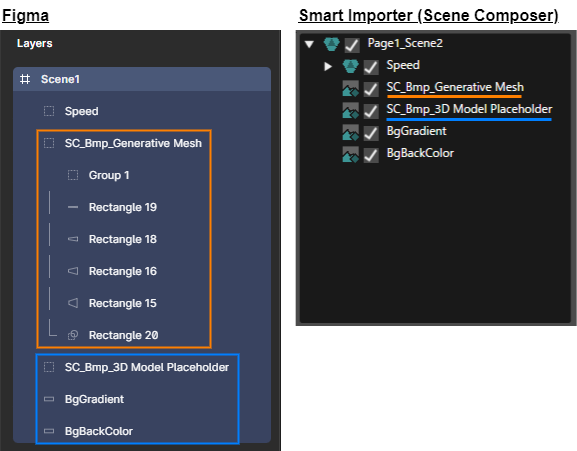
Smart Importer can import group items withthat contain child items as bitmaps when the the group item name is prefixed with [SC_Bmp]SC_Bmp.
Import as State Machine
When Figma flow functionality (screen transitions) is defined, Smart Importer imports the structure of screen transitions into CGIScene StudioComposer as a state machine.
The imported state machine can be reviewed in the State Machine Editor withinin Scene Composer.Composer.
Settings on the Figma SideSettings: (Scenes and Flows)Flows
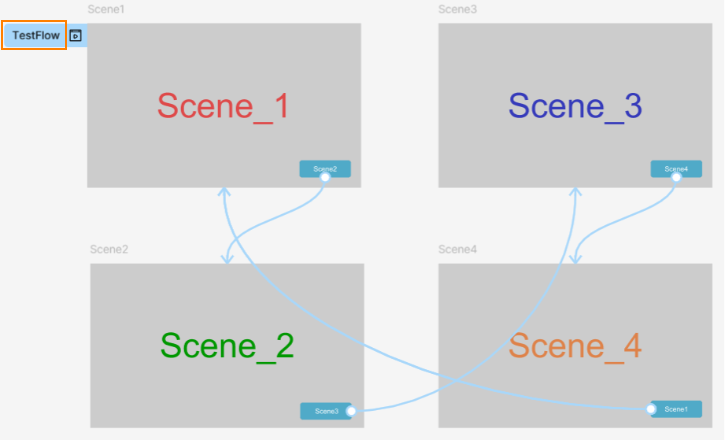
OnIn theFigma, Figma side,define multiple scenes and the flows (that connect them. Create screen transitions) connecting them are defined. Screen transitions arebeginning constructed starting fromwith the scene specifieddesignated as the flow start point.
Import Result on the Scene Composer Side
The flow structure defined in Figma is imported into CGI Studio as a state machine by Smart Importer.
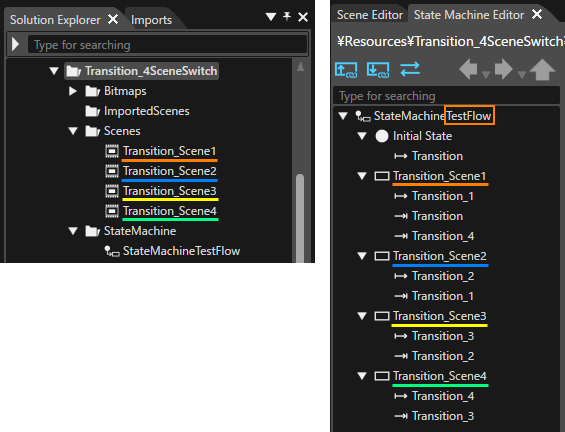
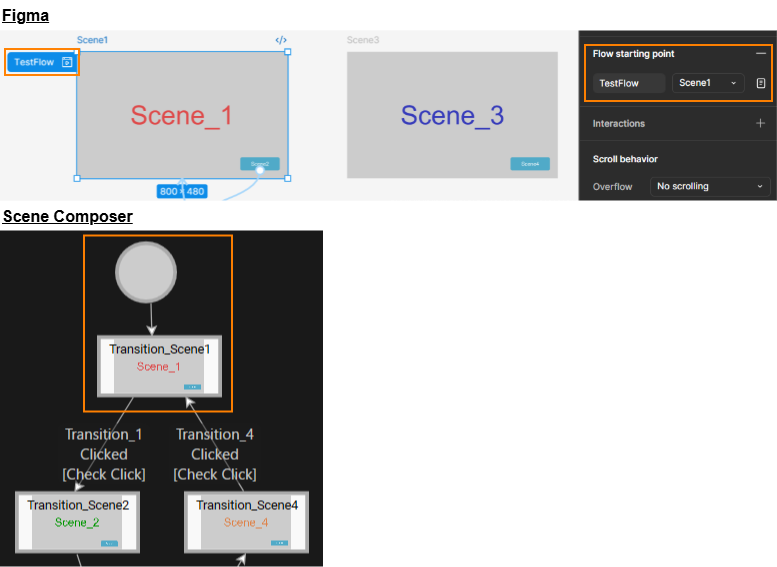
The state machine starts from the state that corresponds to the scene set as the flow start point in Figma. After importing, for each generated state, a screenshot of the corresponding Figma scene is automatically set, and the screenshot is displayed as a Scene Image in the State Machine Editor.
When multiple flows are defined, each flow is imported as an independent state machine.
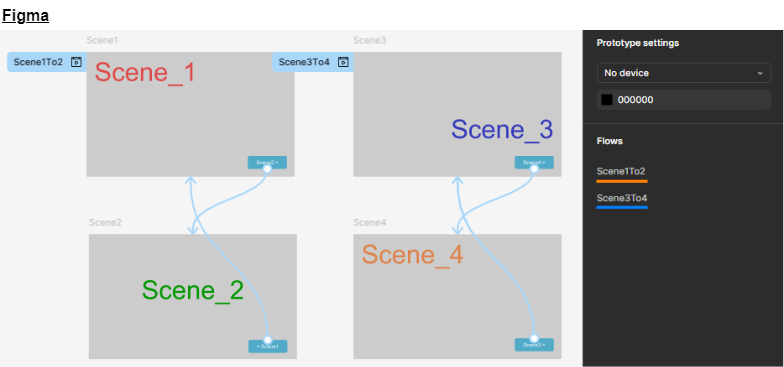
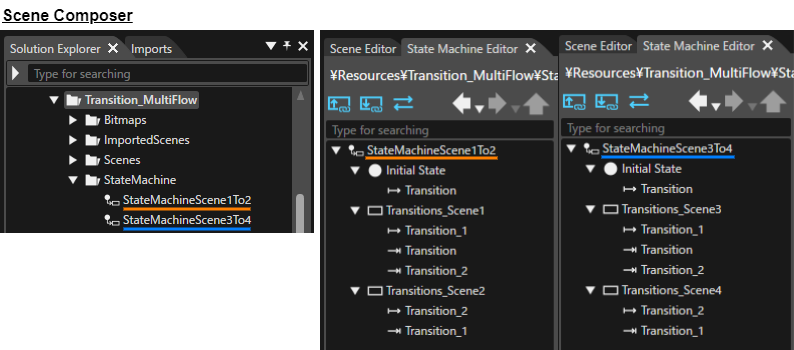
ShouldIf a transition in one Flowflow beis included in a separate Flowflow (ie.that is, when a transition is duplicated), Smart Importer does not import the separate Flow will not be imported.flow.
Names and Behavior After Importing as a State Machine
- About Names After Import
- The name of the state machine after import is
“StateMachine<Flow Name>.” - The name of each state after import is the same as the Figma item name that was imported as a scene.
- The name of the state machine after import is
-
In Figma,
ityouis possible tocan select the interaction that triggers screentransitionstransitions,(such as click, drag, or mouseover, etc.).over.However, regardless of which interaction is set, when importing with Smart Importer, the Transition properties in Scene Composer are setto:as follows:- Event: `Clicked`
- Condition: `Check Click`
Importing a Layout
Auto layout
If you set Auto layout on a Figma Frame, hasSmart anImporter "Autoimports layout"the set, it will be importedframe as a "Stack Layout"Layout in Scene Composer,Composer and applies each setting value of the Auto layout will be inheritedsetting as a Stack Layout property.
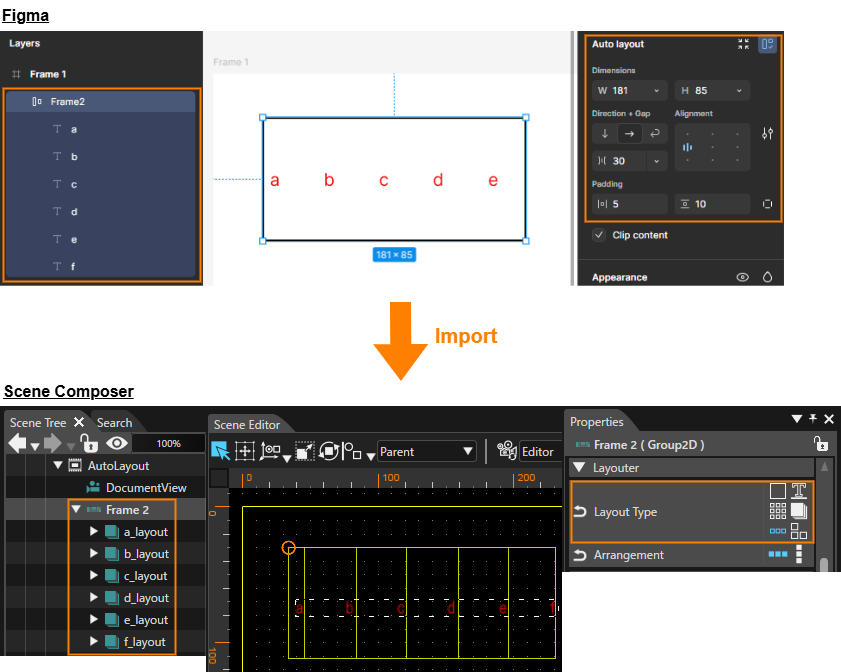
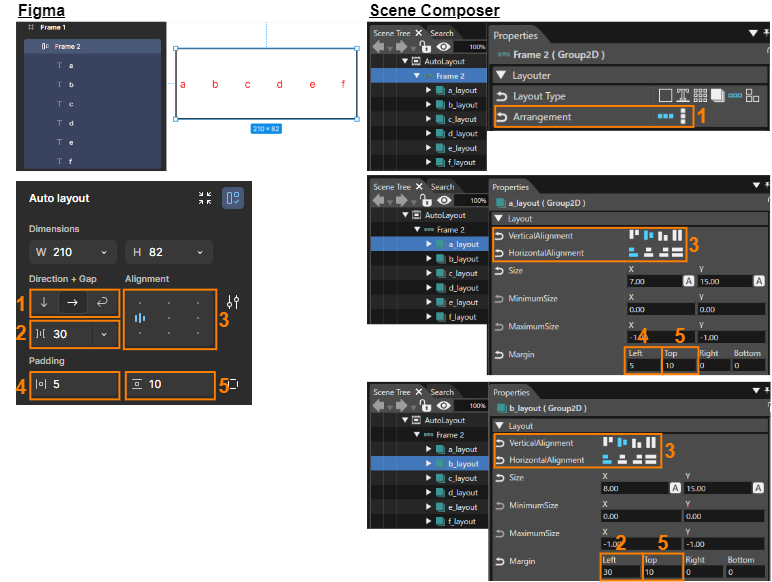
Figma Auto layout settings are inherited as properties of the Stack Layout of Scene Composer:
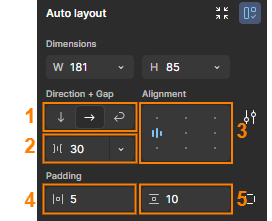
|
Auto layout (Figma) |
Stack Layout (Scene |
|||||||
| 1 |
Direction |
Stack Layout
|
||||||
|
||||||||
| 2 |
Gap |
The node that is placed second or later in the Stack Layout |
||||||
|
||||||||
| 3 | Alignment |
Nodes included in a Stack Layout
|
||||||
| 4 | Padding (Horizontal) |
The node to be placed at the leftmost position of the Stack Layout |
||||||
| 5 | Padding (Vertical) |
The topmost node |
||||||
BelowThe is anfollowing example ofshows a horizontal Auto layout (horizontal) from Figma that is imported into Scene Composer.
Text Layout
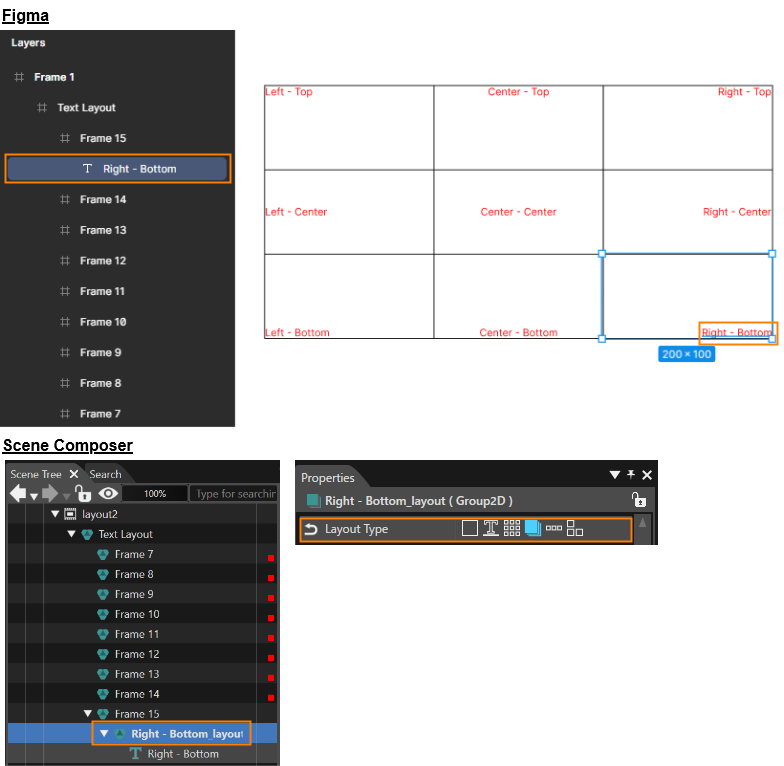
When a Figma text layer is imported ininto Scene Composer, a Group node with LayoutType "Overlay"Overlay is created, and a text node is created under it.
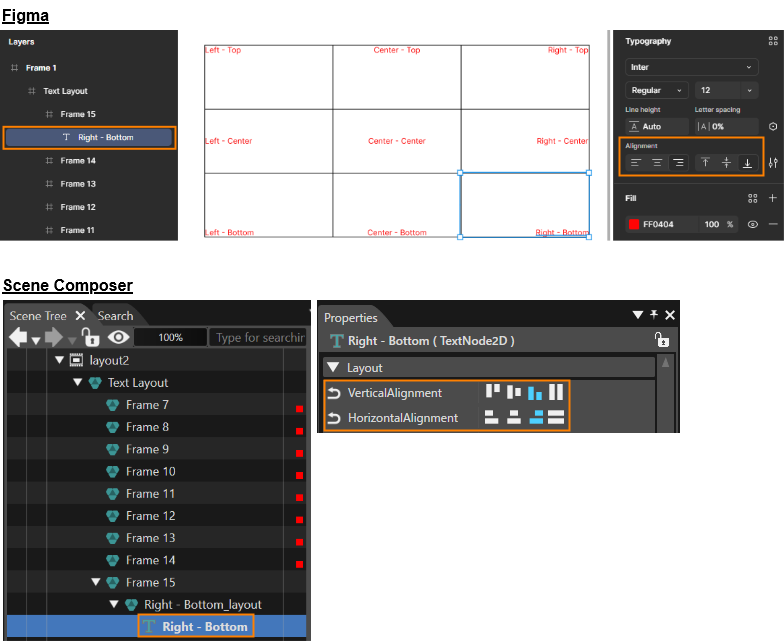
Also, the Typography Alignment of the text layer from Figma is inherited as a layout property of the text node in Scene Composer.
Importing Fonts
When importing Figma data using thewith Smart Importer, ifyou acan fontimport any fonts that are used in the Figma design doesbut are not existavailable in the current solution,Scene theComposer missing font can be imported.solution.
During theimport,Smart importImporter process,compares the fonts used in the Figma design are compared with the fonts available in the solution. If it detects a fontmissing thatfont, doesSmart notImporter exist in the solution is detected,opens the Smart ImportImporter dialog opens and fontdisplays font-selection options are displayed.options.
In the Smart Import dialog, you can chooseselect one of the following options for each missing font:
- Replace it with an existing font (select an existing font from the dropdown menu)
- Import the font as a new resource (select
"Import"Import from the dropdown menu)
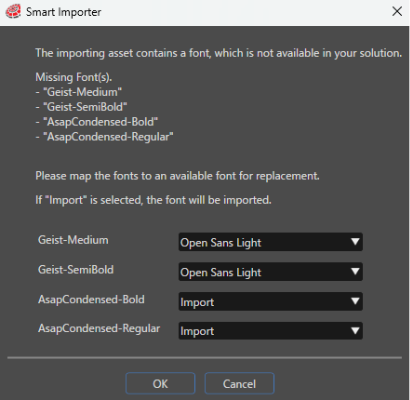
Resources\FontsIn the Smart Importer dialog, the "Import"Import option is displayed in the dropdown menu for each font only when the corresponding font can be imported.
If the Resources\Fonts folder does not exist in the solution, it is automatically created.
Automatic Text Mapping
When importing Figma data using the Smart Importer, the content of text nodes can be compared with the Language Table during import, and matching Text IDs can be automatically assigned. Previously, it was necessary to manually assign a Text ID to each text node after import. This feature enables automation of the mapping process.
When importing Figma data, the displayed text strings contained in the Figma data are compared with the master language strings in the Language Table. If a matching string is found, the corresponding Text ID for that string is automatically assigned.
Configuration
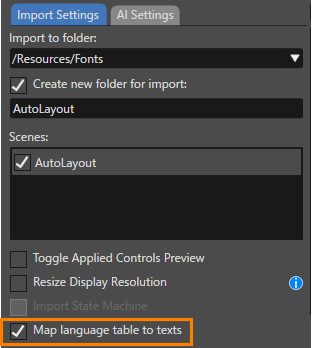
Behavior
This feature works in the following order: retrieve the text → compare it with the Language Table → assign the Text ID.
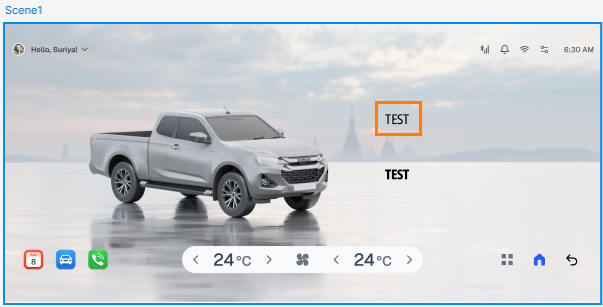
RetrieveSmart Importer retrieves the textstringString from the text node
In the following example, it retrieves thestringString "TEST"is retrieved..
CompareSmart Importer compares the retrievedstringString with the master language in the Language Table
In the following example, it compares the
stringString retrieved in step 1is comparedwith the master language [00] in the LanguageTable.Table.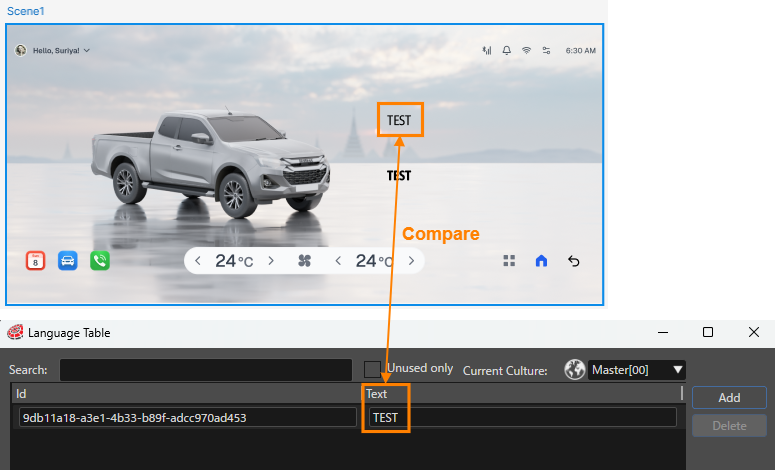
- If Smart Importer finds a
matchmatch,isitfound, assignassigns the Text ID
(In the example below, it assigns the Text ID of the matching Language Table entryis assignedto the text node.)
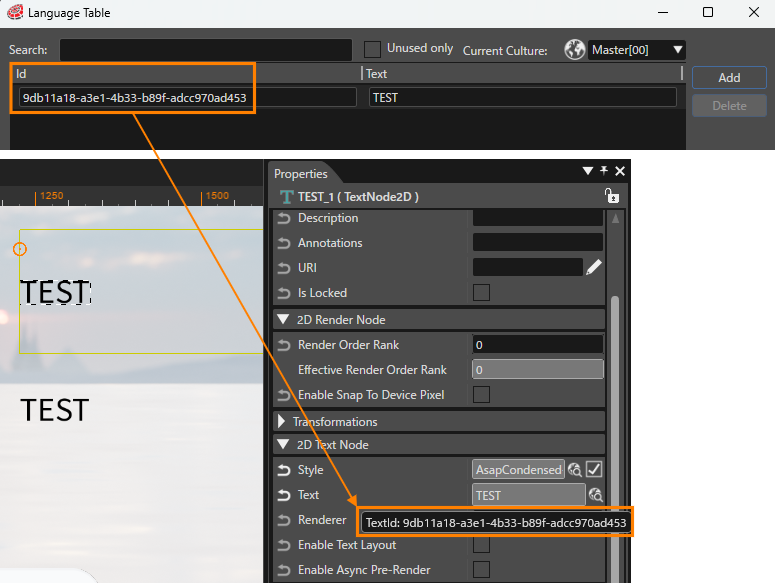
If multiple Text IDs exist for the same text string,String, the first matching Text ID is used.
If no matching text string exists, no Text ID is assigned.