| 1 |
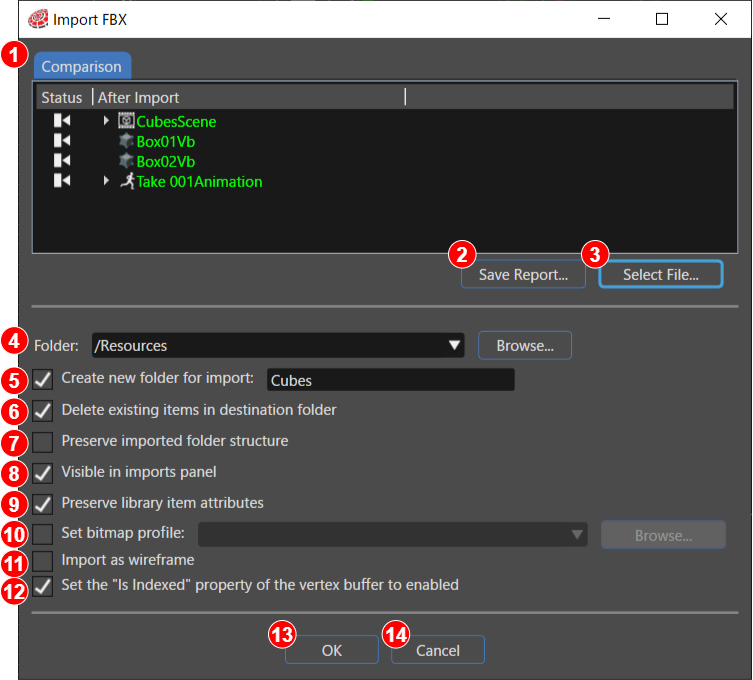
Comparison:
The resources that existlocated at the import destination are compared withagainst the resources toincluded bein importedthe thiscurrent time,import, and the resulting update status is listed.displayed. TheImport status of the import is indicatedshown byusing icons and tooltips in [the Status ] section.column. The same status canis also beconveyed identified bythrough the font color ofapplied to each resource name displayed in [the After Import ] section.column.
Green: Indicates aA new resource beingwill be added.
Yellow: TheA resource with the same resourcename exists, but withits differentproperties properties.are different.
Colorless:No Thehighlight: sameA matching resource already exists andwith has the sameidentical properties, or itthe resource is not included in the resourcescurrent to be imported this time.import.
|
| 2 |
Save Report…:
Generates and saves a report file (cvsCVS format) onsummarizing the comparison ofresults importfor the imported files. The report name and save destinationlocation arecan setbe specified in the dialog window displayedthat byappears clickingwhen this button.button is clicked.
|
| 3 |
Select Files…:
SelectOpens a dialog that allows you to select the items to be imported into the solution.
|
| 4 |
Folder:
Select the destination folder for imported files. Use the drop-down menu or the Browse button to select any location in the Solution Explorer as root folder offor the import destination. By default, the root folder "/Resources"Resources is selected.
|
| 5 |
Create new folder for import:
Select this option if you want to create a new subfolder belowunder the destination specified in "the Folder" section. InputEnter the name of the new subfolder name in the input field.
|
| 6 |
Delete existing items in destination folder:
ThisEnables optiondeletion allowsof you to deleteall existing contentscontent in the destination folder before performing the import operation.operation is executed.
|
| 7 |
Preserve imported folder structure:
This option is available only when importing Image or 3D model file types.types, Itand it can only be setenabled only when "Delete existing items in destination folder" is enabled.active. When "Preserve current folder structure"this option is enabled,selected, theall existing files in the import destination folder are deleted, but the subfolderfolder structure itself is retained.
*This option is not displayed when you import file types forimporting Font or Shader.Shader file types.
|
| 8 |
Visible in imports panel:
This option allows you to makeEnables imported items visibleto be displayed both in both the Import panel and in the Solution Explorer.Explorer.
|
| 9 |
Preserve library item attributes:
This option likesallows export always, bitmap conversion option, etc. allowsyou to keepretain all the differentspecific attributes set toof an item unchangedduring after thea re-import operation. When enabled, the attributes previously assigned to the item remain unchanged even if the incoming data would normally overwrite them.
The attributes whichthat can be preserved areinclude:
the properties associated with bitmaps - converter,Bitmap-related targetproperties: Converter, Target format, originOrigin
- and all the vertexVertex buffer properties: buffer type, enable cache, position, normal, texture coordinate, tangent, bi normal etc.
The preservation
ofWhen any of these properties impliesis preserved, the factre-import process will not modify it, even if the newly imported object contains different values for that when an object is re-imported and any of those mentioned properties will be re-written, the "preserved" property will remain unchanged.property.
|
| 10 |
Set bitmap profile:
This option allows you to specify a default bitmap profile that canis beapplied used forto all bitmaps whichthat do not have aan profileexplicitly setassigned explicitly,profile. andIt canis be setavailable when importing images,Images, FBX, and glTF files.
You can set-upconfigure Bitmapbitmap Profileprofiles fromin two ways:
- From the menu bar: Solution > Solution Options... from
- From the menu bar. In addition to this, settings can also be made from the Properties panelpanel, thatwhich appears when you select the target resource is selected in the Solution Explorer.Explorer.
|
| 11 |
Import as wireframe:
This option appearsis available only when importing FBX files. IfWhen checked,enabled, a wireframe vertex buffer willis be created basedgeneratedbased on the triangles and rectangles contained in the FBX file. If checked,Both the vertexstandardvertex buffer and the wireframe vertex buffer willare bethen registered inunder Associated Vertex Buffer in the solutionSolution options.Options.
|
| 12 |
Set the "Is Indexed" property of the vertex buffer to enabled:
This option is displayed only displayed when importing FBX files (this optionand is enabled by default).default.
IfWhen this option is enabled,selected, the buffer type is changedconverted to an index array.array, As a result,allowing Scene Composer to automatically selectsdetermine and apply the appropriate index size. If thisthe option is disabled, the buffer type is set to ana array.regular array instead.
|
| 13 |
OK button:
ImportImports the selected resources withusing the specifiedconfigured settings.
|
| 14 |
Cancel button:
CloseCloses the dialog without performing the import.
|