Import Dialog Options

This section describes the configuration of the importImport dialog that appears when importing resources such as FBX files, images, shaders, fontsfonts, or scripts.

The specificavailable options available inwithin the dialog may vary depending on the type of asset being imported.

Import Dialog
drawing-4-1777265099.pngdrawing-5-1780046106.png

1

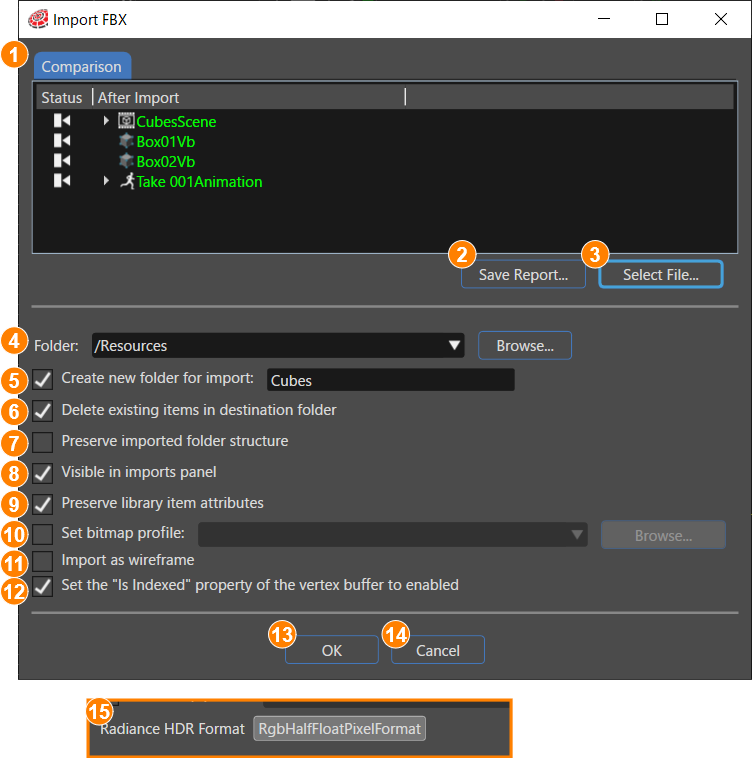
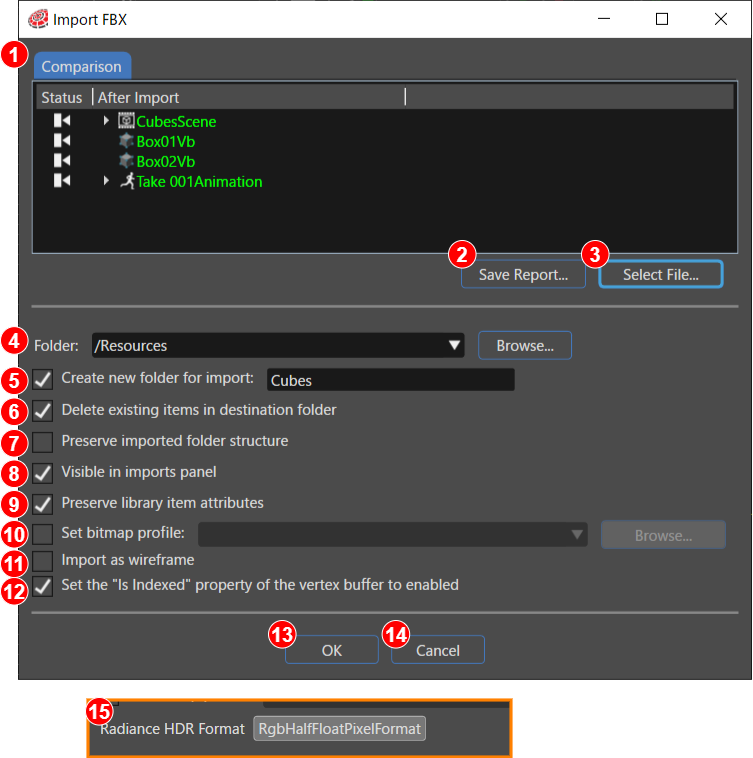
Comparison:

The resources locatedResources at the import destination are compared againstwith the resourcesthose included in the current import, and the resulting update status is displayed. ImportThe import status is shownindicated usingby icons and tooltips in the Status column.column The same statusand is also conveyedreflected throughby the font color applied toof each resource name in the After Import column.

Green: A new resource will be added.
Yellow: A resource with the same name exists, but its properties are different.differ.
No highlight: A matching resource already exists with identical properties, or the resource is not included in the current import.

2

Save Report…:

Generates and saves a report file (CVS format) summarizing the comparison results for the imported files. The report name and save location can be specified in the dialog window that appears when this button is clicked.

3

Select Files…:

Opens a dialog that allows you to selectchoose the items to be imported into the solution.

4

Folder:

Select the destination folder for imported files. Use the drop-down menu or the Browse button to select any location in the Solution Explorer as root folder for the import destination. By default, the root folder /Resources is selected.

5

Create new folder for import:

SelectEnable this option to create a new subfolder underwithin the selected destination specified in the(4) Folder section.. Enter the name of the new subfolder in the provided input field. 

6

Delete existing items in destination folder:

EnablesWhen deletion ofenabled, all existing content in the destination folder is deleted before the import operation is executed.performed.

7

Preserve imported folder structure:

This option is available only when importing Image or 3D model file types, and it can be enabled only whenif Delete existing items in destination folder is active. When this option is selected, all existing files in the destination folder are deleted,removed butwhile retaining the existing folder structure itself is retained.structure.

*Note: This option is not displayedavailable when importing Font or Shader file types.

8

Visible in imports panel:

EnablesWhen enabled, imported items to beare displayed in both in the ImportImports panel and in the Solution Explorer.

9

Preserve library item attributes:

This option allows you to retain specific item attributes of an item during a re-import operation. When enabled, the attributes previously assigned to the itemattributes remain unchangedunchanged, even if thenewly incomingimported data wouldcontains normallydifferent overwrite them.values.


The attributesAttributes that can be preserved include:

- Bitmap-relatedBitmap properties: Converter, Target format, Origin

- Vertex buffer properties: bufferBuffer type, enable cache, position, normal, texture coordinate, tangent, bi normal etc.


When any of these propertiespreservation is preserved,applied, the re-import process willdoes not modifyoverwrite it,these evenproperties, ifregardless of the newlydifferences importedin objectthe containsincoming different values for that property.data.

10

Set bitmap profile:

This option allows you to specifySpecifies a default bitmap profile that is applied to all bitmaps that do not have an explicitly assigned profile. ItThis option is available when importing Images, FBX, and glTF files.

You 

Bitmap profiles can configurebe bitmap profilesconfigured in twothe following ways:

- From the menu bar: Solution > Solution Options...

- From the Properties panel, which appears when you selectselecting the target resource in the Solution Explorer.

11

Import as wireframe:

This option is available only when importing FBX files. When enabled, a wireframe vertex buffer is generatedbasedgenerated based on the triangles and rectangles containeddefined in the FBX file. Both the standardvertexstandard vertex buffer and the  wireframe vertex buffer are then registered under Associated Vertex Buffer in the Solution Options.

12

Set the "Is Indexed" property of the vertex buffer to enabled:

This option is displayedavailable only when importing FBX files and is enabled by default.
When this option is selected, the buffer type is converted to an index array, allowing Scene Composer to automatically determine and apply the appropriate index size. If the option is disabled, the buffer type is set to a regular array instead.

13

OK button:

Imports the selected resources using the configured settings.

14

Cancel button:

Closes the dialog without performing the import.import operation.

15

Radiance HDR Format:
This option appearsis displayed only when the import selection contains Radiance HDR (.hdr) files. The default value follows the format configured in Solution Options > Import Images Config.

Available formats include:

  • RgbFloatingPoint9E5PixelFormat
  • RgbFloatPixelFormat
  • RgbHalfFloatPixelFormat
  • RgbaFloatPixelFormat
  • RgbaHalfFloatPixelFormat

In an OpenGL ES 2.0 environment, none of the fiveavailable Radiance HDR Format options (RgbFloatingPoint9E5PixelFormat / RgbFloatPixelFormat / RgbHalfFloatPixelFormat / RgbaFloatPixelFormat / RgbaHalfFloatPixelFormat) are supported. If your solution contains any of these formats,formats are present in the solution, a warning is showndisplayed in the Problems panel.

SVG Importer Dialog
drawing-4-1725634633.pngdrawing-5-1780046153.png
(1)

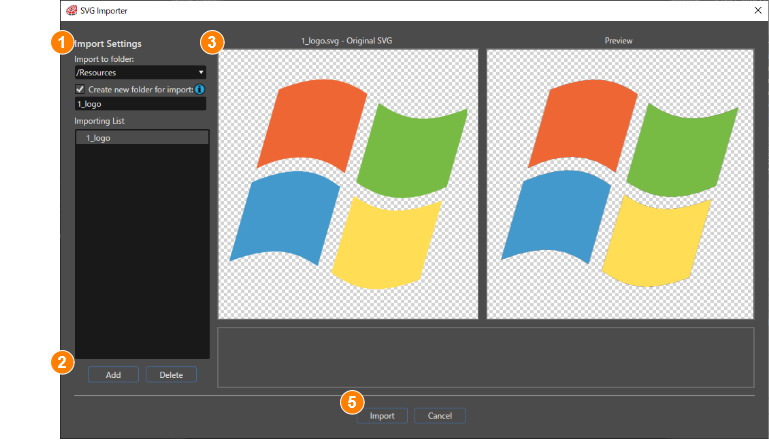
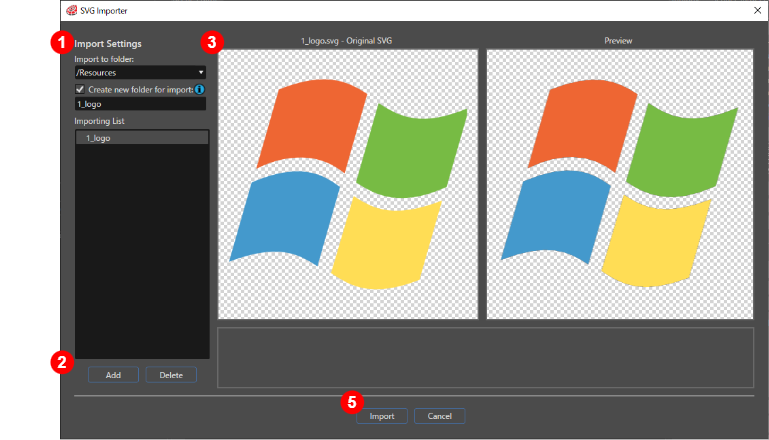
Import Settings

Import to folder:

Specifies the destination folder in the Solution Explorer where the SVG file will be imported. 

Create new folder for import

SelectEnables thisthe optioncreation to createof a new subfolder underwithin the destinationselected specified in the Folder section.destination. Enter the name of the new subfolder in the input field below.provided.

Importing List

Displays the list of items  selected for import.

- Items that cannot be imported willare be displayedindicated with an error icon.

- Items that can only be partially imported willare be displayedindicated with a warning icon

Even if no icon is shown,displayed, somecertain elements may still fail to load dependingdue onto their content or structure.

(2)

Add/Delete:

Add: Adds anotheran additional SVG file to the list of items to be imported.
Delete: Removes the selected SVG file from the import list.

(3)

Preview Display:

Left-side: ShowsDisplays the original of the SVG image that has been selected from the Importing List
Right-side: Shows a preview of how the selected SVG image will appear after being imported into Scene Composer.

In the current version of Scene Composer, the previewed size may not always match the sizeoriginal dimensions of the original SVG image.

(4)

Error Message:

If the selected file containsDisplays any warnings or errors,errors associated with the correspondingselected message will be displayed in this area.file.

(5)

Import/Cancel:

Import: Imports all items listed in the Importing List.
Cancel: Cancels the import operation without importing any items.