
Smart Importer UseCase
This section describes various use cases for Smart Importer operations.
Configure Scene Contents
UsingThis section explains how to configure the contents by using an example ofthat importingimports an image file consisting of two scenes, an IVIIn-Vehicle Infotainment (IVI) scene (e.g., music player and climate control) and a cluster scene, explains how to configure the contents.scene.
IVI_SampleThelayer:IVI layer is an IVI scene consisting of a music player and air conditioningcontrols
controls.- The Cluster
layer:layerAis a sceneconsistingthatof clusterscontains only clusters.
If the import file nameIVI_Scene "IVI_Scene" consists ofcontains the above two layers,layers described above, you can configure the two scenes canto holdcontain different contents (elements)elements by performing the following operations.these steps.
SelectIn[theIVI_SceneSmart]Importer window's Import Settings tab, select IVI from[Scenes:]and select[Clone Scene...]from the context menu.
- In the
[Clone Scene...]dialog box,specifyenter"Cluster_Scene"Cluster_Sceneasin the name field, andpressthen[click OK]. - Two scenes,
"IVI_Scene"IVI_Scene and"Cluster_Scene" willCluster_Scene, appearinunderthe [ Scenes: ] section.Scenes.
- In the
-
Select
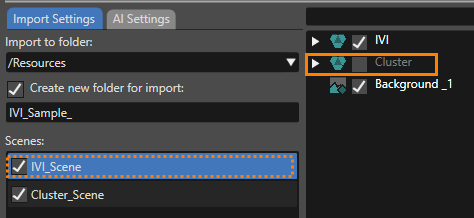
[IVI_Scene]from[ Scenes: ]Scenes, anduncheckthen[ Cluster ] from withinclear thelayerClustertree.check box in the Layer Tree.-
TheSmart Importer excludes the Cluster layerwill be excludedfrom the IVI_Scene scene structure.
-
-
Select
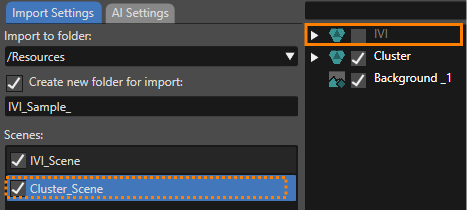
[Cluster_Scene]from[ Scenes: ]Scenes, anduncheckthen[clear the IVI_Sample]check box in thelayerLayertree.Tree.-
TheSmart Importer excludes the IVI_Sample layerwill be excludedfrom the Cluster_Scene scene configuration.
-
-
PressClickthe [OK] buttonintheSmart Importerdialogto perform the import.-
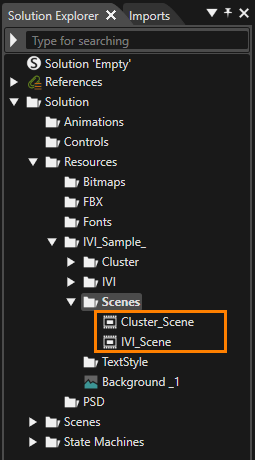
You can see the imported scenes and resources in the Solution Explorer panel.
-
ScenesThe IVI_Scene and Cluster_Scene scenes do not contain the layers specified in steps2-3,two and three, respectively.
-
Re-importing a file containing new images
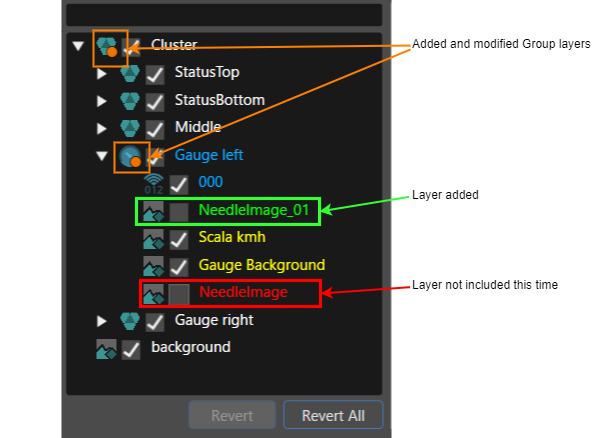
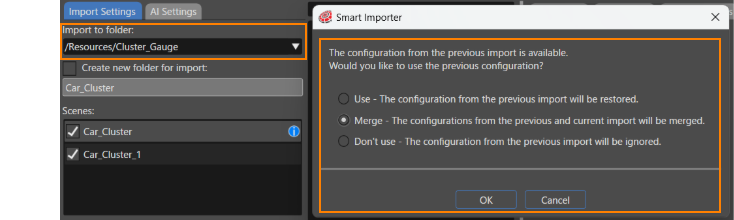
If you reopen a previously imported file thatusing Restore, and the file has alreadythe been imported (same file name and samepath, pathSmart whereImporter the file was saved) using [ Restore ],loads the saved settingssettings, (including applied controls and appearance settings) will be loaded.settings. If the destination folder or scene already exists, youSmart willImporter be notified bydisplays blue information icons (see orange frames in the orange boximage below). HoveringHold the mouse cursor over these icons willto display the necessary information in a tooltip. RunningWhen you run the import with the current settingssettings, willSmart overwriteImporter overwrites already imported resources and scenes, thus keepingkeeps the Layer Mapping settings and applied controls informationinformation, and updatingupdates the images in the Scene Composer solution to the latest image.

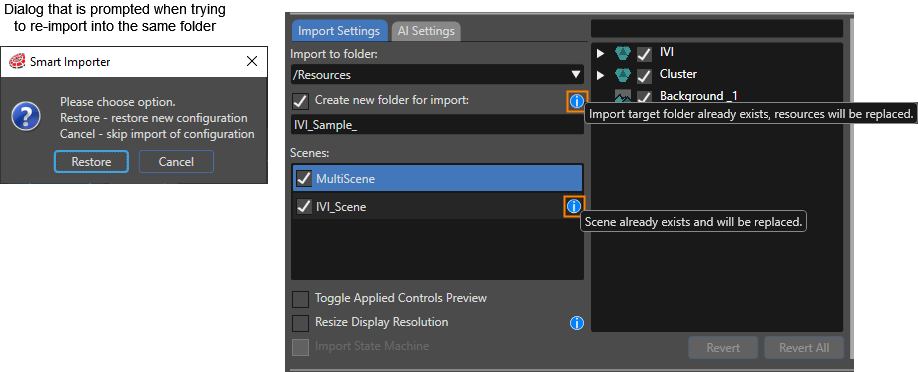
If you want to import image content into the Scene Composer solution a second time, keeping the resources and scenes from both imports, select a different import location or a different scene name.
Re-importing a file containing images with different layers
If you import a filepreviously imported file, that has alreadythe been imported (same destination path,path and same file name),name, but has a partially different layer structure, it will appear as follows on the layerLayer treeTree of thein Smart Importer dialog.dialog appears as follows.
|
|
|
| Control Assigned Bitmap |
If |
| Newly added layer |
Note that
|
| Deleted Layer |
Smart Importer also disables the
|

Merging multiple scene settings
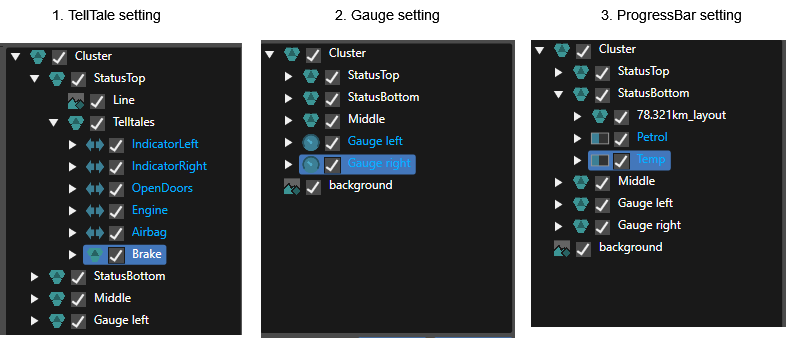
TheSmart Importer saves the settings whenthat appliedyou apply during the import run are saved in the solution along with the imported scene. This settings-saving behavior allows you to import various configurations into the solution by using a single import target file,file and eventually merge themthe configurations into a single configuration. The following is an example ofshows suchhow ato setupset procedure.this up.
Creating Multiple Configurations
This section uses an example of import using the Car_Cluster.psdPhotoshop Document (PSD) file storedCar_Cluster.psd in the following location.location as an import example. Note that Smart Importer does not display the "New SPI configuration was found"found dialog will not be displayed during each import operation because theyou folderspecify specifieda asdifferent the import import-destination is different.folder.
<root>\cgi_studio_content\2D\PSDPSD\Car_Cluster.psd
- Open the
Car_ClusterCar_Cluster.psdfile in the Smart Importer and configure the Telltale control. Then, under[Import to Folder],specifyenterthe "/Resources/as the import destination and perform the import.Cluster_Telltales" folderCluster_Telltales- See
"1. TellTaleSettings"Settings in the image below.
- See
-
Re-open the same image file in the Smart Importer, this time setting the Gauge control.
SpecifyEnter"/Resources/as the import destination and perform the import.Cluster_Gauge" folderCluster_Gauge-
See
"2. GaugeSettings"Settings in the image below.
-
-
InRepeat thesameprocessway, setfor the ProgressBar control.SpecifyEnter"/Resources/as the import destination and perform the import.Cluster_ProgressBar" folderCluster_ProgressBar-
See
"3. ProgressBarSettings"Settings in the image below.
-

Merge of multiple scene configurations
- Open the
Car_ClusterCar_Cluster.psdfile in the Smart Importer. SpecifyEnter"/Resources/in theCluster_Telltales"Cluster_Telltales[Import into folder]anduncheckclear the[Create new folder for import]checkcheckbox.box.
At this point, theThe Smart Importer dialogwillappears.appear.
- A blue caution icon
will appearappears in[ Scenes: ]Scenes.

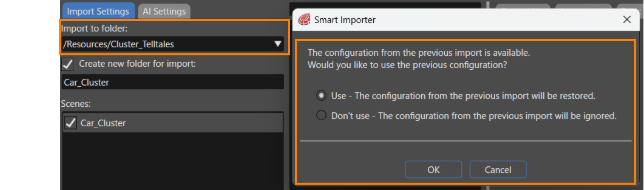
/Resources/Cluster_Gauge"Cluster_Gauge.- A dialog box similar to the one below
willappears.
As a result, theThe configured Gauge controlwill beis added to the previously configured Telltale control.

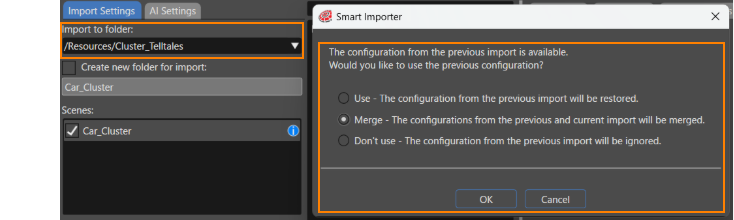
/Resources/Cluster_ProgressBar"Cluster_ProgressBar.- As in step
3,4, a dialog box similar to the one shown belowwillappears.
As a result, theThe configured ProgressBar controlwill beis added.

TheThese abovesteps operation results increate a configuration with TellTalethe control,TellTale, Gauge control,Gauge, and ProgressBar controlcontrols applied.
Configure a control image with multiple layers
ItIn issome possible thatcases, the imported image file youmay arecontain importing is soa complex thatstructure, where elements such as the Gaugegauge background and needlesneedle are made upcomposed of multiple images foror example.layers. However, the Gauge control in Scene Composer requires only one image for the background and one for the needle. InTo order to balancesupport complex image configurations andwhile preserving control settings, the Smart Importer allows multiple layers for each image used in the control.
TheThis section uses the Car_Cluster.psd file is used as an example.
The imageSmart belowImporter showswindow displays the layerfollowing, treeafter you selected Car_Cluster.psd as file to import with the Smart Importer (see also image below):
Car_Cluster.psd"psd file

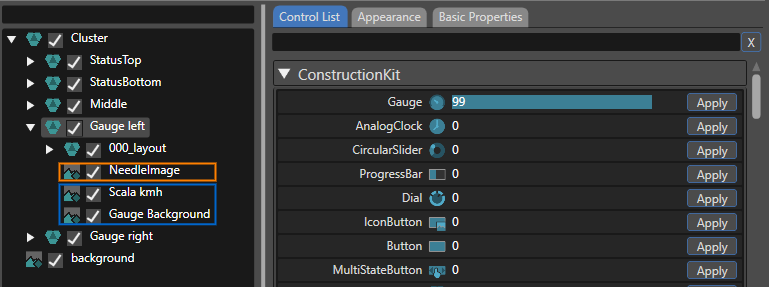
To apply
Follow the steps below to configure a Gauge control,control with a background image that has multiple layers:
ByWhen selectingyou select the root layer to which you apply the controlcontrol, isSmart applied,Importer can configure the entire layer groupgroup, canincluding beall set.child Child layers will be set in the same way.
layers.
To select multiple layers and set them all at once, hold down the <ctrl or > key<shift and click > keyon the target layer with the mouse,layer, or click and drag around the layer you wishwant to select.
After
NeedleImage.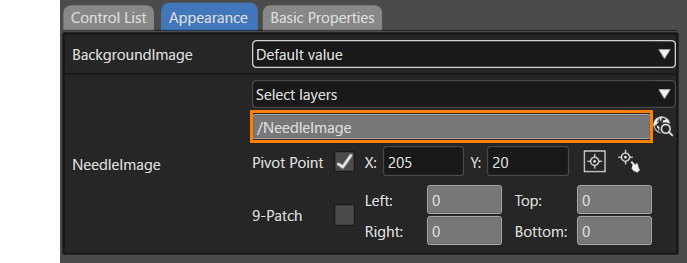
Car_Cluster.psd file contains multiple background-image layers.

In



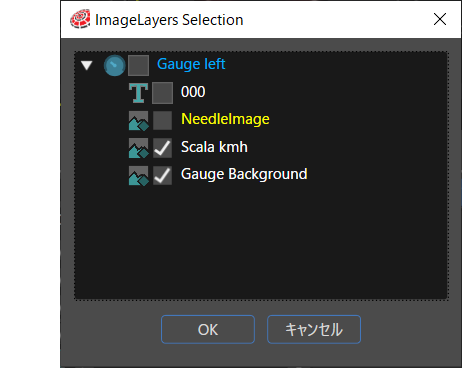

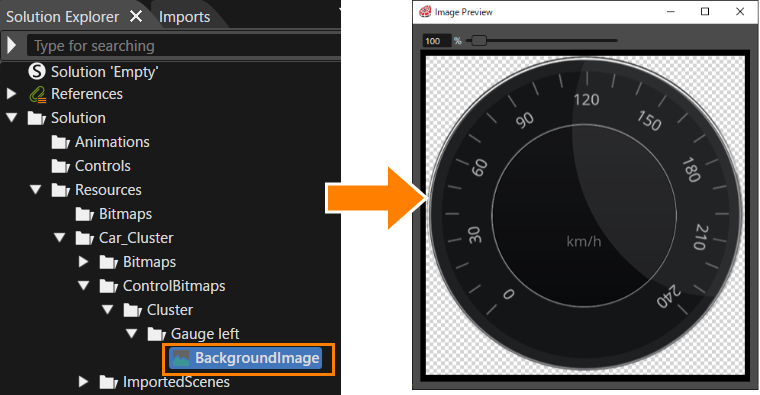
AsSmart shownImporter above,places bitmaps merged from multiple layers for control properties are placed in the [ ControlBitmaps ] folder in the Solution Explorer.Explorer.