
CourierSampleApp
System Requirements
This document mandates adherence to the Android Application Development Environment
Setup Guide, as a prerequisite for system compliance.
By following these steps, you should have a consistent and well-configured development environment for your Android application on Windows 10/11. Remember to restart your system after making changes related to CMake in Android Studio and after updating Environment Variables.

Project Structure
CourierSampleApp is using the Android Gradle Plugin Version 8.9.1+ with Gradle Version 8.11.1. The
Application is tested with ndk 28.0.13004108 that can be installed from the document in chapter Configuration and System Requirements. The supported API range is 31-36. The supported ABIs are arm64-v8a, x86_64, x86. The CourierSampleApp Android Application is NOT using the NativeView library. The build process is different than the Android Applications that use the NativeView library.
Building and Running the Android Application
To be able to build and run the Android Application, the following steps must be done.
1. CGI Studio
These steps are required to prepare the asset from the solution to use in the CMake and Android Studio steps.
- Subst [windows-commands/subst] the root of CGI Studio.
- Open a Command Prompt in the root of CGI Studio directory e.g., “...\cgistudio” and type: “subst
x: .” and click enter. The CGI root is now available under the subst "x" drive in Windows Explorer.
- Open a Command Prompt in the root of CGI Studio directory e.g., “...\cgistudio” and type: “subst
- Run CGI Studio by double clicking on “X:\bin\SceneComposer\SceneComposer_Android_OpenGLES30.bat”,
- Open the following solution for CourierSampleApp from X:\cgi_studio_courier_apps\src\CourierSampleApp\SCSolution\Android\Solution.scs”.
- Save this solution as:
- AssetLibCff_Android_Target.bin and then copy it into the /sdcard/ directory of the target/emulator. For the emulator this can be done in the "Device Explorer" of the emulator in Android Studio.
- AssetLibCff_Android_Target.bin and then copy it into the /sdcard/ directory of the target/emulator. For the emulator this can be done in the "Device Explorer" of the emulator in Android Studio.
2. CMake
These steps are to prepare the ".so" library required by the Android application. Make sure the steps of "Alternative CMake Approach" have been done prior to the next step.
3. Android Studio
These steps are to prepare the Android Studio to build and run the Android application.
- Open the Android Application in Android Studio from “X:\cgi_studio_apps\References\Android\SampleApp”.
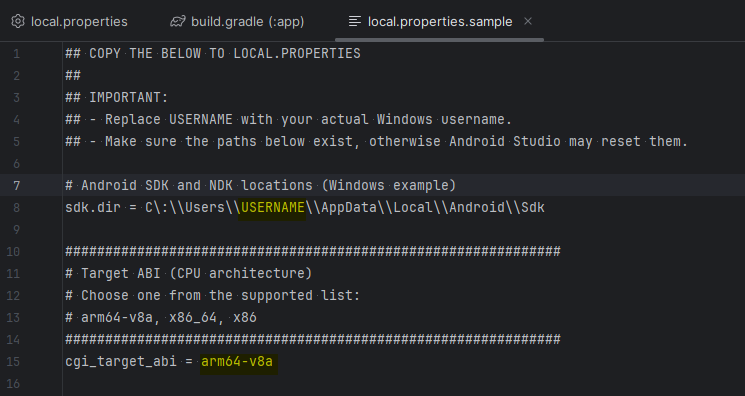
- Open the “local.properties.sample” file and change the “USERNAME” in the SDK
and NDKpath to match the
system it will be usedon.on and choose the supported ['arm64-v8a', 'x86_64', 'x86'] ABI "mAbi".
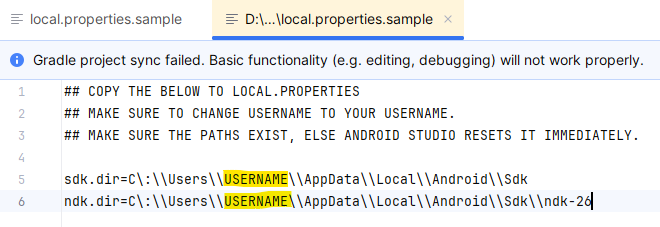
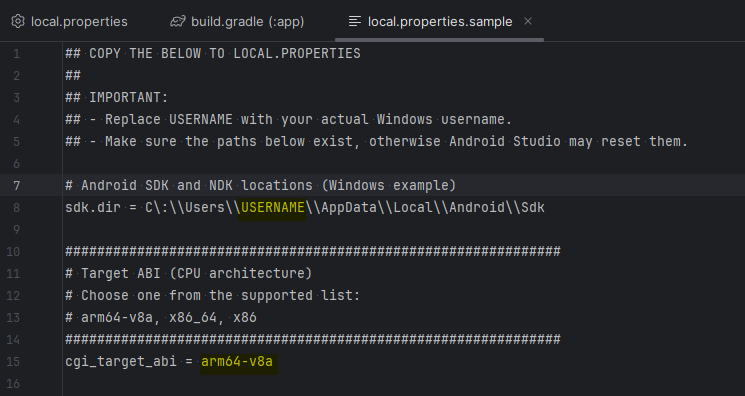
- Copy the contents of the "local.properties.sample" to “local.properties”. Note that if the SDK
or NDKpaths do not exist, Android Studio will reset the “local.properties” again after trying to Sync Project with Gradle Files. - Make sure the JDK is set to
1117 in [File | Settings | Build, Execution, Deployment | Build Tools | Gradle]
like described in chapter Java Development Kit (JDK).
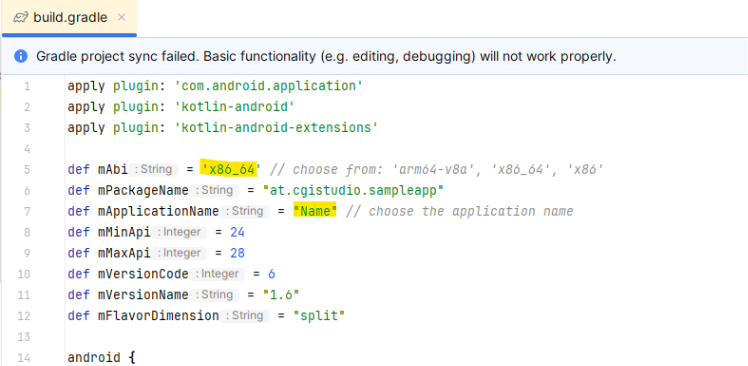
Run the Application by selecting the target/emulator and clicking on “run app”. The first time the Application starts, it will request permissions.
Troubleshooting
- If encountering any issues during the setup, refer to the official documentation for Android Studio,
CMake, and NDK for troubleshooting steps. - If you encounter any issues linked to outdated source code, reach out to the Android developers for
assistance in implementing a resolution. - Check for updates regularly and keep your development environment components up to date.
Platform Tests
- Google Pixel C, ARM Cortex A57, Android 8.1.0, API 27
- Huawei MediaPad M5, ARM Cortex A73, Android 9, EMUI 9.1.0, API28
- Emulator Pixel 2, x86_64, Android 6, API 23 (Without Play/APIs)
- Emulator Medium Phone, x86_64, Android 9, API 28 (Without Play/APIs)
- Emulator Pixel 2, x86, Android 9, API 28 (Without Play/APIs)