
Controlling Transitions with Conditions and Action Chains
daInIn this page, you implement a conditional automatic transition for DetailView, combining a timer with a checkbox value. The central theme is the division of roles: the Action Chain Editor is the place to build the processing flow, while the Condition Editor is the place to define the condition expression independently. You build behavior that returns to MainView after a certain time elapses after entering DetailView, while stopping the auto-transition only when the Keep Detail Open CheckBox is on. This lets you understand the coordination of triggers, conditions, and actions in practice. In particular, in this page, setting OperationMode of Check Processed Value to CompareExternalValueWithConditionValue is the key to correct behavior.
Configuring the CheckBox Control
First, you convert the state of the CheckBox control placed in the DetailContent scene into a form readable by the Condition Editor. If you skip this step, you cannot use the current checked state in a condition expression.
- Double-click the DetailContent scene to open the Scene Editor.
- In the Scene Tree, select KeepDetailOpenCheckBox.
- Drag and drop a Forward Value behavior onto the Extra Scene Tree.
- Select the added Forward Value behavior and configure the following properties in the Properties panel:
Property Category Item Value Asset EventDispatchStrategy DedicatedBehavior - Add a Value behavior under DedicatedBehavior of the Forward Value behavior.
- Drag and drop the added Value behavior onto the DetailContent scene in the Scene Tree to associate it.
With this configuration, the current value of the CheckBox control is held on the scene node, and the Condition Editor can reference it as an external value. The target that you specify as ValueBehavior in the next step is the Value you created here.
Configuring the ConditionBlock
Here, you define the condition logic that determines whether the automatic transition is allowed, separately from the Action Chain. Separating the condition makes it easier to understand the processing flow and the evaluation logic independently.
In this task, you build a condition that becomes true only when both the timer has fired and the Keep Detail Open CheckBox is off. This is the heart of the conditional transition.
- In Solution Explorer, select the Solution folder and select Add > New Item from the context menu.
- In the New Item dialog, select ConditionBlock and name it ReturnToMainOnTimeoutCondition.
- The Condition Editor panel appears and displays the diagram of the newly created ReturnToMainOnTimeoutCondition > Condition.
- The Condition Editor panel appears and displays the diagram of the newly created ReturnToMainOnTimeoutCondition > Condition.
- On the diagram, use the context menu and select Add Check > Condition > Control > Check Timer to add it to the diagram.
- In the same way, from the context menu, select Add Check > Condition > Control > Check Processed Value to add it to the diagram.
- Select the added Check Processed Value and configure the following properties in the Properties panel:
Property Category Item Value Asset OperationMode CompareExternalValueWithConditionValue ConditionOperator Equal ConditionValue type Bool ConditionValue False ValueBehavior DetailContent scene > Value - Next, from the context menu, select Add AND to add an AND node.
- Connect Check Timer and Check Processed Value to the AND.
- Connect the output of the AND to the ConditionOutput.
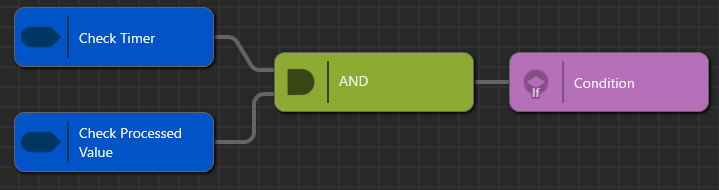
The meaning of the condition built here is: allow the automatic transition only when the timer has fired and the checkbox is off. The OperationMode setting is especially important. If you set it to an in-process event-dependent mode such as CompareProcessedValueWithConditionValue, no value event to compare against exists at the time of the Timer event, and the condition is not evaluated correctly. The correct choice here is CompareExternalValueWithConditionValue, which references the external value held on the scene node.
Configuring On Entry for DetailView
Next, configure the action that starts the timer at the moment of entering DetailView. At this point, no transition occurs yet — you only set up the reference time for the subsequent condition evaluation.
You can edit a View's OnEntry action in the OnEntry / OnExit Editing Mode of the Action Chain Editor. This tutorial uses this method.
- Double-click MainViewTree to open the View Tree panel.
- Double-click DetailView to open the Action Chain Editor.
- In the left pane of the Action Chain Editor, double-click State > OnEntry.
- The OnEntry pseudo-block appears in the right pane.
- The OnEntry pseudo-block appears in the right pane.
- On the right side of the pseudo-block, select Add Action > Action > Control > Start Timer from the context menu to add a Start Timer action.
- Select the added Start Timer and configure the following properties in the Properties panel:
Property Category Item Value Asset Delay 3000
This configuration means: use the moment three seconds after entering DetailView as the timing for the automatic transition decision. Note that starting the timer and the transition itself are separate configurations. The content added to OnEntry in the Action Chain Editor is automatically synchronized with the OnEntry property of DetailView.
Configuring the Action Chain
Finally, build a processing flow that receives the timer event, evaluates the ConditionOutput, and returns to MainView only when the result is true. This is the first point at which the Action Chain Editor and the Condition Editor work together.
- Double-click MainViewTree to open the View Tree panel.
- Double-click DetailView to open the Action Chain Editor.
- In the left pane, double-click ActionChain1 to open the diagram.
-
On the diagram, from the context menu Add Condition, select the Condition of the ReturnToMainOnTimeoutCondition you created earlier to add it.
-
From the context menu, select Add Action > Action > Views > Jump To View and place it on the diagram.
-
Select the Jump To View and configure the following properties in the Properties panel:
Property Category Item Value General Name JumpToMainViewAfterTimeout Asset View MainView - From the context menu, select Add Trigger > Condition > Control > Check Timer and place it on the diagram.
- On the diagram, connect Check Timer to Condition.

-
Finally, snap the Jump To View action to the Condition to connect them.

This configuration means: when Check Timer fires, evaluate the ConditionOutput of ReturnToMainOnTimeoutCondition, and return to MainView only when the result is true. If you connect Check Timer directly to Jump To View, the system always returns after the timer elapses and cannot reflect the checkbox state. By placing a ConditionOutput in between, the transition becomes a conditional one.
Verifying in the Player
In this verification, you confirm not just the automatic transition by the timer itself, but also that the behavior changes depending on the checkbox state. This is the final check to verify that the division of roles between the Action Chain and the Condition is functioning correctly.
- Save the solution and launch the Player.
- Verify that MainView is displayed immediately after launch.
- Verify that MainView is displayed immediately after launch.
- Click the Open Detail button.
- Verify that the screen switches to DetailView.
- Verify that the screen switches to DetailView.
- Leave the Keep Detail Open checkbox off and wait for three seconds.
- Verify that the screen returns to MainView automatically.
- Verify that the screen returns to MainView automatically.
- Click the Open Detail button again.
- This time, turn the Keep Detail Open checkbox on.
- Verify that the screen does not return automatically even after waiting about three seconds.
- Verify that the screen does not return automatically even after waiting about three seconds.
- Verify that you can return to MainView by clicking the Back button.
In this page, you implemented a conditional automatic transition whose behavior changes according to the UI state, by coordinating the Action Chain Editor with the Condition Editor. With this, you have practiced all four basic features of the View Editor: creating screen-level Views in the View Definition Editor, configuring their relationships in the View Tree, building processing flows in the Action Chain Editor, and separating condition expressions in the Condition Editor. The complete flow of the tutorial is now finished.