
Preparing Scenes and Views
This page covers the preparation of the foundation used throughout the subsequent pages. Starting from the Empty solution, you will set up a learning environment, configure the Render Targets, and create the basic scenes — Background, Header, MainContent, and DetailContent — along with the corresponding Views for each.
In the subsequent pages, you will use these elements to learn about screen switching with sibling Views, screen structuring with parent-child Views, and conditional transitions using the Action Chain Editor and Condition Editor.
Preparing the solution
In this task, you prepare a learning environment free from the influence of existing samples. If unnecessary scenes or State Machines remain from the start, they can be difficult to distinguish from the structures you are about to create, so it is important to clean them up first.
- Create a new solution from the sample solution Empty.
- In the Solution Explorer, delete the Scene2D and Scene3D scenes from Scenes.
- Select Render Targets under Scenes and configure the following properties in the Properties panel:
Property Category Item Value Render Target Auto Swap True Auto Clear True - Next, delete the GlobalStateMachine from the State Machine in the Solution Explorer.
- Save the solution with a name of your choice.
Background Scene
The purpose of this task is not simply to place a background. The Background scene plays the role of finalizing the screen's color content at the beginning of every frame. If this scene is not configured correctly, the previous screen might appear to remain visible, even though the View switch itself succeeds.
- Create a new 2D Scene and name it Background.
- Select the camera in the Scene Tree and configure the following properties in the Properties panel:
Property Category Item Value Camera Sequence Number 0 Clear Color Buffer True Enable Swapping False - Place a 2D Text Node from the Toolbox onto the Scene Tree of the Background scene.
Property Category Item Value Transform Position X 0 Position Y 0 2D Text Node Text Background
The Background scene requires Clear Color Buffer to be set to True. This clears the previous color content before drawing a new frame, so even when subsequent content scenes overlay their rendering with Clear Color Buffer set to False, the screen is less likely to appear doubled. Note that because the Background scene serves as both the shared background and the clearing handler, it is safer not to include screen-specific decorations in this scene.
Header Scene
Here, you create a shared display element that multiple screens reuse. The Header is an element displayed in both MainView and DetailView, so you will later extract it as an independent View for reuse.
- Create a new 2D Scene and name it Header.
- Select the camera in the Scene Tree and configure the following properties in the Properties panel:
Property Category Item Value Camera Sequence Number 2 Clear Color Buffer False Enable Swapping False - Place a 2D Text Node from the Toolbox onto the Scene Tree of the Header scene.
Property Category Item Value Transform Position X 300 Position Y 10 2D Text Node Text Common Header
The Header is a layer that simply overlays on top of the background and content. If you clear the color buffer here, you might erase previously drawn elements. By assigning a Sequence Number that places the Header in front of the background and the content, the Header achieves a natural stacking order as a heading.
MainContent Scene
In this task, you create the main screen content used for the first screen switch. The buttons you add here serve as the entry point for building sibling View transitions in the next page.
- Create a new 2D Scene and name it MainContent.
- Select the camera in the Scene Tree and configure the following properties in the Properties panel:
Property Category Item Value Camera Sequence Number 1 Clear Color Buffer False Enable Swapping False - Place a 2D Text Node from the Toolbox onto the Scene Tree of the MainContent scene.
Property Category Item Value Transform Position X 50 Position Y 50 2D Text Node Text Main Screen - Next, add two TextButton controls and configure each as follows:
Property Category Item Value TextButton 1 General Name OpenDetailButton Transform Position X 100 Position Y 100 Control Text Open Detail TextButton 2 General Name OpenNavigationButton Transform Position X 400 Position Y 100 Control Text Open Navigation
MainContent is ordinary content placed on top of the background, so Clear Color Buffer remains False. Background handles clearing, and this Scene is responsible only for layering its screen contents on top of it.
DetailContent Scene
Here, you will create the contents of DetailView. The Back button is used for the return transition between sibling Views, and the CheckBox is used on a later page as the control input for the conditional automatic transition.
- Create a new 2D Scene and name it DetailContent.
- Select the camera in the Scene Tree and configure the following settings in the Properties Panel.
Property Category Item Value Camera Sequence Number 1 Clear Color Buffer False Enable Swapping False - In the Scene Tree of the DetailContent Scene, place a 2D Text Node from the Toolbox.
Property Category Item Value Transform Position X 50 Position Y 50 2D Text Node Text Detail Screen - Next, place a TextButton control and configure it as follows.
Property Category Item Value General Name BackButton Transform Position X 100 Position Y 100 Control Text Back - Finally, add a CheckBox control and configure it as follows.
Property Category Item Value General Name KeepDetailOpenCheckBox Transform Position X 100 Position Y 200 Control Text Keep Detail Open
Creating Views from Scenes
At this stage, prepare the basic building blocks so that they can be referenced as Views on later pages. By creating Views from the Scenes in advance, it becomes easier to organize screen-level structures later in the View Definition Editor.
- Select each of the four Scenes created in the previous steps, choose Create View from the context menu, and create the corresponding View for each Scene.
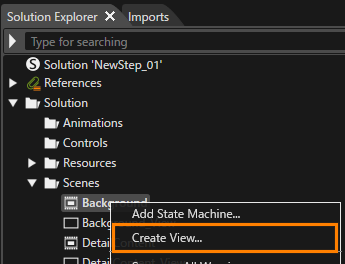
Scene Name View Name (automatically assigned) Background Background_View Header Header_View MainContent MainContent_View DetailContent DetailContent_View
On the next page, you will combine these elements to construct MainView and DetailView and learn how to switch between them as sibling Views on the View Tree.