Structuring Screen Transitions with Parent-Child View States

ThisIn pagethis guidespage, you through definingdefine NavigationView as a parent ViewComposite View, and creatinginside it, you build a configurationstructure that switches between NavigationMain_ViewNavigationMain (a Scene with IsView=true) and RouteDetailsView (a Composite View) as child View StatesStates. within it. HereWhat you willlearn learnhere is that, unlike the sibling relationship covered onin the previous page, a parent-child relationship is suited for "switching only a local statesstate while maintaining athe commonshared display." By keeping the map and shared buttons visible inside NavigationView while switching only between the normal display and the detail display,display while maintaining the map and shared buttons inside NavigationView, you willunderstand gain athe practical understandinguse of how to usethe parent-child structuresstructure in the View Tree. InYou addition,also yourevisit canthe reconfirmcomposition howthat tocombines combinea newlyComposite created ViewsView with Viewsa derivedScene fromthat existinghas scenes.IsView=true.

Creating CommonShared Scenes for Navigation

First, you prepare the elements that you want to remaindisplay visiblecontinuously wheneverwhile NavigationView is active. Here, you will treathandle the map display and the Home button as commonshared elementsparts, and incorporate them into the parent View definition later.

NavigationMap Scene

  1. Create a new 2D scene and name it NavigationMap.NavigationMap.

  2. Select the camera in the Scene Tree and configure the following properties in the Properties panel:


    Property Category Item Value
    Camera Sequence Number 1
      Clear Color Buffer False
     
    Enable Swapping False

  3. Place a 2D Text Node from the Toolbox onto the Scene Tree of the NavigationMap scene.


    Property Category Item Value
    Transform Position X

    250

      Position Y

    200

    2D Text Node Text

    Navigation Map

NavigationViewButtons Scene

  1. Create a new 2D scene and name it NavigationViewButtons.NavigationViewButtons.

  2. Select the camera in the Scene Tree and configure the following properties in the Properties panel:


    Property Category Item Value
    Camera Sequence Number 2
      Clear Color Buffer False
     
    Enable Swapping False

  3. Place a TextButton control from the Toolbox onto the Scene Tree of the NavigationViewButtons scene and configure the following properties:

    scene.
    Property Category Item Value
    General Name JumpToHomeViewButton
    Transform Position X 350
      Position Y

    300

    Control Text Home

NavigationMap and NavigationViewButtons are elements that shouldyou alwayswant to remain visible while NavigationViewin is active.NavigationView. Therefore, you will incorporate them into the parent View definition later.

Creating Transition Scenes for Navigation

Next, you prepare the elementstargets to switch withinbetween inside NavigationView. Here, you will create separate scenes for the normal display and the route detaildetails display so that theyyou can betreat usedthem as child Statesstates of the parent View.

NavigationMain Scene

  1. Create a new 2D scene and name it NavigationMain.NavigationMain.

  2. Select the camera in the Scene Tree and configure the following properties in the Properties panel:


    Property Category Item Value
    Camera Sequence Number 2
      Clear Color Buffer False
     
    Enable Swapping False

  3. Place a 2D Text Node from the Toolbox onto the Scene Tree of the NavigationMain scene.


    Property Category Item Value
    Transform Position X 50
      Position Y

    200

    2D Text Node Text Navigation Main
  4. Next,

    Placeplace a TextButton control and configure the following properties:


    Property Category Item Value
    General Name ShowDetailsButton
    Transform Position X 50
      Position Y

    300

    Control Text Show Details

RouteDetailsContent Scene

  1. Create a new 2D scene and name it RouteDetailsContent.RouteDetailsContent.

  2. Select the camera in the Scene Tree and configure the following properties in the Properties panel:


    Property Category Item Value
    Camera Sequence Number 2
      Clear Color Buffer False
     
    Enable Swapping False

  3. Place a 2D Text Node from the Toolbox onto the Scene Tree of the RouteDetailsContent scene.


    Property Category Item Value
    Transform Position X 450
      Position Y

    200

    2D Text Node Text Route Details

NavigationBack Scene

  1. Create a new 2D scene and name it NavigationBack.NavigationBack.

  2. Select the camera in the Scene Tree and configure the following properties in the Properties panel:


    Property Category Item Value
    Camera Sequence Number 2
      Clear Color Buffer False
     
    Enable Swapping False

  3. Place a TextButton control from the Toolbox onto the Scene Tree of the NavigationBack scene and configure the following properties:


    Property Category Item Value
    General Name BackToNavigationMainButton
    Transform Position X 50
      Position Y

    300

    Control Text Back

    NavigationMain representsis for the normal display, whileand RouteDetailsContent and NavigationBack are components for the detail display. These are not commonshared displaydisplays elements;— instead,you theytreat servethem as the switching targets withinto switch between inside NavigationView.

    Creating Navigation-Related Views

    Here, you will use both approaches:the case of creating a simple View from an existing sceneScene and the case of creating a new View that combines multiple components. UnderstandingThis when to use each approachdistinction is also important forwhen learning the parent-child structures.structure.

    Creating Views: Using Existing Scenes

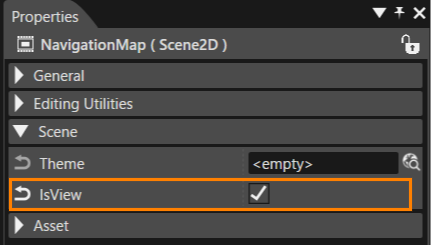
    1. Select each of the fourfive scenes created in the previous steps and choose Create View fromselect the contextIsView menucheckbox toin createthe a View corresponding to each scene.
      Scene Namecategory of the Properties panel.
      drawing-4-1779261329.png
      • ViewNavigationMap
      NameNavigationViewButtons (auto-assigned)NavigationMain RouteDetailsContent NavigationBack NavigationMap NavigationMap\_View NavigationViewButtons NavigationViewButtons\_View NavigationMain NavigationMain\_View RouteDetailsContent RouteDetailsContent\_View NavigationBack NavigationBack\_View

      Creating athe New RouteDetailsView

      1. Create a new View and name it RouteDetailsView.RouteDetailsView.

      2. Double-click the created RouteDetailsView to open the View Definition Editor.

      3. Add the following elements to the left pane of the View Definition Editor:
        • RouteDetailsContent_View

          RouteDetailsContent
        • NavigationBack_View

          NavigationBack

        RouteDetailsView is a screen state that groupsbundles the detail display bodyitself and the backreturn operation together.operation. By extracting a localizedlocal setgrouping oflike componentsthis as a compositeComposite View in this way,View, you can handlemake it moreeasier easilyto treat it as a child View State later.

        Configuring NavigationView

        Here, you willbundle groupinto the parent View only the elements that shouldyou alwayswant to remain visibledisplayed while in Navigation into the parent View.Navigation. It is important thatto include only the shared display in the parent ViewView, containsand onlynot the common display elements and does not include the elementsparts that you want to switch.

        1. SelectIn Solution Explorer, select the Solution folder in Solution Explorer and chooseselect Add > New Item from the context menu.

        2. In the Add New Item dialog, select View and name it NavigationView.NavigationView.

        3. Double-click the created NavigationView to open the View Definition Editor.

        4. Add the following elements to the left pane of the View Definition Editor:
          • Background_ViewBackground
          • HeaderViewHeader
          • NavigationMap_ViewNavigationMap
          • NavigationViewButtons_ViewNavigationViewButtons

        TheYou definition of NavigationView doesdo not include NavigationMain_ViewNavigationMain or RouteDetailsView.RouteDetailsView in the NavigationView definition. You will add these later as child View States onin the View TreeTree, soand thattreat theythem become switchingas targets to switch between under the parent. This separation clarifies the roles of the commonshared display and the local switching.

        Configuring MainViewTree

        Here, you will add NavigationView as a top-level sibling View and attach child View States beneathinside it. This allowslets you to experience a two-layer structure:structure a— sibling relationshiprelationships at the top level and a parent-child relationship inside Navigation.

        1. Double-click MainViewTree to open the View Tree panel.

        2. Drop NavigationView into the empty area below MainView and DetailView to add it as a top-level View State.

        3. Drop NavigationMain_ViewNavigationMain onto the body of the parent NavigationView to add it as a child View State.

        4. Drop RouteDetailsView onto the body of the parent NavigationView to add it as a child View State.

        By dropping elements onto the body of the parent, the child Statesstates are treated as internal states of NavigationView while it is active. This is the essentialessence difference betweenof a parent-child relationshiprelationship, andas opposed to a sibling relationship.

        Configuring Navigation-Related Transitions

        Here, you will configure both athe transitiontransitions to a top-level sibling View StateStates and the switching betweenof child View States under the parent. This demonstratesshows that even with the same Jump To View behavior,takes theon meaningdifferent changesmeanings depending on whichthe relationship of the target View belongsyou jump to.

        MainContent Scene

        1. Double-click the MainContent scene to open the Scene Editor.

        2. Select OpenNavigationButton inIn the Scene Tree.Tree, select OpenNavigationButton.

        3. Drag and drop a Jump To View behavior onto the Action in the Extra Scene Tree.

        4. Select the added Jump To View behavior and configure the following properties in the Properties panel:
          Property Category Item Value
          General Name JumpToNavigation
          Asset View NavigationView

        NavigationMain Scene

        1. Double-click the NavigationMain scene to open the Scene Editor.

        2. Select ShowDetailsButton inIn the Scene Tree.Tree, select ShowDetailsButton.

        3. Drag and drop a Jump To View behavior onto the Action in the Extra Scene Tree.

        4. Select the added Jump To View behavior and configure the following properties in the Properties panel:
          Property Category Item Value
          General Name JumpToRouteDetail
          Asset View RouteDetailsView

        NavigationBack Scene

        1. Double-click the NavigationBack scene to open the Scene Editor.

        2. Select BackToNavigationMainButton inIn the Scene Tree.Tree, select BackToNavigationMainButton.

        3. Drag and drop a Jump To View behavior onto the Action in the Extra Scene Tree.

        4. Select the added Jump To View behavior and configure the following properties in the Properties panel:
          Property Category Item Value
          General Name JumpToNavigationMain
          Asset View NavigationMain\_ViewNavigationMain

        NavigationViewButtons Scene

        1. Double-click the NavigationViewButtons scene to open the Scene Editor.

        2. Select JumpToHomeViewButton inIn the Scene Tree.Tree, select JumpToHomeViewButton.

        3. Drag and drop a Jump To View behavior onto the Action in the Extra Scene Tree.

        4. Select the added Jump To View behavior and configure the following properties in the Properties panel:
          Property Category Item Value
          General Name JumpToMainView
          Asset View MainView

        The keyimportant point here is thatthat, withininside NavigationView, NavigationMain_ViewNavigationMain and RouteDetailsView switch between each other as child View States, whereaswhile the Home button exits Navigation entirely and returns to MainView, which is athe top-level sibling View State.

        Verifying Behavior in the Player

        The purpose of this verification is to observesee how the meaning of the parent-child relationship is reflected in the screen display. Pay attention to the factVerify that the commonshared display elementsportion areis maintained while only the child Statesstate switch.switches.

        1. Save the solution and launch the Player.
          • Verify that MainView appearsis displayed immediately after launch.

        2. PressClick the Open Navigation button.
          • Verify that the screen switches to NavigationView.
          • VerifyAt the same time, verify that Background and Header are displayed at the same time.displayed.
          • AlsoIn addition, verify that Navigation Main, Navigation Map, the Show DetailsDetail button, and the Home button are displayed.

        3. PressClick the Show Details button.
          • Verify that the screen switches to Route Details.
          • VerifyAt the same time, verify that Background and Header are displayed at the same time.displayed.
          • AlsoIn addition, verify that Navigation Map and the Home button are displayed.

        4. PressClick the Back button.
          • Verify that the screen returns to Navigation Main.

        5. PressClick Home.
          • Verify that the screen returns to MainView.

        OnIn this page, you createdbuilt a structure inthat whichuses NavigationView serves as the parent View State and switches between child View States switch withininside it. ThroughThis this exercise,let you confirmedconfirm in practice that a sibling relationshipsrelationship areis suited for exclusive switching of entire screens, while a parent-child relationshipsrelationship areis suited for switching only a local statesstate while keepingretaining commonthe displayshared elements visible.display. In the next page, you will add conditional automatic transitions to DetailView using the Action Chain Editor and the Condition Editor.