
Structuring Screen Transitions with Parent-Child View States
In this page, you define NavigationView as a parent Composite View, and inside it, you build a structure that switches between NavigationMain (a Scene with IsView=true) and RouteDetailsView (a Composite View) as child View States. What you learn here is that, unlike the sibling relationship in the previous page, a parent-child relationship is suited for "switching only a local state while maintaining the shared display." By switching between the normal display and the detail display while maintaining the map and shared buttons inside NavigationView, you understand the practical use of the parent-child structure in the View Tree. You also revisit the composition that combines a Composite View with a Scene that has IsView=true.
Creating Shared Scenes for Navigation
NavigationMap Scene
- Create a new 2D scene and name it NavigationMap.
- Select the camera in the Scene Tree and configure the following properties in the Properties panel:
Property Category Item Value Camera Sequence Number 1 Clear Color Buffer False Enable Swapping False - Place a 2D Text Node from the Toolbox onto the Scene Tree of the NavigationMap scene.
Property Category Item Value Transform Position X 250
Position Y 200
2D Text Node Text Navigation Map
NavigationViewButtons Scene
Creating Transition Scenes for Navigation
NavigationMain Scene
- Create a new 2D scene and name it NavigationMain.
- Select the camera in the Scene Tree and configure the following properties in the Properties panel:
Property Category Item Value Camera Sequence Number 2 Clear Color Buffer False Enable Swapping False - Place a 2D Text Node from the Toolbox onto the Scene Tree of the NavigationMain scene.
Property Category Item Value Transform Position X 50 Position Y 200
2D Text Node Text Navigation Main - Next, place a TextButton control and configure the following properties:
Property Category Item Value General Name ShowDetailsButton Transform Position X 50 Position Y 300
Control Text Show Details
RouteDetailsContent Scene
- Create a new 2D scene and name it RouteDetailsContent.
- Select the camera in the Scene Tree and configure the following properties in the Properties panel:
Property Category Item Value Camera Sequence Number 2 Clear Color Buffer False Enable Swapping False - Place a 2D Text Node from the Toolbox onto the Scene Tree of the RouteDetailsContent scene.
Property Category Item Value Transform Position X 450 Position Y 200
2D Text Node Text Route Details
NavigationBack Scene
Creating Navigation-Related Views
Here, you use both the case of creating a simple View from an existing Scene and the case of creating a new View that combines multiple components. This distinction is also important when learning the parent-child structure.
Creating Views: Using Existing Scenes
- Select each of the five scenes created in the previous steps and select the IsView checkbox in the Scene category of the Properties panel.
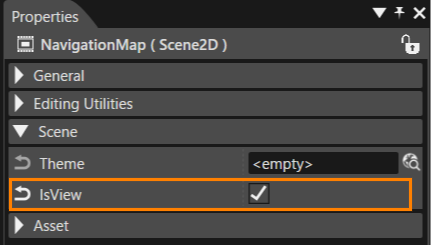
Creating the New RouteDetailsView
- Create a new View and name it RouteDetailsView.
- Double-click the created RouteDetailsView to open the View Definition Editor.
- Add the following elements to the left pane of the View Definition Editor:
- RouteDetailsContent
- NavigationBack
RouteDetailsView is a screen state that bundles the detail display itself and the return operation. By extracting a local grouping like this as a Composite View, you make it easier to treat it as a child View State later.
Configuring NavigationView
- In Solution Explorer, select the Solution folder and select Add > New Item from the context menu.
- In the New Item dialog, select View and name it NavigationView.
- Double-click the created NavigationView to open the View Definition Editor.
- Add the following elements to the left pane of the View Definition Editor:
- Background
- Header
- NavigationMap
- NavigationViewButtons
Configuring MainViewTree
- Double-click MainViewTree to open the View Tree panel.
- Drop NavigationView into the empty area below MainView and DetailView to add it as a top-level View State.
- Drop NavigationMain onto the body of the parent NavigationView to add it as a child View State.
- Drop RouteDetailsView onto the body of the parent NavigationView to add it as a child View State.
Configuring Navigation-Related Transitions
Here, you configure both the transitions to top-level sibling View States and the switching of child View States under the parent. This shows that the same Jump To View takes on different meanings depending on the relationship of the View you jump to.
MainContent Scene
- Double-click the MainContent scene to open the Scene Editor.
- In the Scene Tree, select OpenNavigationButton.
- Drag and drop a Jump To View behavior onto Action in the Extra Scene Tree.
- Select the added Jump To View behavior and configure the following properties in the Properties panel:
Property Category Item Value General Name JumpToNavigation Asset View NavigationView
NavigationMain Scene
NavigationBack Scene
NavigationViewButtons Scene
Verifying in the Player
The purpose of this verification is to see how the meaning of the parent-child relationship is reflected in the screen display. Verify that the shared display portion is maintained while only the child state switches.
- Save the solution and launch the Player.
- Verify that MainView is displayed immediately after launch.
- Verify that MainView is displayed immediately after launch.
- Click the Open Navigation button.
- Verify that the screen switches to NavigationView.
- At the same time, verify that Background and Header are displayed.
- In addition, verify that Navigation Main, Navigation Map, the Show Detail button, and the Home button are displayed.
- Click the Show Details button.
- Verify that the screen switches to Route Details.
- At the same time, verify that Background and Header are displayed.
- In addition, verify that Navigation Map and the Home button are displayed.
- Click the Back button.
- Click Home.
- Verify that the screen returns to MainView.