
View Tree
View Tree is the editor for arranging View in the solution as a tree and composing screen transition logic based on that structure. When you define transition relationships between Views on the tree, that information is exported as the Global State Machine at asset generation and becomes available as destination candidates for the JumpToView action behavior.
When you set a parent–child relationship between Views, the child View is activated in sync when the parent View becomes active, allowing you to manage groups of screen elements that should always be shown together. In addition, by associating an Action Chain created in the Action Chain Editor with each View, you can define that View’s event logic and conditional transitions.
View Tree panel UI
The View Tree panel is hidden by default. To show the panel, do either of the following:
-
Select View > View Editor > View Tree from the toolbar menu.
-
In Solution Explorer, double-click an existing View Tree.
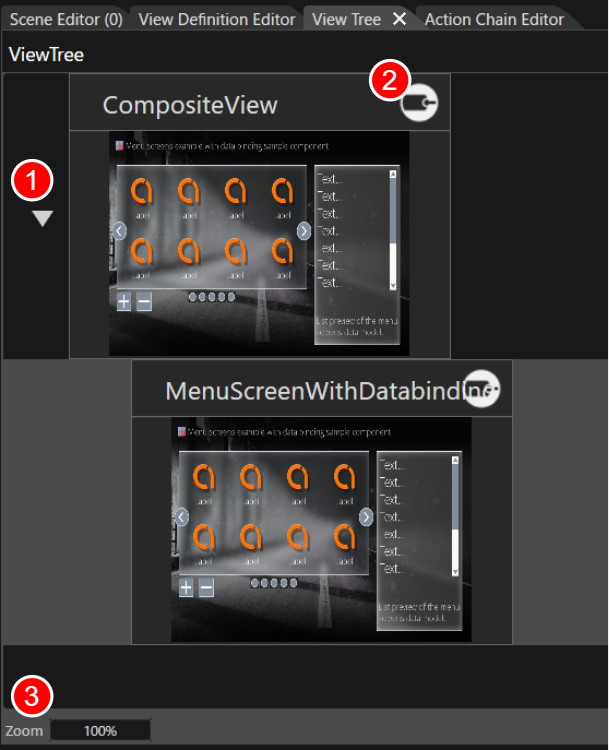
| 1 | Expand/Collapse icon | Appears when parent-child Views exist in the View Tree. Clicking this icon shows or hides the child Views. |
| 2 | Status indicator |
An identifier icon displayed on a ViewTreeItem when an Action Chain or an OnEntry / OnExit behavior is assigned to it. The display updates automatically according to the behavior's configuration status. |
| 3 | Zoom |
Enlarges or reduces the thumbnail display inside the View Tree. In addition to clicking, you can also enter a value directly in the Zoom display area or use the mouse wheel on the panel to enlarge or reduce the display (this behavior is common to other SceneComposer editors). |
Basic operations
Create a new View Tree
Follow these steps to create a new View Tree:
-
In Solution Explorer, open the context menu at the desired location.
-
Choose Add > New Item.
-
The Add New Item dialog opens.
-
-
In the left menu of the dialog window, select View Tree and click the OK button.
- View and View Tree in the left menu of the dialog appear with distinct icons, so you can visually distinguish between them before selecting.
- The name set in Name becomes the name of the new View Tree.
-
A new View Tree is created in the Solution Explorer.
- In the Solution Explorer, a View Tree appears with a dedicated icon distinct from that of a View.
-
When you double-click the newly created View Tree, the View Tree panel is selected.
For the View Tree you created, you can use the standard operations in Solution Explorer to copy, duplicate, delete, and rename it.
Place Views
Views defined in the View Definition Editor are configured by dragging & dropping them onto the View Tree panel. Depending on how you place them, the structural relationships between Views and their display behavior will differ.
Vertical placement: If you drop a View into an empty area below an existing View, it is placed as a View at the same hierarchy level. In this case, each View is controlled independently and does not affect the others.
Parent-child placement: If you drop a View onto an existing View itself, a parent-child relationship is established. This relationship provides the following structural and behavioral benefits.
|
Effect |
Description |
|---|---|
| Show parent and child together | When the parent View becomes active, the child View is shown at the same time. This is suitable for elements that should always be visible, such as headers or navigation. |
| Event linkage | Actions configured for the parent View (in the Action Chain Editor) are automatically propagated to and triggered for the child View as well. |
| UI structuring | By placing multiple child Views, you can compose the screen by splitting it into multiple blocks (for example, a navigation area and a main view). |
| Visualized hierarchy | In the View Tree, the View above is visually shown as the parent and the View below as the child, making the structure easy to understand. |
In this way, placement in the View Tree directly defines the mechanism for display control and event propagation—it is not merely a visual arrangement. It is important to design the optimal placement relationship based on each View’s purpose and when it should be used.
Configuring in Action Chain Editor
You can configure event logic in the Action Chain Editor for each View placed in the View Tree. To launch the Action Chain Editor, perform one of the following operations.
- Double-click the target View.
- Select the target View and select Open Action Chain Editor from the context menu.
A status indicator appears on the View Tree panel for any ViewTreeItem that has an Action Chain or an OnEntry / OnExit behavior assigned. This lets you tell which View has logic configured just by looking at the panel. The indicator updates automatically according to the behavior's configuration status.
Exported as a Global State Machine
The View hierarchy and transition logic configured in the View Tree panel are exported as a Global State Machine when generating assets. As a result, at application runtime, each View’s visibility state and transition behavior are automatically controlled based on the relationships defined in the View Tree. In particular, the View placed at the top level of the View Tree functions as the first View to be shown when the application starts or when the application transitions back to that View Tree. This information is also incorporated into the Global State Machine and is used as the initial view and as a transition target at runtime.
In addition, screen transitions between Views are controlled by actions defined in the Action Chain Editor and are output as state-transition definitions in the Global State Machine.
In this way, the View Tree and the Action Chain Editor work together as an integrated mechanism that governs both screen composition and behavioral control.