
Manage Nodes
Copying and Moving Scene Nodes
A scene is composed of individual scene nodes. They may originate from the Toolbox panel or the Imports panel.
During solution development, you may need to divide a single scene into multiple smaller scenes or merge elements from several scenes to maintain a structured and manageable solution. Instead of recreating nodes manually, you can copy and paste existing nodes into any other scene as needed.
To copy and paste a node, follow the steps below:
- In the Scene Tree or Scene Editor, select the desired node.
- Right-click on your selection.
- The context menu is opened.
- Choose Copy from the context menu.
- Switch to the target scene.
- In Scene Tree or Scene Editor, right-click where you want the copied node to be placed.
Within the Scene Tree, you can also navigate to a specific node - such as a GroupNode - and right-click it to paste the copied element directly into that node.
- The context menu is opened.
- Choose Paste from the context menu
- The copied item is pasted.
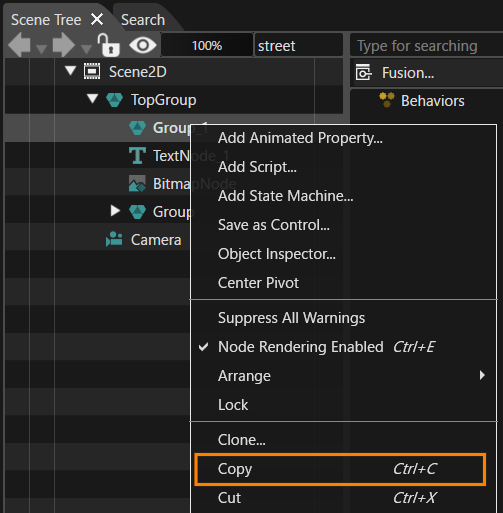
You can also use the following keyboard shortcuts to perform copy, cut and paste operations:
- Ctrl + C ... Copy
- Ctrl + X ... Cut
- Ctrl + V ... Paste
During copy, cut or paste operations, the Scene Composer executes the requested action and reports any resulting errors or warnings. These messages may include issues such as missing references, invalid paths, or other dependency violations.
-
It is possible to select and copy, cut or paste multiple nodes simultaneously, provided that all selected nodes reside at the same level within the scene hierarchy.
Clone, Delete and Rename Scene Nodes
Clone
You can clone a scene node using the Clone option from the context menu following the steps below:
- Right-Click on the item you want to clone.
- The context menu opens.
- Select Clone from the context menu
- The Clone Item dialog appears, as shown below.
- Enter a name for your clone (or accept the provided name) and confirm by clicking OK.
- The cloned item is created in the same group or scene as the original.
- Right-Click on the item you want to clone.
- The context menu opens.
- Select Clone from the context menu
- The Clone Item dialog appears, as shown below.
- Switch to the Multiple Clone tab.
- The Clone Item dialog is displayed as shown below.
- Enter a base name for your clone (or accept the provided name) and the number of clones to be created. Confirm by clicking OK.
- The cloned items are created in the same group or scene as the original.
- The cloned items are created in the same group or scene as the original.
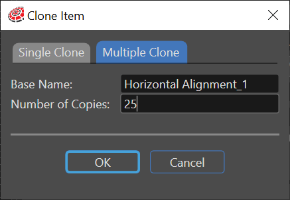
When creating multiple clones (or pasting a copied node), the system automatically checks whether the node's name ends with a numeric suffix. If a number is present, it is incremented for the new node.
For example:
- Cloning Node_1 results in Node_2, Node_3....
- Cloning Node1 results in Node2, Node3.....
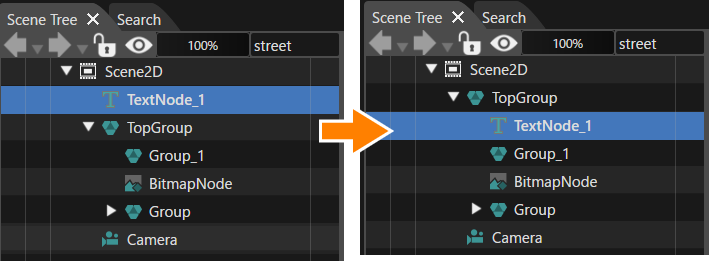
To duplicate an item in the selected location, hold LeftShift while dragging and dropping the item. When you release the mouse button, a copy of the item is created at the target location.
Note that duplicating an item as a child of itself is currently not supported.
Delete
A scene node can be deleted using the Delete option in the context menu or by pressing the Delete key on your keyboard.
Special care must be taken when deleting items that have dependencies. Additional details on handling dependent items can be found here
Rename
A scene node can be renamed using the Rename option in the context menu or by pressing F2.
Revert Properties to Default Value
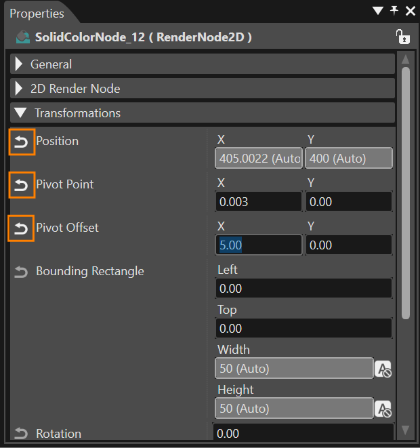
Properties of instance items can be modified in the Properties panel. If necessary, any modified property can be restored to its default value using the Revert button (see image below).
Reset Node Structure
Groups created from a template item (an imported scene graph) can be restored to their original template structure by using the Reset Structure option in the context menu of the group. When this action is performed, any delete or modified elements within the group are restored to their default template configuration.
Multi-Selection and Comparison of Nodes
- For multi-selection of nodes, press the Ctrl key while left clicking all the desired elements to select. When the last desired element is selected the Ctrl key can be released.
- To select a set of consecutive items, click the first item, press the Shift key while clicking the last item.
- Another way is to use one of select options from the Scene Tree context menu for multi-selection:
- Select > Leaf Nodes
- Select > Children
- Select > All Descendants
Examples:
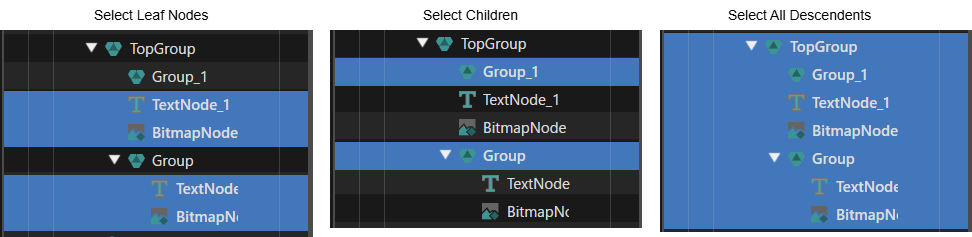
After the multi-selection operation it is possible to copy, move or delete all selected items as desired.